Auto-Leveling Upgrade Guide for Creality 3D Printers
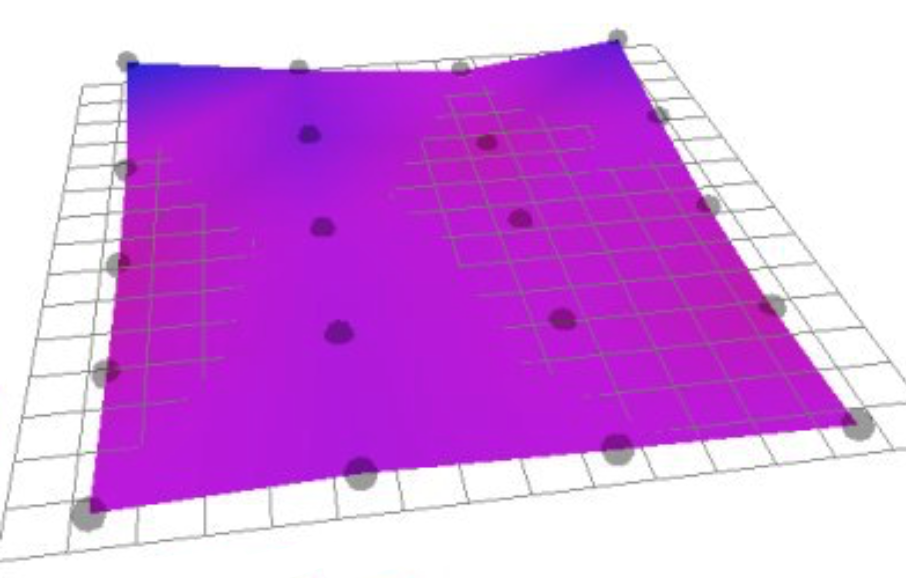
With an auto-leveling sensor, the 3D printer can probe the bed height at many points on the bed, and account for small inconsistencies, such as the higher back corners on this print surface. This is known as “mesh leveling”.
Upgrading your Creality 3D printer to include auto bed leveling will ensure your prints have perfect first layers every time and greatly reduce issues with bed adhesion. When using an auto-leveling system such as the BLTouch sensor, the probe allows better tolerances for slightly warped print beds by measuring and compensating for any inconsistencies. Many premium 3D printers include this feature standard, but fortunately it can also be installed on many lower cost 3D printers as an upgrade.
In this article, we will take a closer look at how auto-leveling works and which hardware we recommend. Then, we’ll show you how to apply this upgrade to your Creality 3D printer to give you a general idea what to expect. Since this upgrade is more difficult on some 3D printers than others, we’ll provide specific information on the install process and hardware you’ll need for many of Creality’s more popular printers including the Ender 3 series, Ender 5 series, CR-10 series, and CR-X series.
Note: Creality Experts receives a commission for items you purchase from this page, at no additional cost to you. For more information, please see our affiliate link policy.
How does automatic bed leveling work?
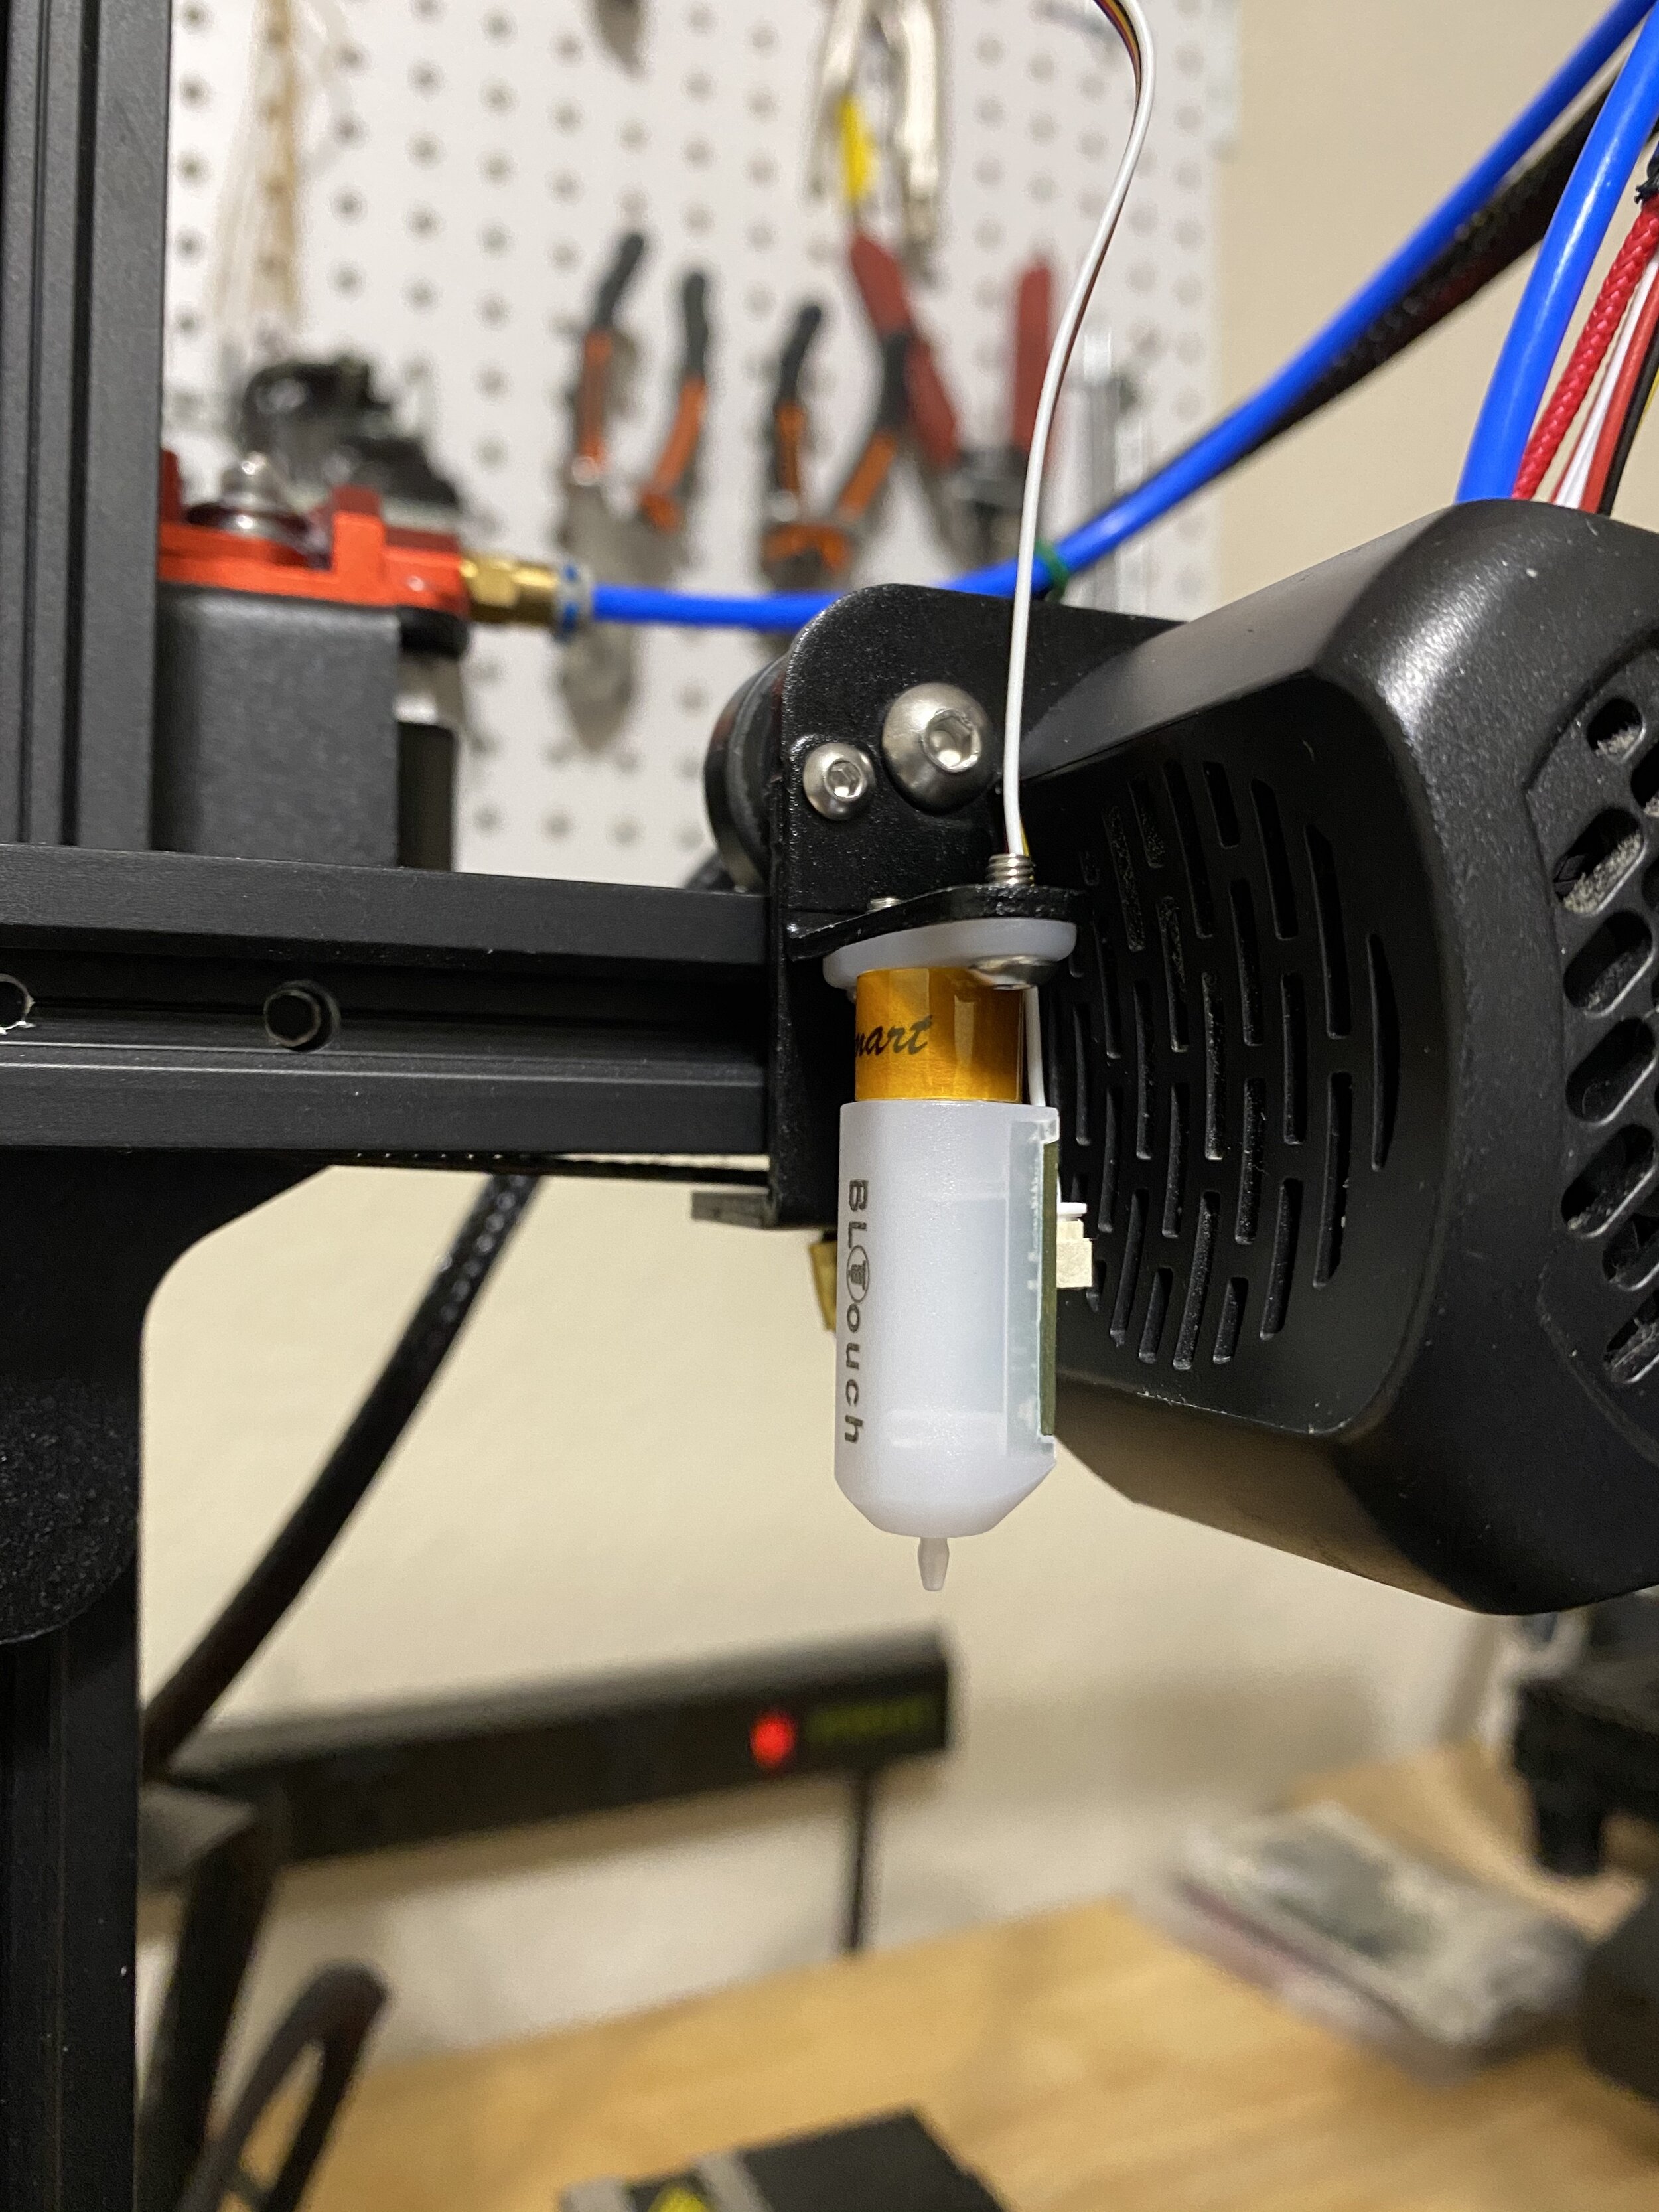
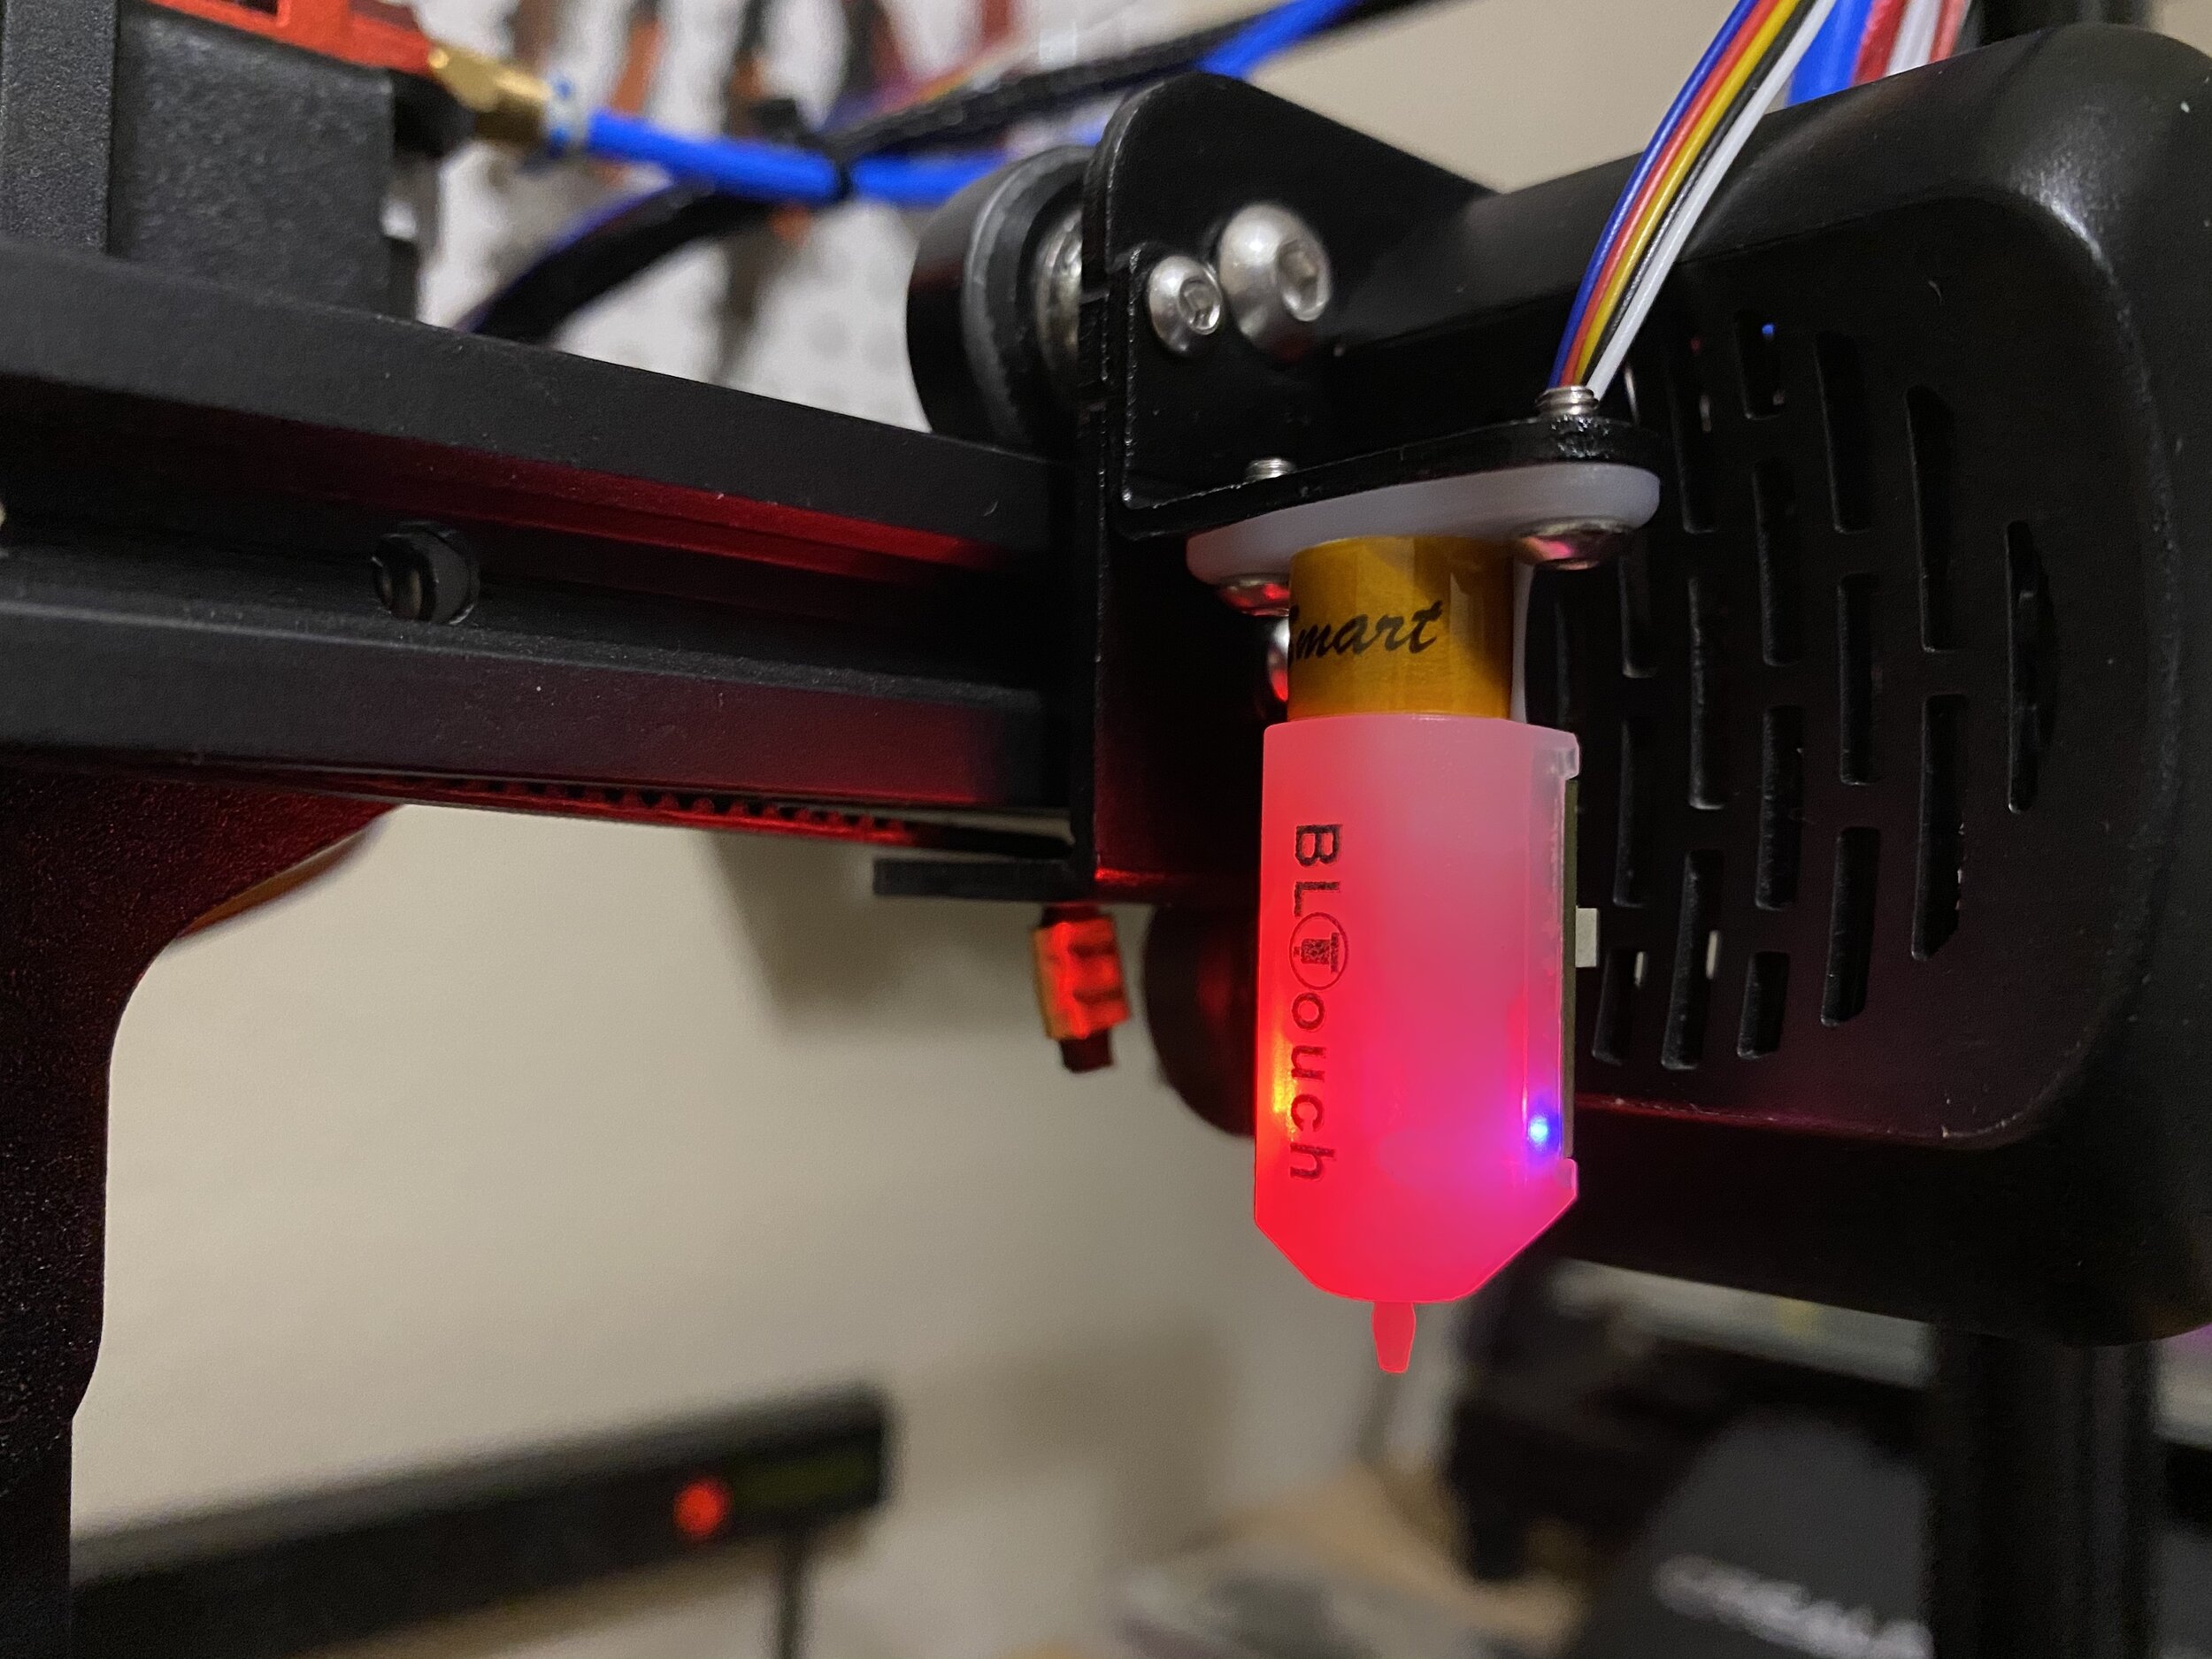
This BLTouch bed leveling sensor precisely detects when the nozzle is the correct distance from the print bed.
With traditional manual leveling, the 3D Printer uses a Z endstop, a small switch located by the Z axis motor, to tell the printer when the nozzle is fully lowered to the print bed. Since this does not take into account the position of the print bed, you’ll use the knobs on the corners of the bed to adjust the bed’s vertical position until it is just the right distance from the nozzle. This process requires a fair amount of manual effort and calibration to get just right.
An automatic leveling system instead uses a small probe near the hot end to measure the distance of the nozzle from the bed. As the printer lowers the nozzle closer to the print bed, the probe detects when the nozzle has reached the desired offset. Since this accounts for the position of the bed, the nozzle can be positioned correctly regardless of the position of the print bed.
Additionally, since the probe is on the hot end carriage, it can easily measure different positions on the bed. To accomplish this, the machine probes the print bed in a grid pattern at the beginning of a print. After measuring the print bed at several points, the 3D printer software can automatically make small adjustments to the Z height as the nozzle moves to different positions on the bed, which maintains a consistent offset from the bed. We have found that almost all print beds have some slight irregularities, and this process helps greatly in ensuring a consistent first layer at every position on the bed.
What automatic bed leveling system should I buy for my Creality 3D printer?
We have found the BLTouch to be the most precise and repeatable bed leveling system.
If you want to add automatic bed leveling to your Creality Ender 3, CR-10 V2, or other Creality 3D printer, we recommend going with the BLtouch sensor based on our experience with using them and other options on the market. The BLTouch is the best automatic bed leveling probe we’ve used, due to its high accuracy and repeatability.
The BLTouch sensor is a small cylinder that can be mounted on the side of the hot end carriage. It uses a small probe which extends downward past the nozzle when it is in use. The sensor detects the bed when the probe makes contact with the bed. Once it has finished measuring, the probe is retracted to prevent damage.
We have tried other types of bed leveling probes in the past, including inductive probes which use magnetic induction instead of physical contact to detect the print bed. We found that they are not as accurate and also can be inconsistent based on temperature changes. We have also seen some cheaper BLTouch alternatives on the market, but we don’t recommend them since they are known to cut corners and use lower quality components. However, Creality recently released its own sensor based on the BLTouch, which we have had success with so far but have yet to see how it performs long term. We really like that it uses a metal probe instead of plastic, which ensures that the probe will not be damaged if a failed print applies bending forces to it. The Creality Touch sensor is fully compatible with the BLTouch and uses the same cabling, so the installation will be the same as a BLTouch sensor.
Compatibility with your Creality 3D Printer
You can purchase a kit containing everything you need to install the BLTouch on your Creality 3D printer, including the sensor itself, the mounting bracket, and the required cables and adapters to plug it into your 3D printer’s control board. The specific kit you should purchase depends on your 3D printer, so use the following table to find the correct kit for your printer. The table also summarizes the difficulty level of the installation for each printer, which we will detail further in the rest of this article.
| Ships with Auto Leveling | Firmware Update Method | Motherboard Connections | Required Hardware | Mainboard Version | |
|---|---|---|---|---|---|
| Ender 3 / Ender 3 Pro | - | ISP Adapter | connects via provided adapter | kit 1 | 1.1.4 |
| Ender 3 V2 / Max | - | SD Card | plugs into dedicated port on mainboard | kit 2 | 4,2.2 or 4.2.7 (previously 1.1.5) |
| Ender 5 | - | ISP Adapter | connects via provided adapter | kit 1 | 1.1.4 |
| Ender 5 Pro | - | SD Card | plugs into dedicated port on mainboard | kit 2 | 4,2.2 or 4.2.7 (previously 1.1.5) |
| Ender 5 Plus | Yes | - | - | - | 2.2.0 |
| Ender 6 | - | SD Card | plugs into dedicated port near Z motor | kit 3 (+ printed bracket) | 4.3.1 |
| CR-10 / CR-10 Mini | - | ISP Adapter | connects to pinboard and Z endstop | kit 1 | 1.1.4 |
| CR-10 S / S4 / S5 | - | ISP Adapter | connects to pinboard and Z endstop | kit 1 | 2.2.0 |
| CR-10 Max | Yes | - | - | - | 2.4.0 |
| CR-10S Pro V2 | Yes | - | - | - | 2.4.0 |
| CR-10 V2/V3 | - | SD Card | plugs into dedicated port near Z motor | kit 4 | 2.5.2 |
| CR-X | - | ISP Adapter | connects to pinboard and Z endstop | kit 1 | 2.2.0 |
| CR-X Pro | Yes | - | - | - | 2.2.1 |
How to install the BLTouch automatic bed leveling kit on your printer
Installing the BLTouch sensor using an included bracket
The BLTouch automatic bed leveling kit will contain everything you need to add the BLTouch probe to your Creality 3D printer. This section will give you an overview of the process so you can understand what is involved, and look at the differences in the process for various popular Creality printers. This page is meant to give you an idea of what the process looks like; it is not a comprehensive installation guide. You can find links to our printer specific install guides in the compatibility table, or use the instructions included in the BLTouch probe kits.
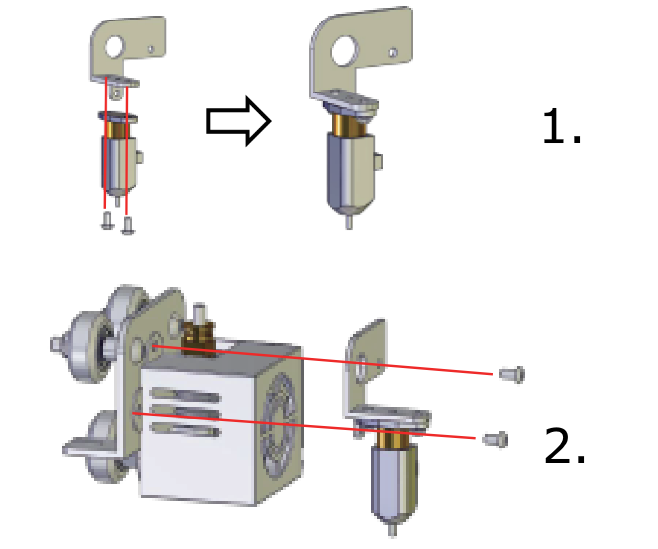
1. Mount the BLTouch sensor to the hot end carriage
On the Ender 3 V2 and many other more modern 3D printers, the sensor is plugged in using a dedicated port on the mainboard.
First, you will need to mount the BLTouch probe on the printer, which is a pretty simple process. The kit includes multiple brackets you can use based on which Creality printer model you have. The exact mounting location will vary by model, but in all cases it will be to the side of the hot end. On the Ender 3, the bracket will screw into the same holes that hold the hot end enclosure. For the Ender 3 V2 and CR-10 V2, the bracket attaches to dedicated holes on the carriage added specifically for this upgrade.
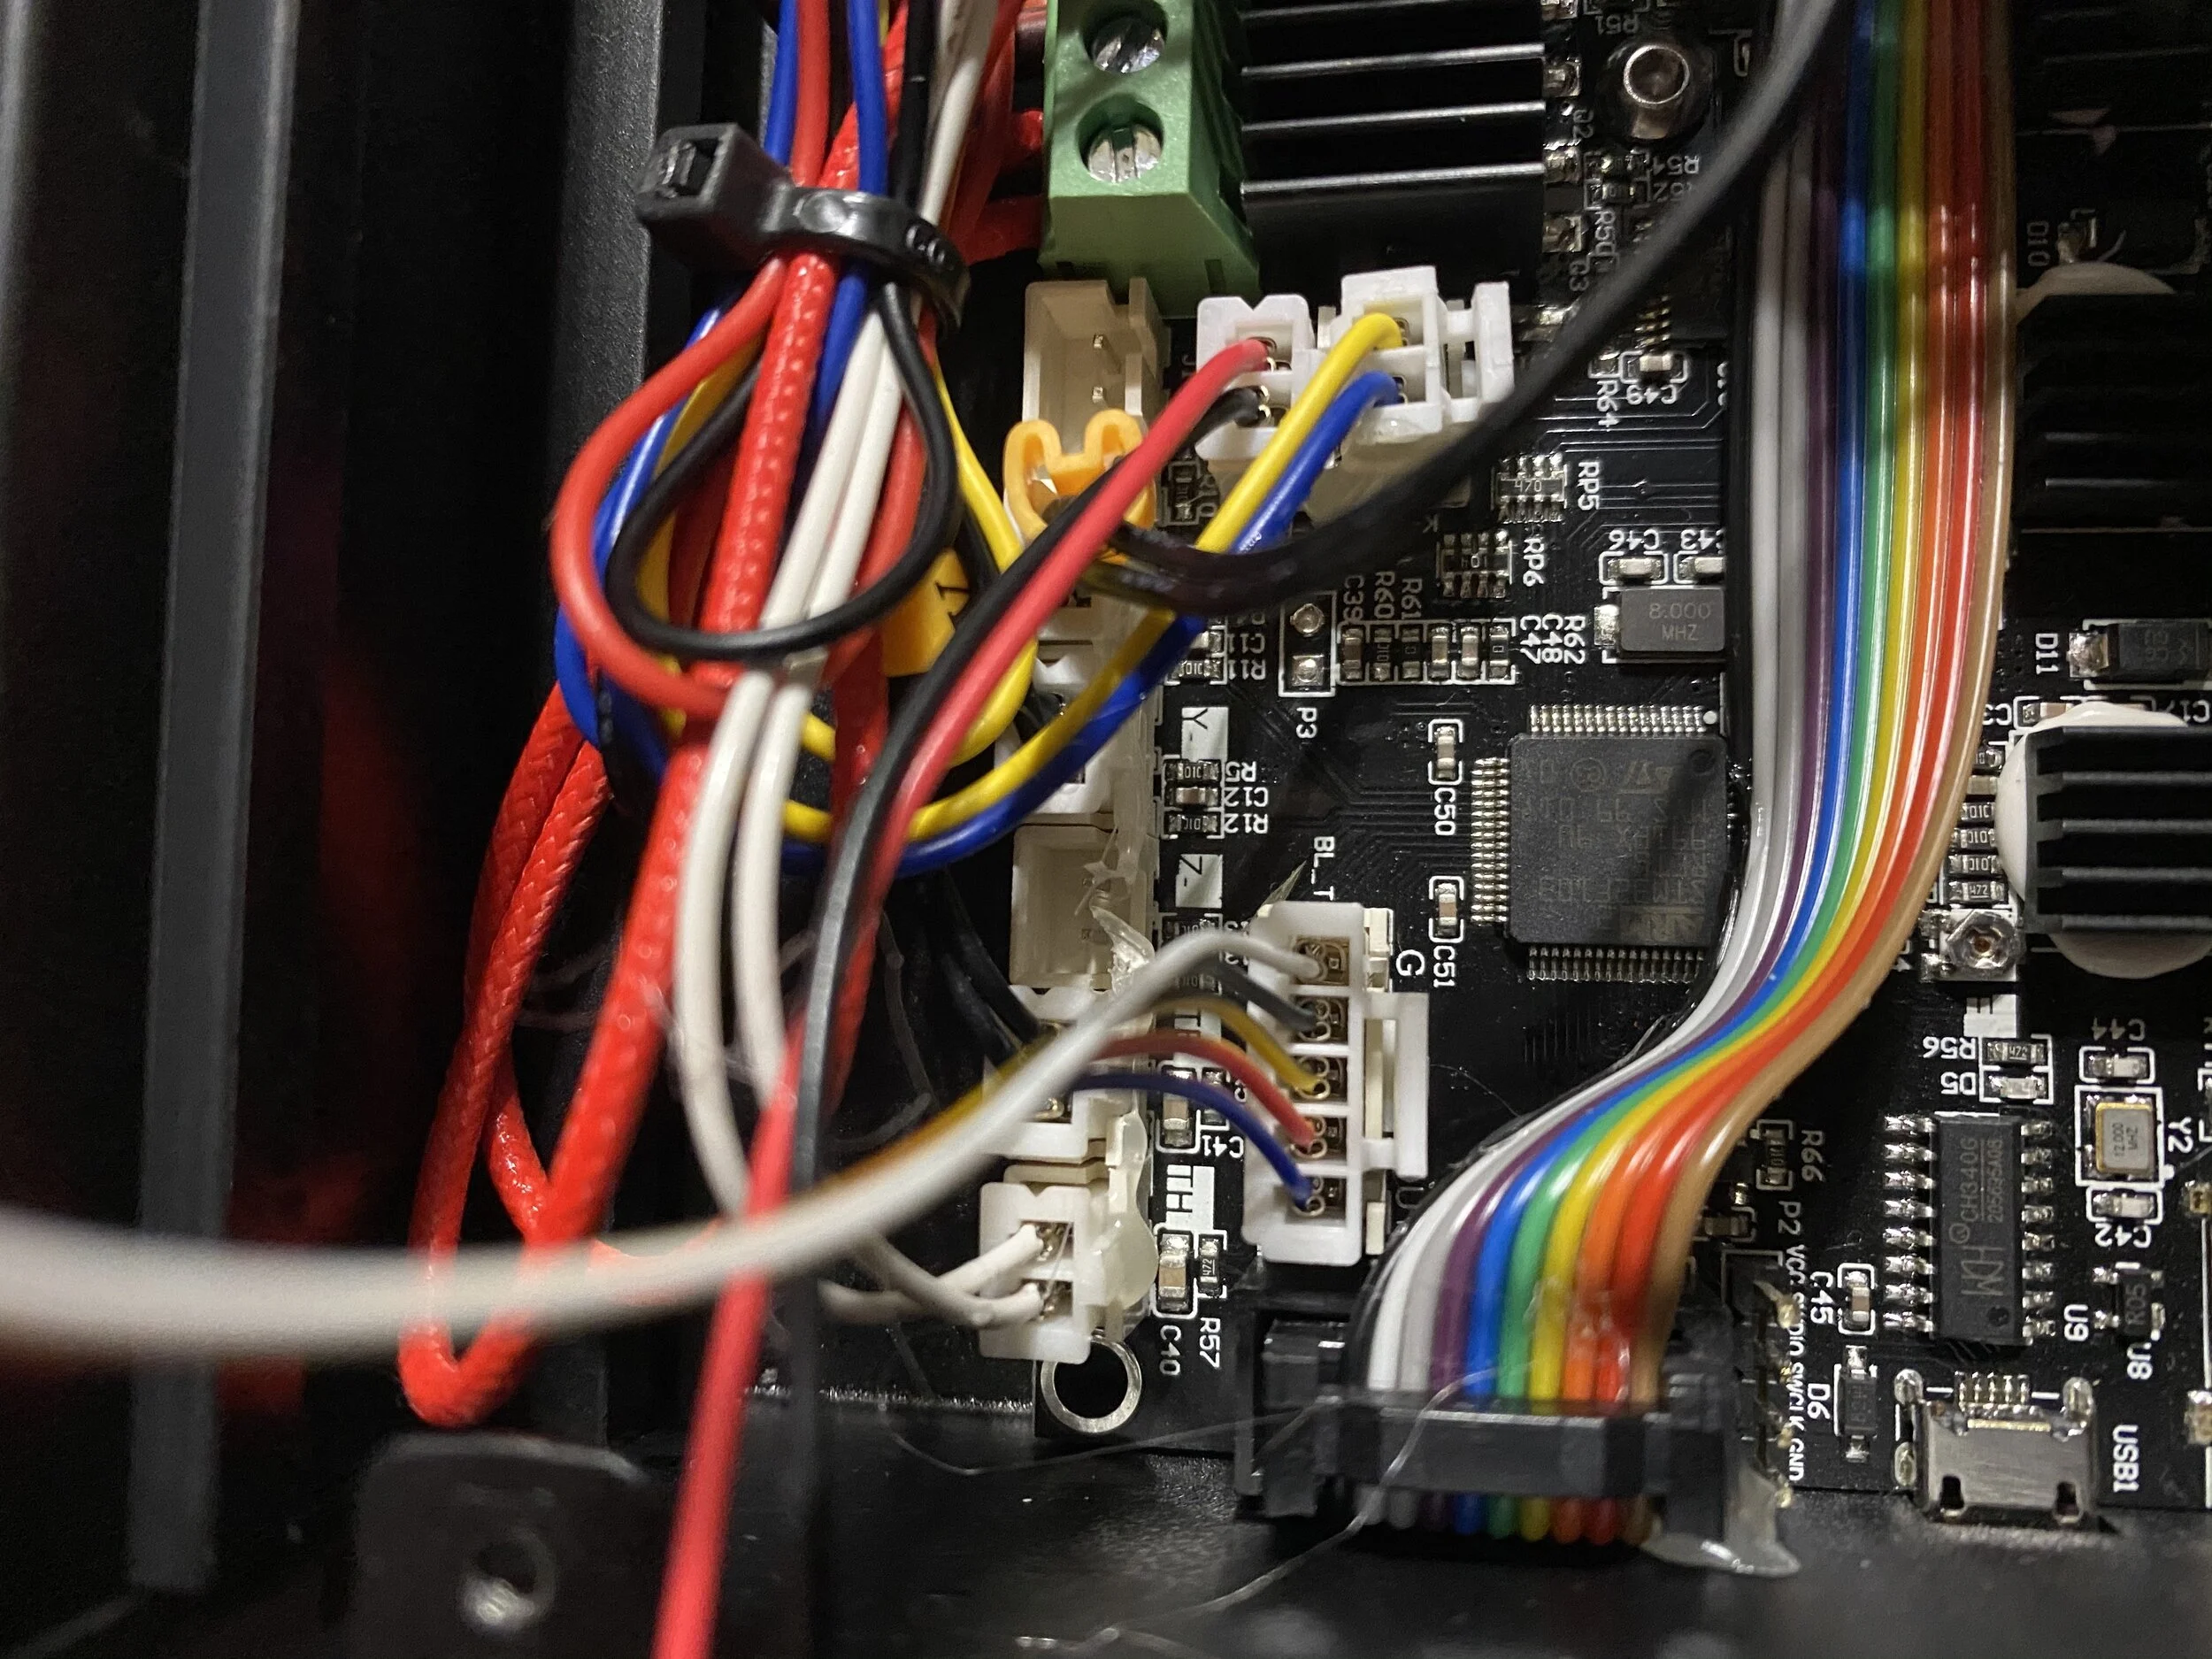
2. Connect the BLTouch sensor cable to the 3D Printer mainboard
Regardless of which 3D printer you have, the small white port on the cable will connect to the BLTouch probe. To connect the probe to the printer, you will need to route the wiring to the mainboard of the printer or a dedicated breakout board (on the Ender 6 and CR-10 V2/V3). On CR-10 Series printers, the mainboard is a separate box, while on the Ender series, it’s integrated with the body of the printer. In either case, you will need to gain access the mainboard of the printer or the breakout board. Depending on your printer, the way the sensor is connected will vary:
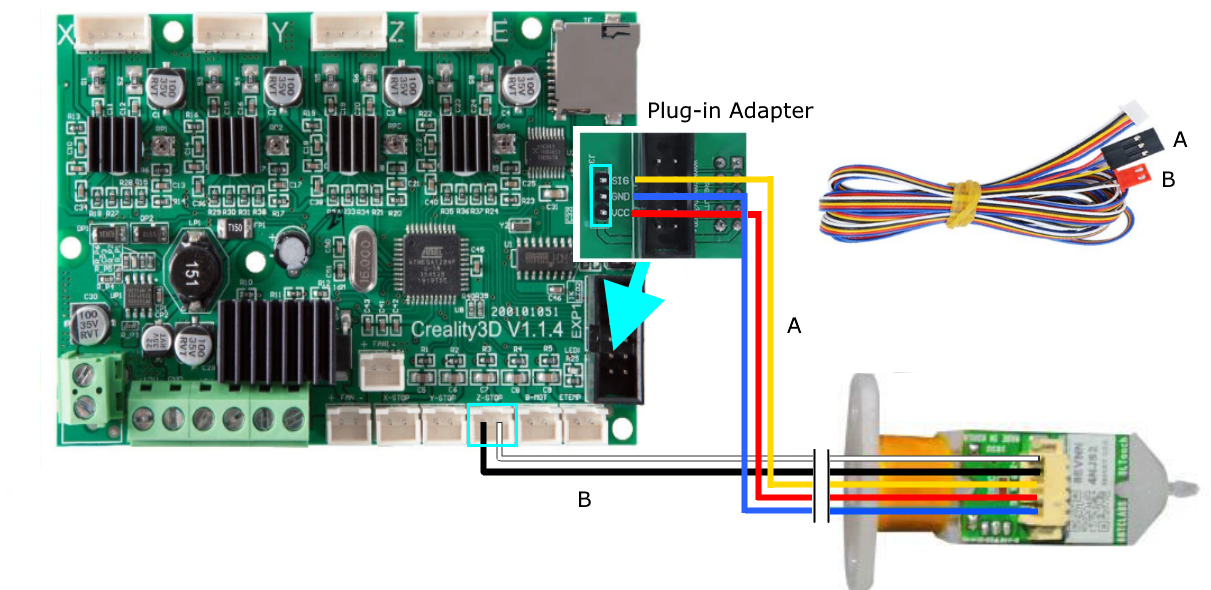
For older machines like the Ender 3/Pro, Ender 5, or CR-X you’ll use an adapter to wire the sensor to the mainboard.
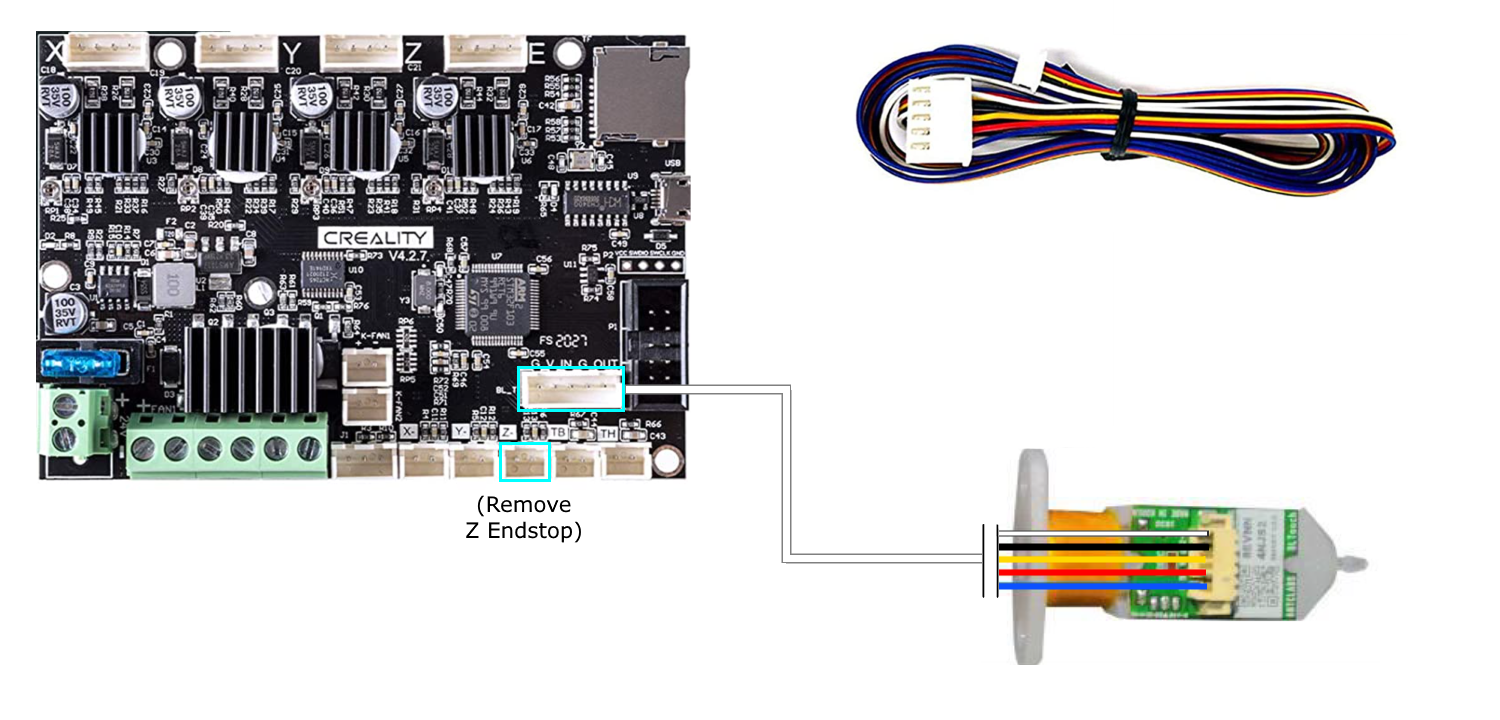
Newer mainboards, like those used by the Ender 3 V2 and Ender 5 Pro, include a dedicated port for the BLTouch sensor.

On the CR-10 V2 and V3, the sensor port is located on a breakout board located near the Z motor, and accessing the mainboard is not required.
3. Update printer firmware
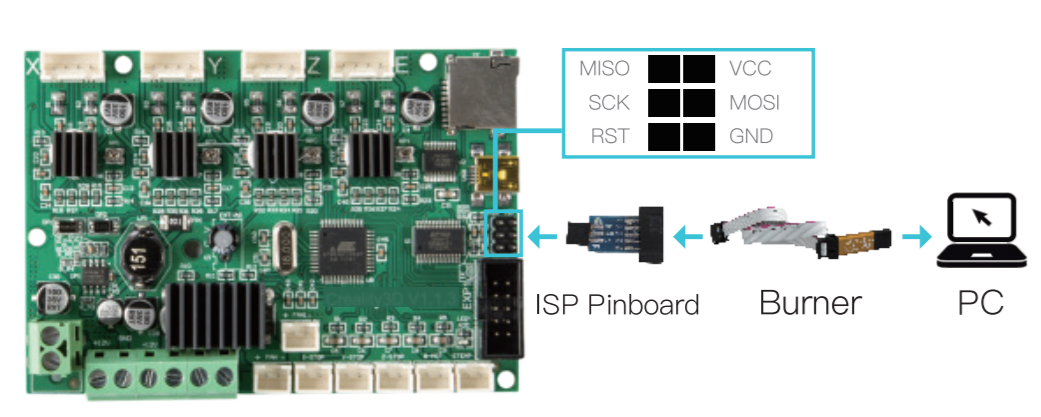
Many Creality 3D printers allow you to easily update the firmware via USB or the SD card. For some printers, you’ll need to use an adapter and special software on your computer to update the firmware to the mainboard. This can be a bit daunting, but it is laid out step by step in the included instructions.
After the BLTouch probe hardware is mounted and connected, you will need to update the printer firmware so that it can utilize the new probe. The process for updating firmware depends on whether your printer has a bootloader. A bootloader allows you to update the firmware using a USB connection or SD card, which is a simple process. For printers without a bootloader, you’ll need to use a special adapter to update the firmware via ISP (which is included in the kit for these printers). Refer to the compatibility table above to see what method is required for your 3D printer.
4. Calibrate the Z offset for the BLTouch probe
Once installed, you’ll need to calibrate the Z offset to ensure the nozzle is the correct distance from the bed. This process requires running through the leveling procedure, adjusting a Z-offset value on the printer LCD, then saving the setting to the printer’s memory.
Is an Auto-Leveling upgrade worth it?
Now that you understand the benefits of auto-leveling and have a general idea what the install looks like, it’s up to you to decide whether this upgrade is worth the time and effort to install. We have found that it is very convenient to not have to think about leveling and makes the printer “just work”, even though we are pretty comfortable with manual leveling. We do occasionally see issues with the BLTouch system, such as needing to replace bent or broken probes from collisions with failed prints—which is why we are excited to try out the new CR-touch sensor with a metal probe—but in general, the BLTouch sensor has been reliable for us.