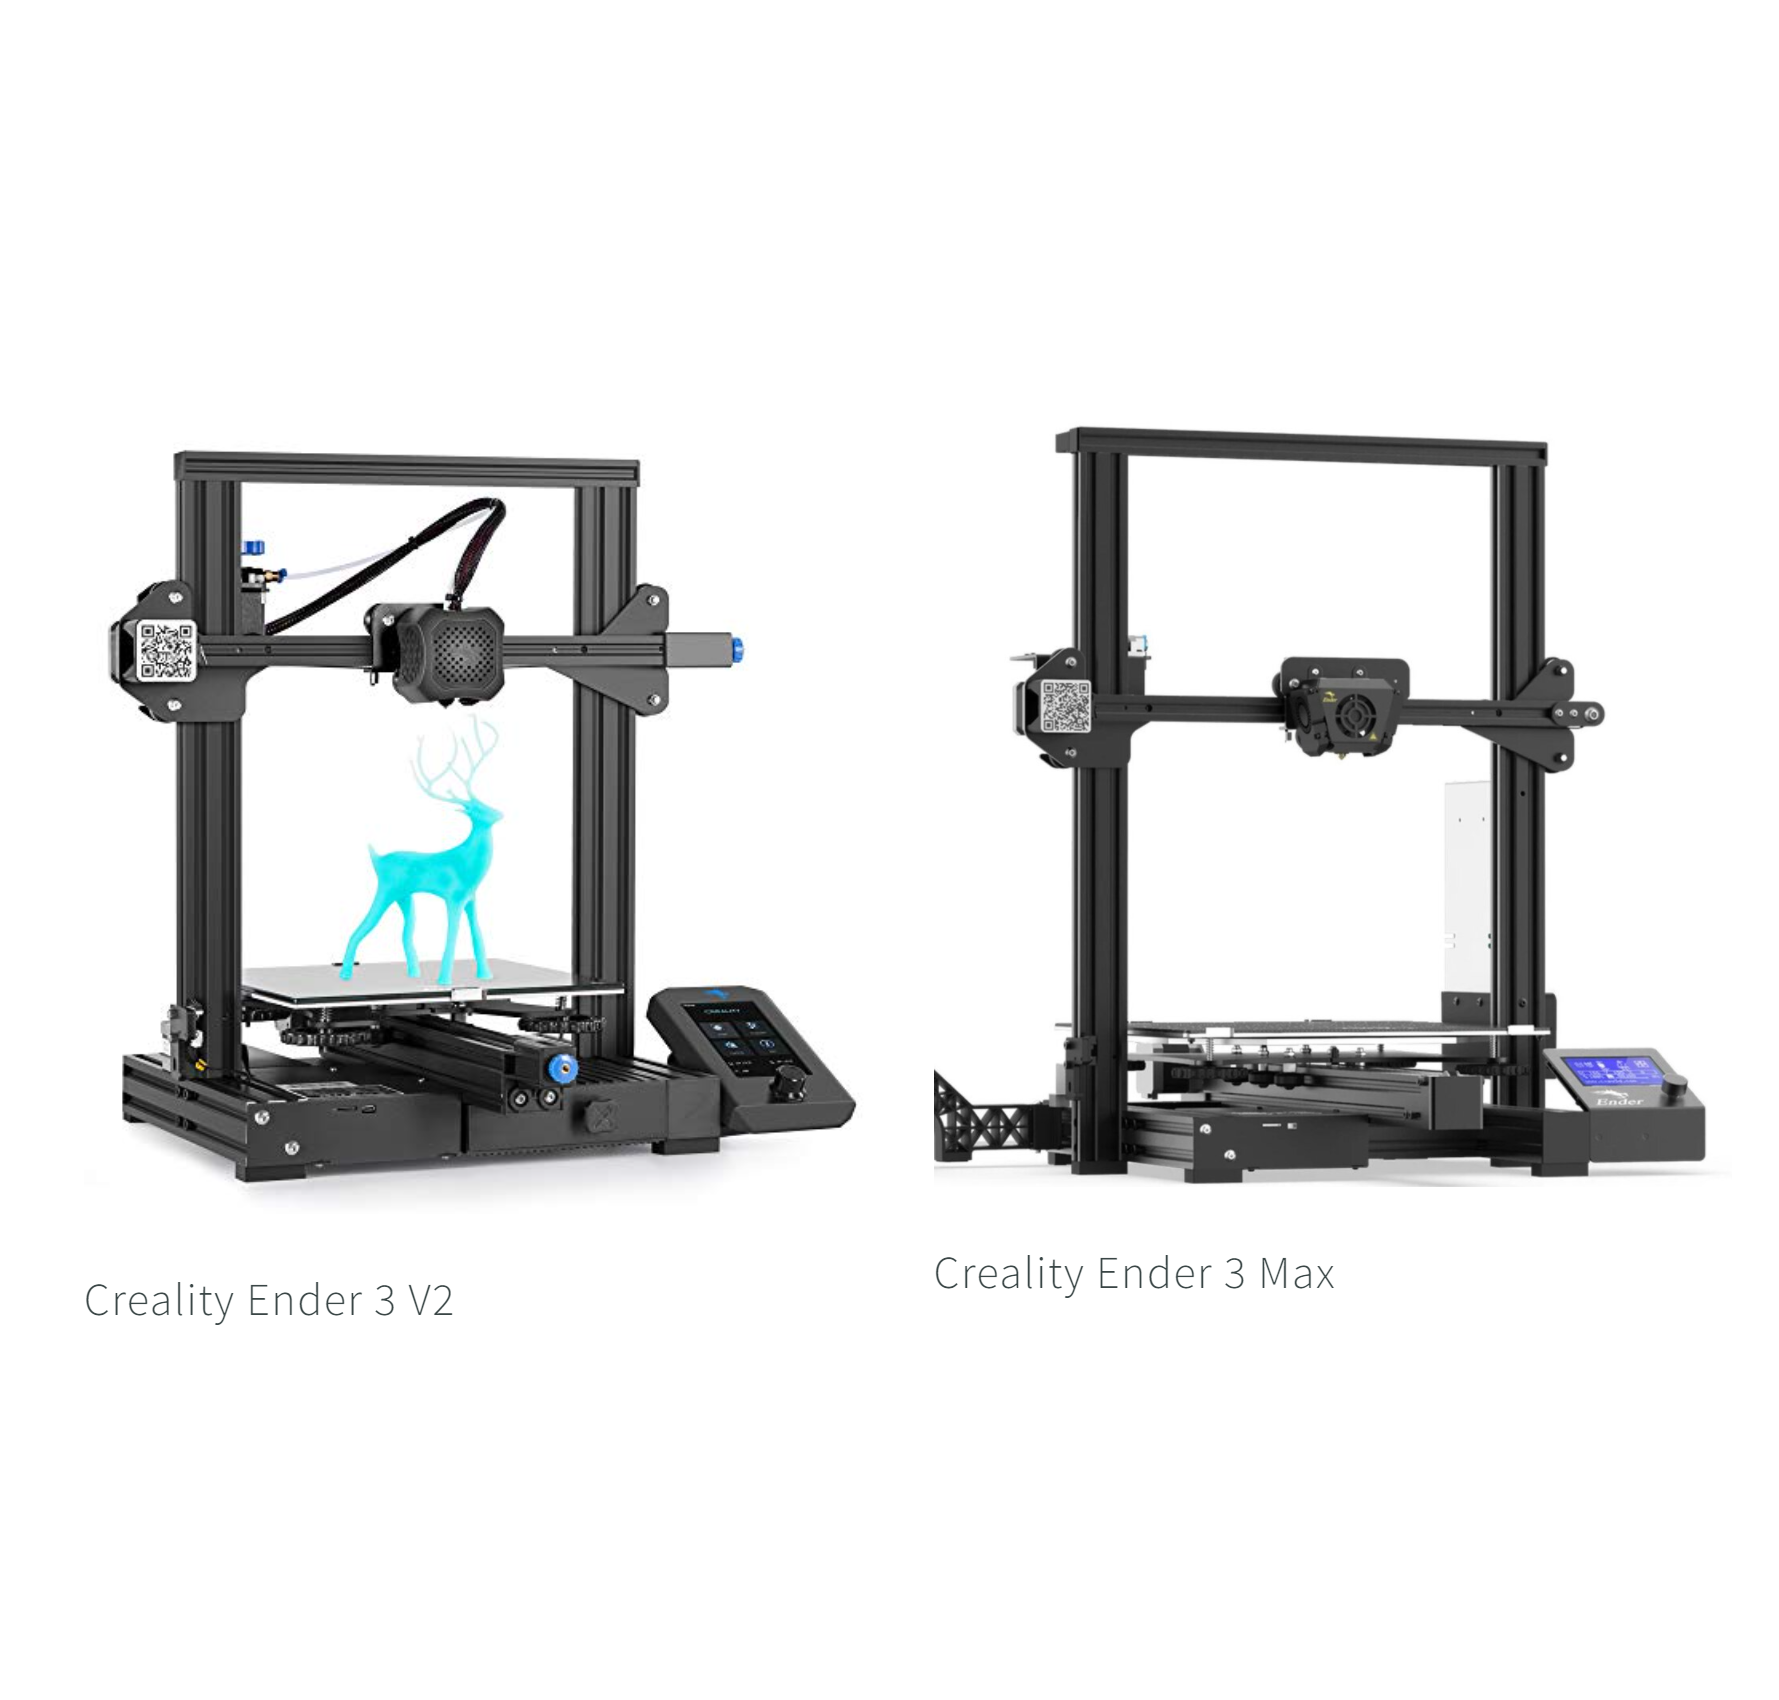
Comparing the Creality Ender 3 Max vs Ender 3 Max Neo
In this article, we will take a look at two of the most affordable 3D printers with larger build volumes: The Creality Ender 3 Max and the Creality Ender 3 Max Neo. The Ender 3 Max Neo improves on the original Ender 3 Max with some great features, but is it worth the added price?
The Creality Ender 3 series has been one of the most popular 3D printer model lines on the market, but has historically taken a back seat to the Creality CR-10 series when it comes to build volume. While the Ender 3 series has a 220mm x 220mm build plate, the CR-10 series machines are substantially larger at 300 x 300 x 400mm. The CR-10 series, however, has a number of drawbacks: an inconvenient separate control unit and a much higher price. A Creality CR-10 V2 will easily cost an extra $200 or more over the price of an Ender 3 V2.
In 2020, the Creality Ender 3 Max changed all that. It’s a 3D printer that has the single body chassis and affordable price of the Ender 3 series, but with the larger 300 x 300 mm bed of the CR-10 series. In 2022, Creality released the Ender 3 Max Neo, the next generation of this 3D printer.
Soon after this release, the prices for the Ender 3 Max have gone down, and you can often find them in the $300 range, while the Ender 3 Max Neo is closer to $400. However, the Ender 3 Max Neo has a lot of improvements that are worth considering before making a decision. We will cover the differences in these machines in detail to help you decide which one is a better fit for you.
Note: Creality Experts receives a commission for items you purchase from this page, at no additional cost to you. For more information, please see our affiliate link policy.
Vs.
Shared Features
Lets start with the features that the Ender 3 Max shares with the updated Ender 3 Max Neo.
Material Capabilities
All Ender 3 models are capable of heating the nozzle to 260C and the bed to 110C, hot enough to print any common materials such as PLA, PETG, and ABS. Since neither printer has an all-metal hot end, continued printing at high temperatures can cause the PTFE tubing that carries the filament to degrade over time, which increases the likelihood of jamming. Fortunately, this is a fairly easy issue to fix if you know what to look for. You can learn more about this issue and the repair in our hot-end guide.
Chassis Style
The Ender 3 V2 and Ender 3 Max have the same single body style typical of the Ender 3 series. While not as sleek as the more premium printers like the CR-10 Pro V2, we like this body style because it doesn’t require a separate control box with messy wires, and these printers are easy to move around since it is all a single piece. This is in contrast to the CR-10 series printers, which use a separate control box that makes the printer more difficult to move.
Print Quality
The Ender 3 Max and Ender 3 Max Neo both offer impressive print quality out of the box. Since the printers use similar components along the filament path including a single gear extruder and the standard Creality hot end, we have not seen any significant print quality differences between these machines. However, one difference to note is that the Ender 3 Max has dual part cooling fans, which we will look at more later in the article.
Assembly
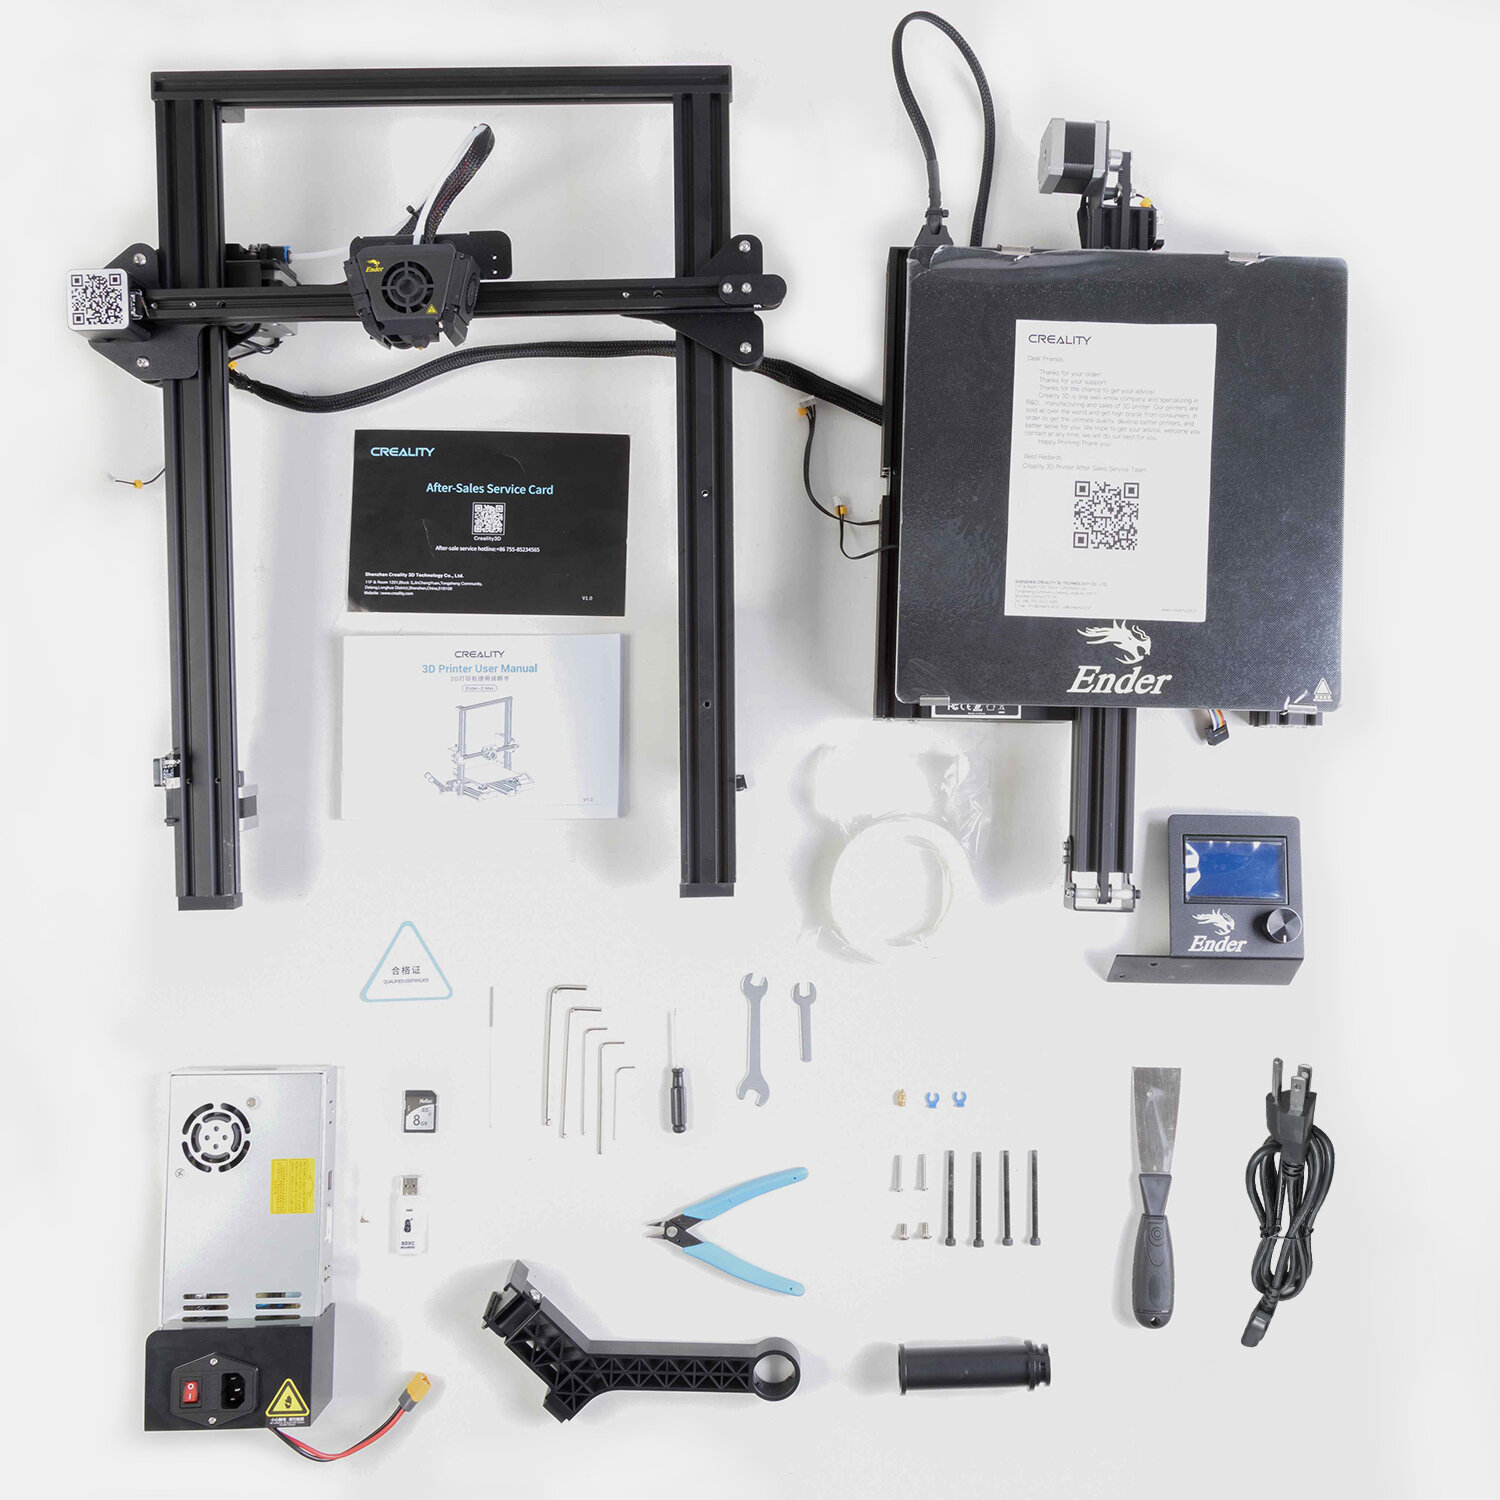
Both printers are shipped mostly pre-assembled, with only four pre-assembled components that are easy to connect together (Ender 3 Max shown here).
Both of these printers ship mostly assembled, and will only take about 15 minutes to get up and running. This is a welcome improvement over older printers in the Ender 3 series, such as the Ender 3 V2, which comes in many pieces and takes at least an hour to put together.
Physical Size / Footprint
Both printers are nearly the same size, but the Ender 3 Max Neo is a bit wider.
Ender 3 Max: 513 x 563 x 590 mm
Ender 3 Max Neo: 516 x 582 x 590 mm
Both printers are smaller than others in this size category, such as the CR-10, which require additional space for the separate controller box.
Build Volume
Both printers share a 300 x 300 mm bed size. The Ender 3 Max Neo actually has a slightly smaller Z axis of 320mm, 20mm less than the Ender 3 Max. However, for practical purposes, the two printers have nearly the same capability for printing larger parts.
Reliability

A premium metal extruder is included on both printers.
Both the Creality Ender 3 Max and Ender 3 Max are reliable 3D printers. We have had to replace a few parts on these printers after extended use, including new hot ends, extruder gears, and new power supplies. The Ender 3 Max and Max Neo have some improvements that increase their reliability and prevent some of the repairs that we eventually needed to perform on the Ender 3 V2.
Upgraded metal extruder - This is a more durable extruder and an important reliability upgrade. Many printers in the Ender series, such as the Ender 3 V2, use a plastic extruder housing, which is a very common point of failure due to the constant tension on the plastic parts.
Premium Meanwell power supply - We always use these when replacing the power supply in our older Creality 3D printers, but it’s included from the factory on the Ender 3 Max and Ender 3 Max Neo. We can confirm that these power supplies are more reliable, and we haven’t had one fail yet on any of our printers.
Thermal Runaway Protection - An important safety feature that allows the printer to detect when there is a malfunction on the temperature sensor and shut off the power to the heater cartridge. Without this protection, if the temperature sensor malfunctions while the printer is active, the heat cartridge will continue to try to heat, potentially reaching very high temperatures and causing a fire hazard. This is a great safety feature.
Bed Material

Both printers use the same carborundum glass build surface
The Ender 3 Max Neo uses a Carborundum glass build surface, just like the Ender 3 Max
We are happy to see that the max Neo uses a carborundum glass build surface, unlike the smaller Ender 3 V2 Neo which uses a PC steel bed. With a carborundum bed, you wont need to use any additional adhesives like hairspray, but it is critical that you clean the bed with a damp cloth after every 5-10 prints to maintain the adhesion of the bed surface. Carborundum is even better than standard glass when it comes to part removal. Typically, parts can be removed with only a light tap once the bed is cooled. After learning how to properly clean these beds, we now prefer them over borosilicate glass. The surface finish is not quite as smooth as borosilicate, but the superior adhesion without any hairspray more than makes up for it.
Other Shared Features
Both printers have many modern features that are nice to have on any 3D printer.
Power recovery - Allows you to resume a print if the printer shuts off due to a power failure.
Updated Mainboard with Silent Stepper Drivers - Older 3D printers such as the CR-10 produce a song-like sound when printing due to the frequencies of the motors moving. Newer electronics prevent this issue, making the printer substantially quieter. The only sound you will hear are the fans, which is much easier to ignore.
Filament Runout Sensor. If your printer runs out of filament, the printer will pause and beep to let you know, allowing you to reload it and start again. Unfortunately, we’ve noticed that the bed heater also turns off when this happens. If you are not able to restart the print within about 10 minutes, the part will often detach from the bed, preventing a successful recovery.
Next, we’ll look at the differences between these printers.
Differences with the Ender 3 Max Neo
Auto Bed Leveling
The most notable new feature of the Ender 3 Max Neo is the addition of a CR-touch auto bed leveling sensor. While it is possible to upgrade the Ender 3 Max with this feature, it is a fairly involved upgrade that costs around $50, so it is a welcome feature to come standard on the Ender 3 Max Neo.
With traditional manual bed leveling, the 3D Printer uses the Z endstop—a small switch located by the Z axis motor—to tell the printer when the nozzle is fully lowered to the print bed. Since this does not take into account the height of the print bed itself, you’ll need to use the knobs on the corners of the bed to adjust the bed’s vertical position until it is exactly the right distance from the nozzle. This process requires a fair amount of manual effort and calibration to get just right, and it drifts slowly over time.
An automatic leveling system instead uses a small probe near the hot end to measure the distance of the nozzle from the bed. As the printer lowers the nozzle closer to the print bed, the probe detects when the nozzle has reached the desired offset. Since this accounts for the position of the bed, the nozzle can be positioned correctly regardless of the position of the print bed. Overall, this means that the 3D printer will print the first layer more accurately, and you won’t need to worry about adjusting the leveling knobs even after many prints.
We were also pleased to see that the sensor in use is the CR-touch, Creality’s version of the BL-touch sensor. The Creality version uses a metal pin to probe the bed, which is an improvement since the plastic pins of the BL-touch sensor can break or bend if they collide with a misprinted part. We have found the CR-touch to be reliable and consistent over many prints.
Part Cooling
This is another area where we feel that the Ender 3 Max Neo took a step backwards. The Ender 3 Max Neo uses a single part cooling fan, which only blows air on one side of the nozzle. The enclosure is designed in a symmetrical way that makes it appear to have a fan on both sides, but only one fan is actually present on the right side. The original Ender 3 Max has two separate cooling fans, one on each side, that cool all sides of the print. Effective part cooling is important when you are printing overhangs, since the filament needs to be cooled quickly to prevent it from drooping.
Based on printing a variety of parts with both of these designs, we think this makes the Ender 3 Max printers more versatile in terms of what can be printed without the need for support material. However, a single cooling fan is sufficient for most applications, so this isn’t a dealbreaker for us.

The Ender 3 Max has a dedicated fan for each side of the nozzle. This is our preferred configuration since the air is routed to both sides of the nozzle for even part cooling.

The Ender 3 Max Neo fan routes air to only one side of the nozzle, which can cause inconsistent overhang results depending on the print orientation.
Reliability
Creality added two features that improve the reliability of the Ender 3 Max Neo over the original Ender 3 Max.
A redesigned heatsink on the hot end adds more surface area for cooling. Keeping the cold side of the hot end cool is important to ensure that the filament does not jam, since most jams are caused by filament getting hot before it reaches the nozzle. If the filament heats up in the heatsink, it expands to the size of the PTFE tube it is running through, eventually causing enough friction to fully stop the extruder from pushing the filament through (see our hot end guide to learn more about how this happens and how to fix it).

The original Ender 3 Max uses the standard Creality Bowden hot end.

The Ender 3 Max Neo hot end includes a redesigned heatsink with longer fins with larger gaps to allow more air cooling.
The Ender 3 Max Neo also includes a second Z motor and lead screw. This feature helps ensure that the hot end is at a consistent height as it rises during a print. We have had issues with these becoming offset in the past, but Creality addressed this by physically coupling the two leads to ensure they do not become offset. That said, we have not noticed any issues with inconsistent Z height on our Ender 3 Max printers, which use a single Z motor and lead screw.

The Ender 3 Max Neo includes dual Z lead screws that are coupled by a belt at the top to ensure they don’t become offset from each other.
Usability & Convenience
A feature the Ender 3 Max Neo has over the Ender 3 Max is an improved LCD screen interface, with a larger screen and a more user-friendly UI. Neither interface is a touch screen, such as those featured on more premium printers like the Creality CR-10S Pro V2.

The Ender 3 Max uses the older style LCD with a smaller screen and text-based interface.
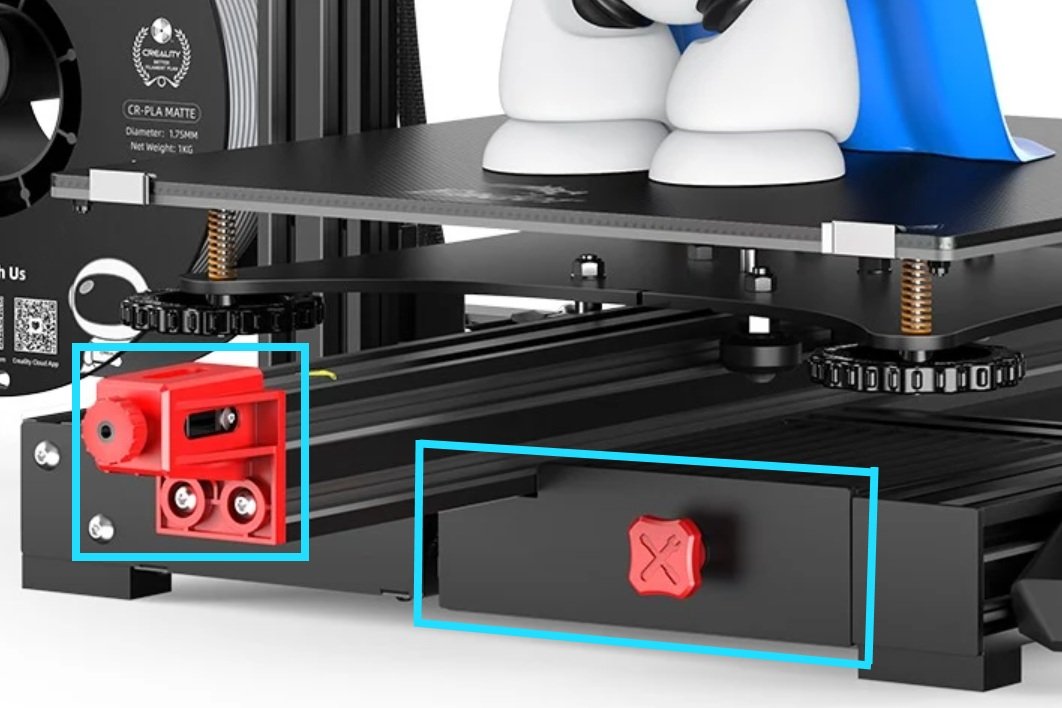
The Ender 3 Max Neo comes with belt tensioning knobs for the X and Y axis (Y shown) as well as a built in tool drawer.
Other more minor usability improvements include:
The Ender 3 Max Neo also adds belt tensioning knobs to make it easier to tighten the belts for the X and Y axes, which can become loose over time.
The Ender 3 Max Neo includes a tool drawer to store the tools that are included with the 3D printer.
The Verdict
Overall, the Creality Ender 3 Max Neo offers an impressive set of improvements over the Ender 3 Max, and despite the shortcomings of the bed material and single cooling fan, we think the Ender 3 Max Neo (Amazon link) is the best all around choice. To summarize, our favorite improvements in the Neo version are:
CR-touch auto bed leveling
Updated heat sink design to reduce likelihood of jamming
Usability improvements, including the updated LCD, tension adjustment knobs, and tool drawer
We feel that all of these features are worth the additional ~$75 you’ll spend over the Ender 3 Max.
If price is a big factor for you, the Ender 3 Max (Amazon link) is a solid choice and will likely be available at lower prices over time as the Neo variants become more mainstream. We have multiple Ender 3 Max printers for our 3D printing business and have been very happy with their quality and reliability. The biggest drawback is that you will need to manually level the bed since it does not have auto bed levelling.
We hope you have a better idea what you are getting with the Creality Ender 3 Max and Ender 3 Max Neo and feel more prepared to make a decision. Here’s a full recap to summarize:
If you’d like to compare other printers, take a look at our 3D Printer Comparison Tool. This tool lets you view multiple 3D printers side by side to easily compare features.