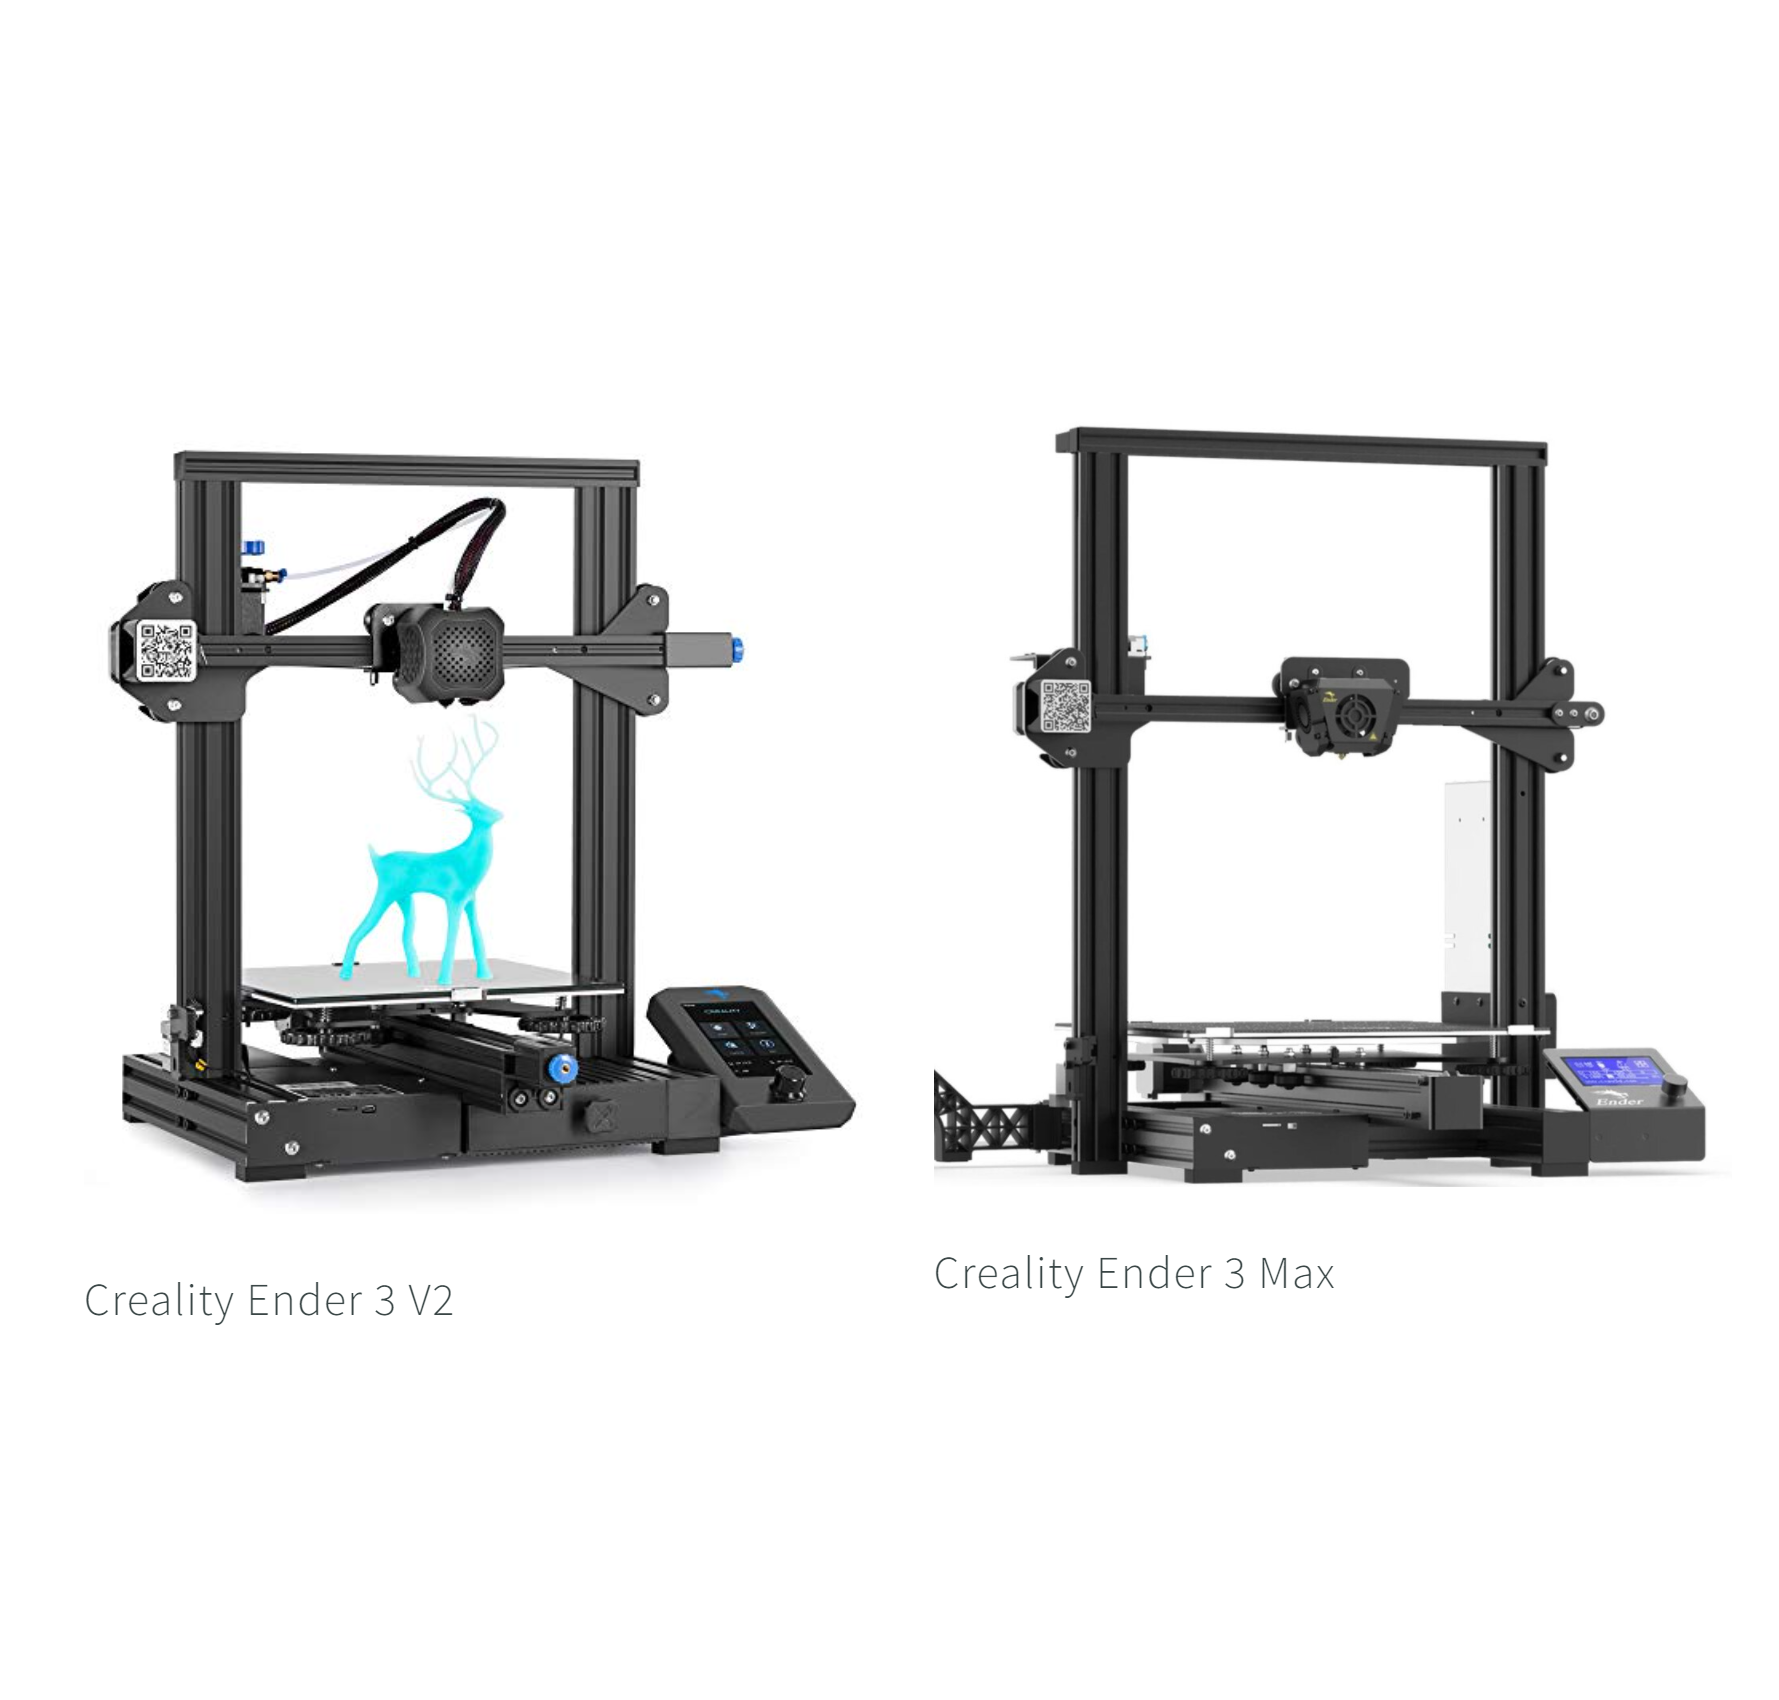
Comparing the Creality Ender 3 V2 Neo vs Ender 3 S1
In this article, we take a look at Creality’s newest addition to their line of Ender 3 consumer 3D printers, the Creality Ender 3 V2 Neo, and compare it to one of the same series’ more elite models, the Creality Ender 3 S1.
For some time now, the Creality Ender 3 series of printers have remained steadfast benchmarks for quality, affordable home 3d printers and several of them even make for reliable printer farm additions for semi-pro work. This line of printers from Creality continues to debunk the old myth that affordability comes at the detriment to quality and features, pulling what some would see as “luxury” features down to the more easily approachable and user-friendly models.
In mid-2022, Creality has introduced their latest addition to the Ender 3 line in the form of the Ender 3 V2 Neo, which is poised to span the gap between the more basic entry level Ender 3 and the more premium Ender 3 S1, bringing some features up to modern expectations while remaining similar in price point to the earlier Ender 3 printers—the Ender 3 V2 Neo is currently priced about $80 lower than the Ender 3 S1, putting it in a clear lower price category as compared to the higher-end machine. With the release of the Ender 3 V2 Neo, Creality is bringing some of its users’ most desired features from their upper-tier printers down into a more affordable price range. Some of the most notable evolutions of the Ender 3 S1 that are also found on the Ender 3 V2 Neo include:
Convenient, quick assembly
Auto bed leveling
Magnetic flexible steel build plate
Let’s go through some of the key differences and similarities between these machines to help you decide which model is right for you.
Note: Creality Experts receives a commission for items you purchase from this page, at no additional cost to you. For more information, please see our affiliate link policy.
Vs.
Similarities Between The Ender 3 V2 Neo and Ender 3 S1
Quick Assembly
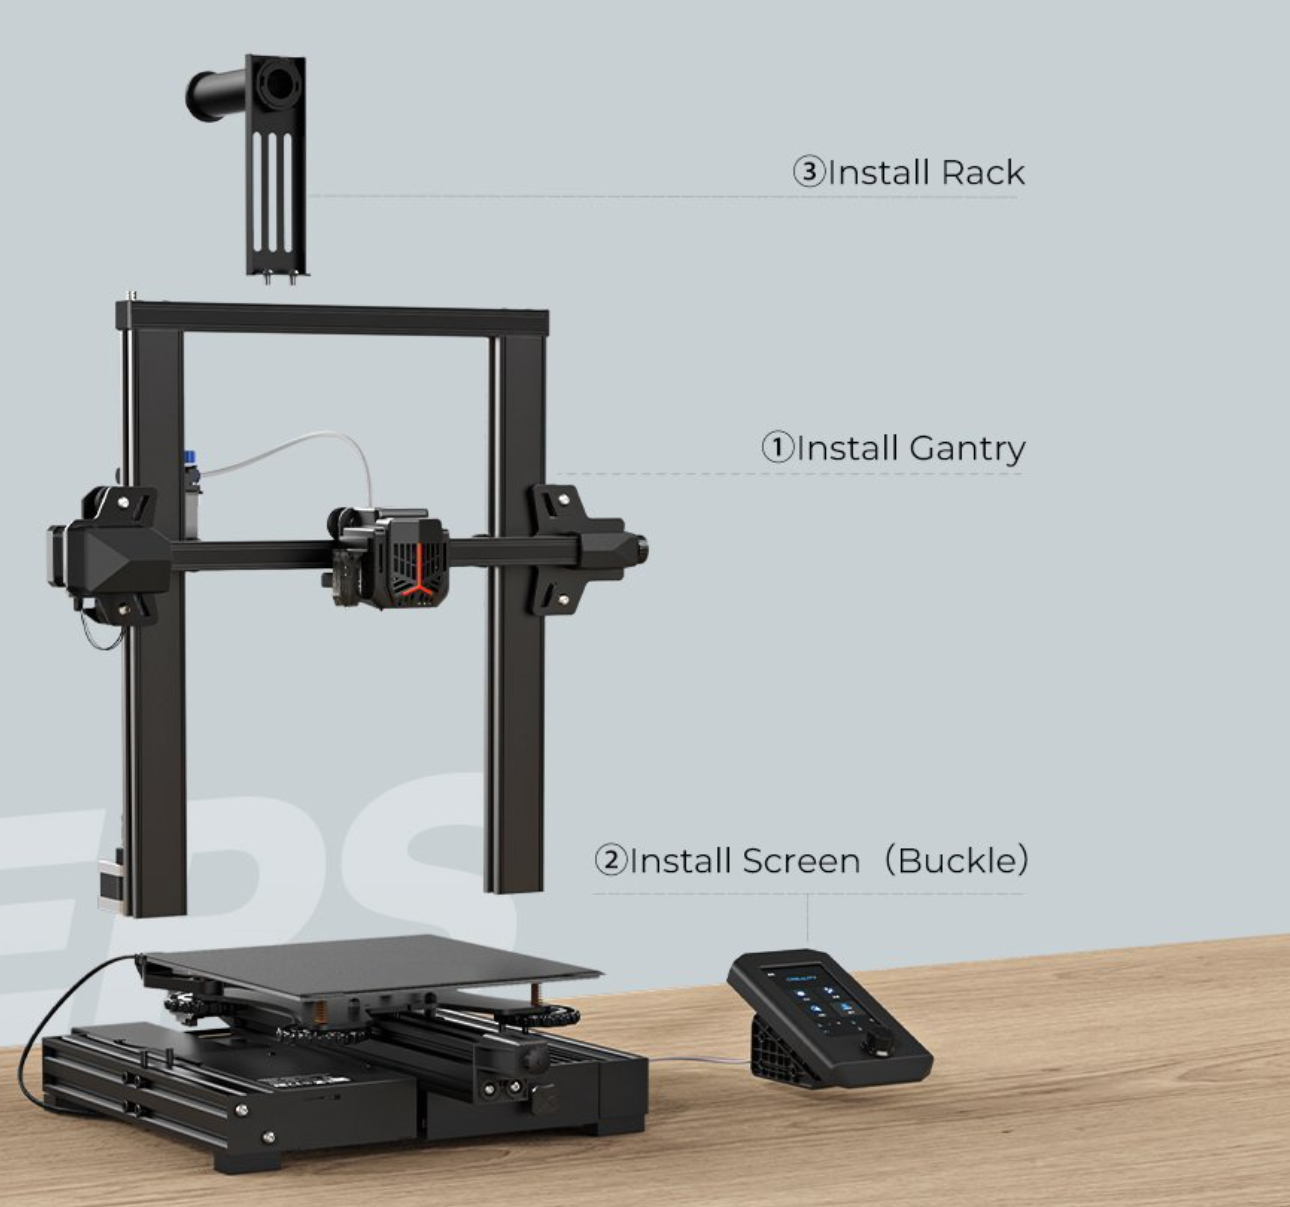
The Ender 3 V2 Neo, like the Ender 3 S1, is easy to assemble.
Looking first at assembly, we’re pleased to see the Ender 3 V2 Neo (view on Amazon) comes as a “mostly-assembled” setup experience just like the Ender 3 S1, rather than shipping in several pieces to reduce pack volume, which is the case for the Ender 3 V2 (and previous Ender 3 models). With this simplified experience, the printer ships in only two pieces, making assembly quick and easy.
Connecting the upper half to the base only involves four bolt connections located under the base of the Z axis arms. This choice will be well-appreciated by new hobbyists and makes the overall experience more approachable to the casual user. Even for us, as experienced 3D printer assemblers, having assembly be this easy is a very welcome change in the Ender 3 V2 Neo.
Auto Bed Leveling
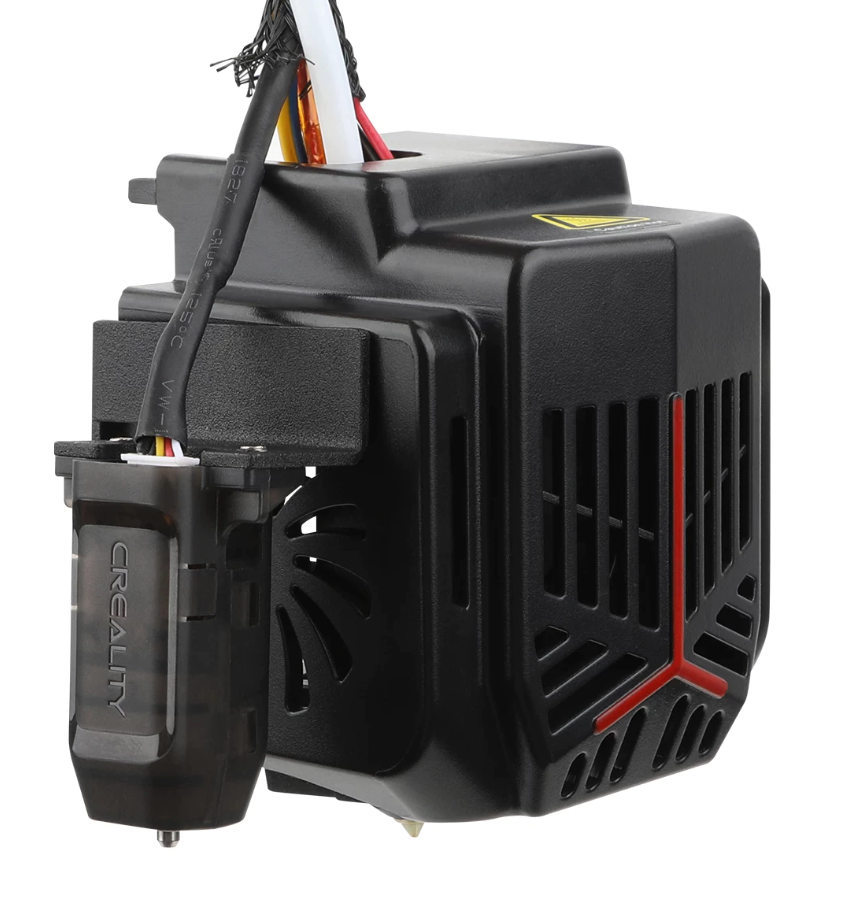
The updated Ender 3 V2 Neo hot end includes a CR-touch leveling sensor, the same sensor as is found on the Ender 3 S1.
Another feature of the Ender 3 S1 of printers that Creality has brought to the Ender 3 V2 Neo is auto bed leveling, utilizing their proprietary CR Touch sensor system.
Basic 3D printers, such as the original Creality Ender 3, require the user to often adjust the bed’s four corner vertical alignment knobs to make the build plate perfectly perpendicular with the Z axis of the print head. With the addition of the CR Touch system, the printer’s homing process uses a sensor attached near the hot end to check sixteen points around the print bed, allowing the printer to automatically compensate for any variances in bed height.
Having this adjustment occur during the printing process means no tinkering of the vertical height knobs of the build surface. The CR Touch is Creality’s take on the popular BL Touch sensor, but with a slightly longer sensor pin that is substantially more durable then its competitor since it’s made of metal rather than plastic. In our experience, auto bed leveling definitely makes for an easier day-to-day printing experience.
Magnetic Flexible Build Plate
The last major design element of the Creality Ender 3 V2 Neo that is shared with the Ender 3 S1 series is the build plate itself. Older models typically used a glass plate, which if used right, makes for great adhesion and removal once the print cools sufficiently. Taking after the S1, the V2 Neo instead has a snap-in-place PC magnetic steel build panel that is also flexible. The magnetic backing mean it takes only a second of effort to remove and reinstall the build surface. Since it’s made of a flexible panel, removal of the prints is simpler because you can slightly bend the build surface, causing the print to pop off. The textured coating applied to the panel also make for very good adhesion of the initial layer, thereby accounting for all build surface requirements.
Though this build plate style is well liked, and initial prints have great adhesion and removal, over time we have noticed that prints become increasingly difficult to pop off even after cooling down. It is also worth keeping in mind that these coated flex plates are somewhat more susceptible to damage if the Z axis is not adjusted appropriately—this can result in gouging of the surface material.
It’s worth noting that the Ender 3 S1 Pro comes with a spring steel build plate with an enhanced PEI coating, which we’ve found to stand up far better to possible damage. Additionally, it is fairly easy to upgrade the bed on either the Ender 3 V2 Neo or Ender 3 S1 to a PEI bed, since the beds already have the underlying magnetic surface.

The PC steel bed found on both printers has very good adhesion, even for small features in the first layer.
However, it is more prone to damage from part removal if the part sticks too well.
Differences Between the Ender 3 V2 Neo and Ender 3 S1
There are some key differences between the Ender 3 V2 Neo and the Ender 2 S1 which do make your choice between the printers easier.
Build Volume
The first of these is found with the build volume: the Ender 2 V2 Neo still maintains the 220 mm x 220 mm x 250 mm print volume you find standard on most machines in the Ender 3 line, whereas the Ender 3 S1 models have an increased Z axis build volume of 270mm, enabling you to print taller models.
Extruder
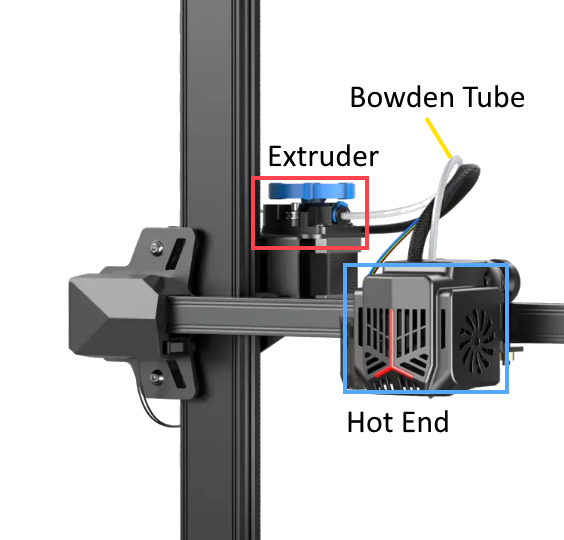
The Ender 3 V2 Neo uses a Bowden style extruder, where the extruder is mounted to the side of the printer instead of on the print head.
The Ender 3 S1 uses a direct drive extruder designed by Creality, named the Sprite extruder.
Next we should look at the extruder of the Ender 3 V2 Neo, which differs from the Ender 3 S1 as it uses a Bowden-style extruder rather than a direct drive. This is an often-discussed focal point for modern 3d printers, with one touted to be better than the other, but often it comes down to your intended usage.
To break it down, the extruder is the powered mechanism that feeds filament towards the hot end, and in the case of a Bowden style extruder, this device is attached to the one of the vertical side arms of the printer. In this scenario, the extruder feeds the filament through a flexible tube towards the hot end on the print head, which does result in the moving print head being lighter. With a direct drive extruder, the mechanism is positioned on the print head, directly above the hot end, with no needed tube to link the filament feed. This causes the print head to be heavier due to the added motor and extruder assembly on the moving head.
This weight difference in some cases can potentially lead to sloppier prints if the hot end were to wobble as the print head moves quickly, but direct drive extruder allows for better control, especially with flexible filament materials such as TPU. Printers equipped with Bowden extruders are able to print at fast speeds on standard filament types, but require decreased speeds on flex types, with added chances of stringing and jams to occur.
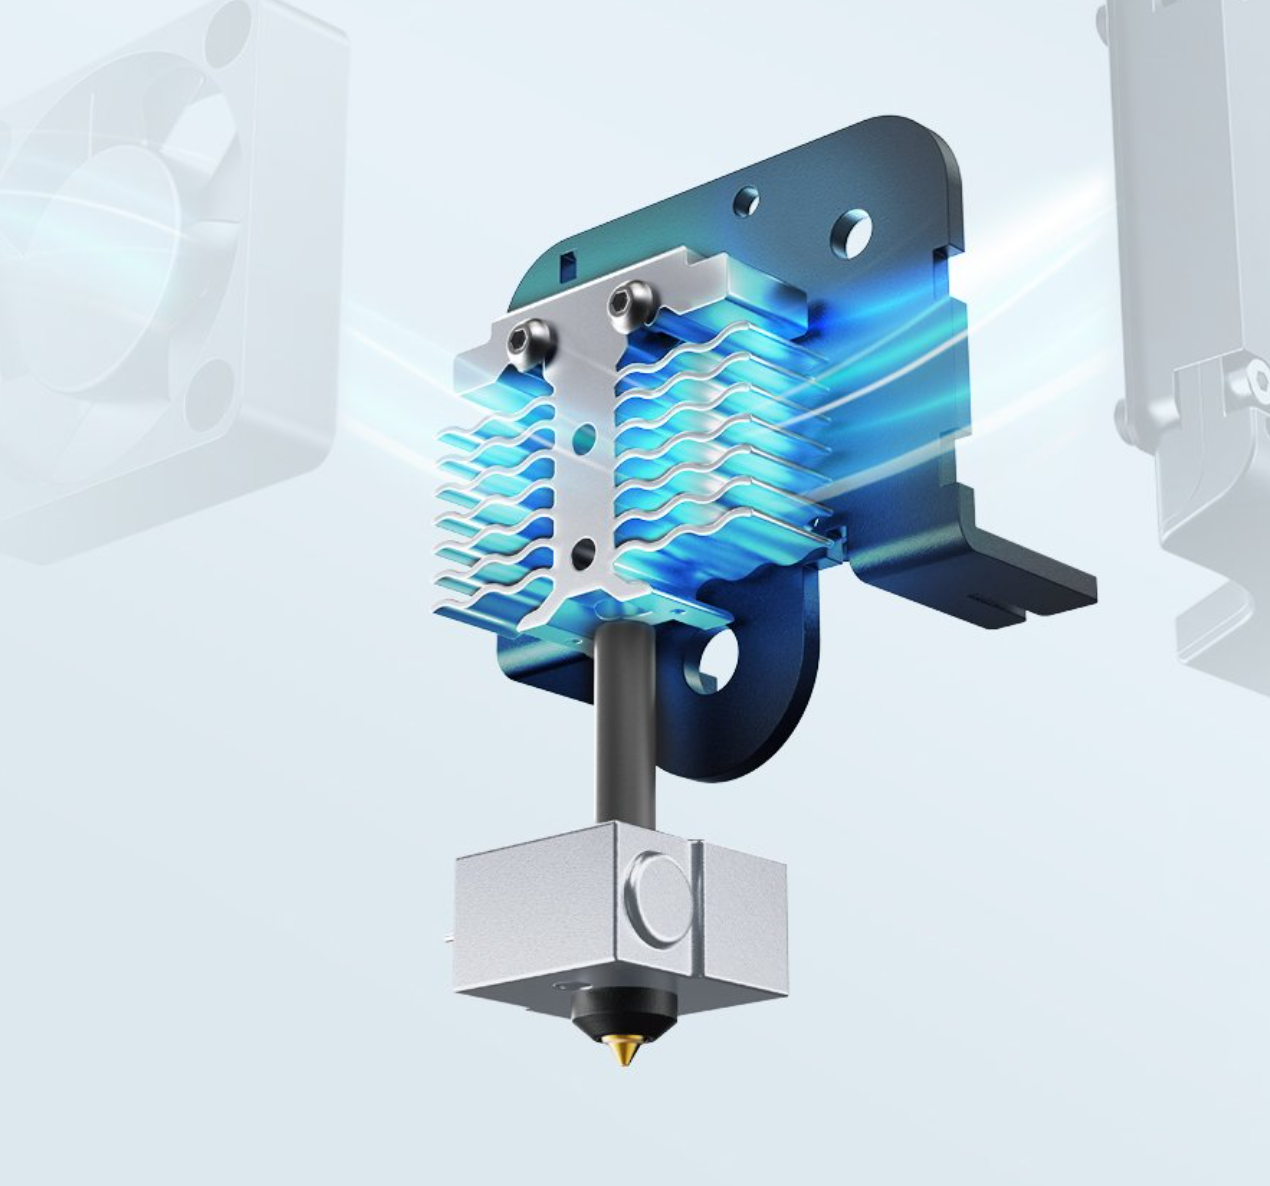
The redesigned heat sink on the Ender 3 V2 Neo provides more surface area for cooling, which reduces the chances of filament jamming due to filament melting too soon.
Considering these key differences between the Ender 3 V2 Neo and Ender 3 S1, however, isn’t as plain as one extruder type being better definitively than the other, especially when considering how much you might be using TPU or other flex type filament. It is worth noting that you’re unlikely to see issues from the weight difference on the print head between the extruder types. This is largely compensated for by the stable design of Creality’s chassis and the inclusion of a secondary Z motor and lead screw for added stability on the Ender 3 S1.
But there are advantages to a direct-drive extruder. We have found that this type is less prone to jamming, since you won’t have to retract filament nearly as far as with a Bowden setup, so we give the Ender 3 S1 the edge in this category. However, the Ender 3 V2 Neo uses a redesigned heat sink on the hot end, which should help make sure the filament doesn’t heat up before it is supposed to and partially mitigate this advantage of the S1.
Ease of Use
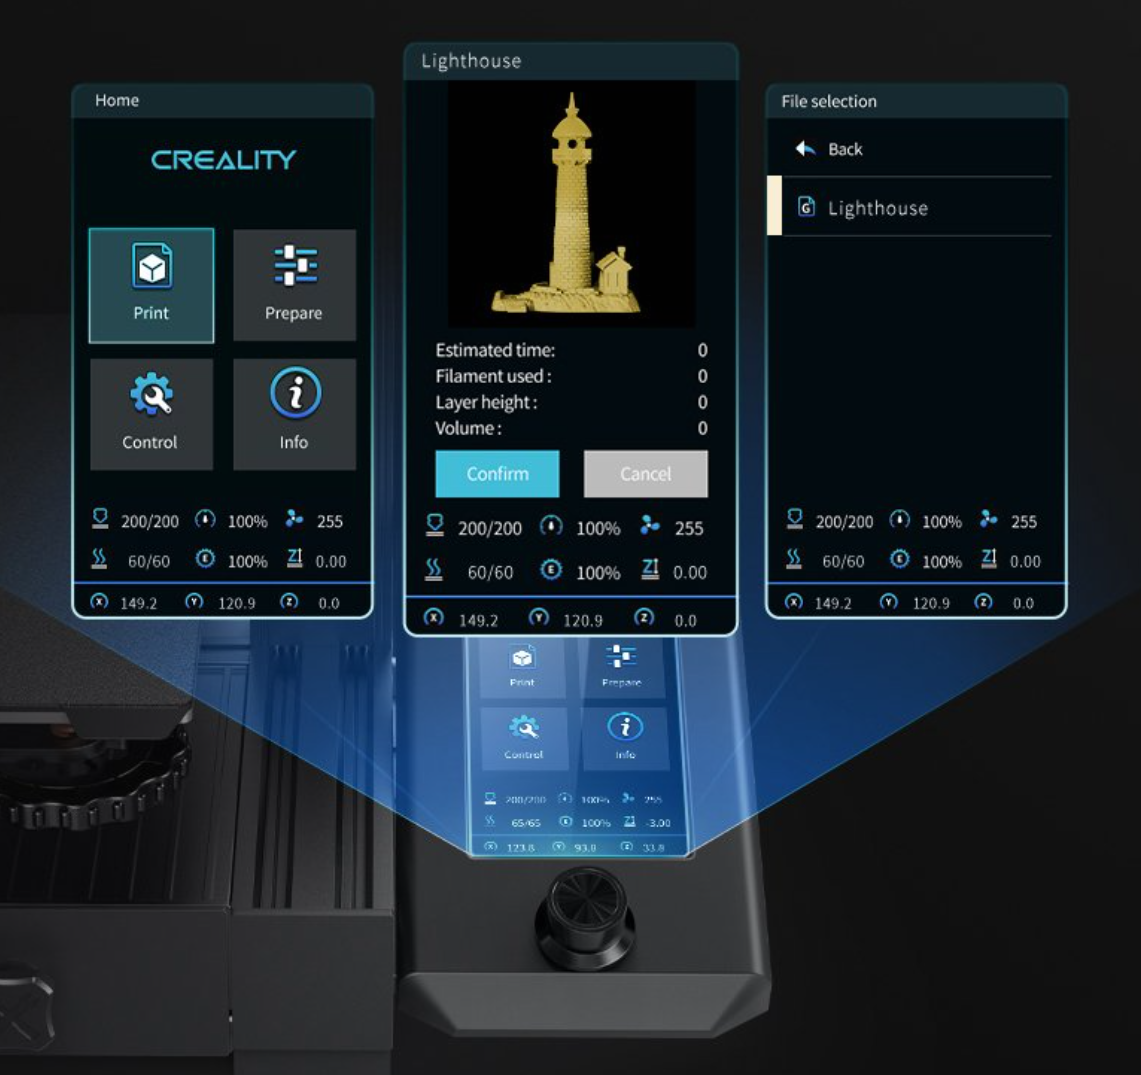
The Ender 3 Neo has a new feature to show model previews before and during printing.
Both the Creality Ender 3 V2 Neo and Ender 3 S1 are simple to operate and highly approachable to new hobbyists. Both printers make use of Creality’s 4.3 inch LCD knob screen for controlling the printing process. The UI on the V2 Neo has also been upgraded somewhat by giving users the new ability to preview their print model on screen, enabling a clearer and better overall experience in spite of its lower price point than the Ender 3 S1.
The Verdict
Crality’s Ender 3 series of printers have proven themselves over time to be workhorses with consistent reliability and ever-improving functionality and user experience. The Ender 3 V2 Neo has, in some ways, moved the goal post forward for the Ender 3 products by adding premium features and upgraded components typically associated with higher end 3D printers like the Creality Ender 3 S1 and above, while maintaining approachable pricing for those looking to acquire their first printer.
The features found on the V2 Neo can really provide all the usability you need when considering a first model that can do most everything well. On the other hand, the Creality Ender 3 S1 (Amazon link) fulfills slightly more niche use cases that may or may not be worth the cost depending what you are printing. The direct-drive extruder’s advantages and the increased height of the build volume found on the Ender 3 S1 are great examples of its added benefits, pushing that printer more into the intermediate or semi-pro use cases. In most scenarios, the new Creality Ender 3 V2 Neo (Amazon link) is the best option for acquiring your first printer, since it offers a great feature set at a substantially lower price than competing printers.
If you’d like to compare other printers, take a look at our 3D Printer Comparison Tool. This tool lets you view multiple 3D printers side by side to easily compare features.