
Creality Ender 2 Pro vs Ender 3: Budget Wars
Creality offers a number of low cost 3D printers, and in this article, we will take a look at the two most affordable printers Creality offers: The Ender 2 Pro and Ender 3. Both of these printers are under $200, but they offer different features for their low price point. In this article, we will take a look at these differences up close to help you decide which of these printers would work best for you.
Note: Creality Experts receives a commission for items you purchase from this page, at no additional cost to you. For more information, please see our affiliate link policy.
Vs.
To help you compare these printers, we will look at various factors that you’ll want to consider when purchasing a 3D printer, and compare the Ender 3 and the Ender 3 Pro on each of these points.
Price
If you are looking for a budget 3D printer, price is probably one of the most important factors in your decision. Both of these machines are around the same price point, but the Ender 2 Pro is a bit less expensive than the Ender 3, with a typical price range of $170 - 190 in the US, while the Ender 3 will typically cost in the $180 - 200 range. These models are among the lowest-cost useful 3D printers on the market - there are a few machines that are closer to the $100 price point, but they have very small print volumes (typically 100 x 100 x 100 mm) which is too small for most uses.
Build Volume
The Creality Ender 3 is the clear winner for build volume: it has a substantial volume of 220 x 220 x 250 mm. This is a bit larger than the standard 200mm cube of many 3D printers on the market, but is still small enough that the printer can easily fit on a desk. The extended Z height is convenient to allow for taller parts without increasing the amount of required desk space. The Ender 2 Pro has a smaller build volume of 165 x 165 x 180 mm, which is large enough for general use, but can definitely be a limiting factor especially for functional parts.
Assembly Complexity
The Ender 3 takes approximately an hour to assemble with the included tools. It is shipped in approximately 12 separate pieces to reduce packaging size. The assembly is helpful in getting to know the printer hardware, and will make it easier to troubleshoot issues you may encounter in the future. The Creality Ender 2 Pro is much easier to assemble, taking around 15 minutes. It is shipped in 3 large subassemblies, and only requires a few screws and connecting labeled wires.

All models of the Ender 3 ship in many parts to reduce the size of the packaging. Assembly will typically take about an hour to complete.

The Ender 2 Pro ships in just a few parts and is much faster to assemble.
Material Capabilities
Material capability is mostly dependent on the maximum hot end and bed temperatures a printer can reach. Both the Ender 3 and Ender 2 Pro are able to heat the nozzle up to 260C, but the maximum bed temperatures differ: The Ender 3 is capable of reaching 110C, while the Ender 2 Pro maxes out at 80C.

Both printers use a Bowden style extruder that is separate from the hot-end. This single gear design is used on both the Ender 3 and Ender 2 Pro.
Due to this, the Ender 2 Pro can print PLA and PETG, but is not capable of printing ABS, which requires a 100C bed temperature. The Ender 3 is capable of printing ABS, however you will want to use an enclosure with ABS to prevent warping.
Both printers use a Bowden style extruder, where the extruder mechanism is separate from the hot end, and connected with a length of PTFE tube. Bowden style extruders work well for standard materials and allow for a lighter hot end, however they struggle to print flexible materials like TPU. It is possible to print these materials, but the extruder can jam often and requires very slow print speeds.
Both printers use the same extruder, which uses a single gear drive with a plastic body, which we suggest upgrading to a metal one for improved reliability.
Chassis
Both printers have a similar physical design, using pulley-guided axes for the X and Y dimensions, which are driven by a belt system. This is a proven system that is used for most of Creality’s 3D printers and many from other brands. Each printer uses a single lead screw and motor for the Z axis, which works well due to the light weight of the Bowden-style hot end.
The most striking difference in the chassis design is that the Creality Ender 2 Pro only has a single Z extension on one side for the gantry. The gantry is held on only one side, instead of both sides like the Ender 3. We were a bit concerned that this design could cause uneven Z height especially when the print head is far from the pulley, but we were pleased that the Ender 2 Pro’s gantry arm is very rigid, and the removal of the second support does not have a noticeable impact on print quality.

The Ender 3, like most Creality printers, has a Z extension on either side to support the gantry and print head. Only the left side includes a lead screw and motor.
The Ender 2 Pro’s print head is supported by a single Z extension on the left side, but we found that the gantry is still very rigid and it didn’t have a noticeable impact on quality.
The Ender 2 Pro includes pulleys on the X and Y axis to tighten the belts, which is a convenient feature found on newer versions of the Ender 3, such as the Creality Ender 3 V2. When the belts are too loose, they can skip, causing large layer shifts that will ruin your 3D print. Having the ability to easily adjust the belt tension is a convenient feature.
Physical Size & Footprint
The Ender 3 and Ender 2 Pro are fairly similar in size:
Ender 3: 440 x 410 x 465 mm (595mm high with filament holder)
Ender 2 Pro:421 x 383 x 465 mm
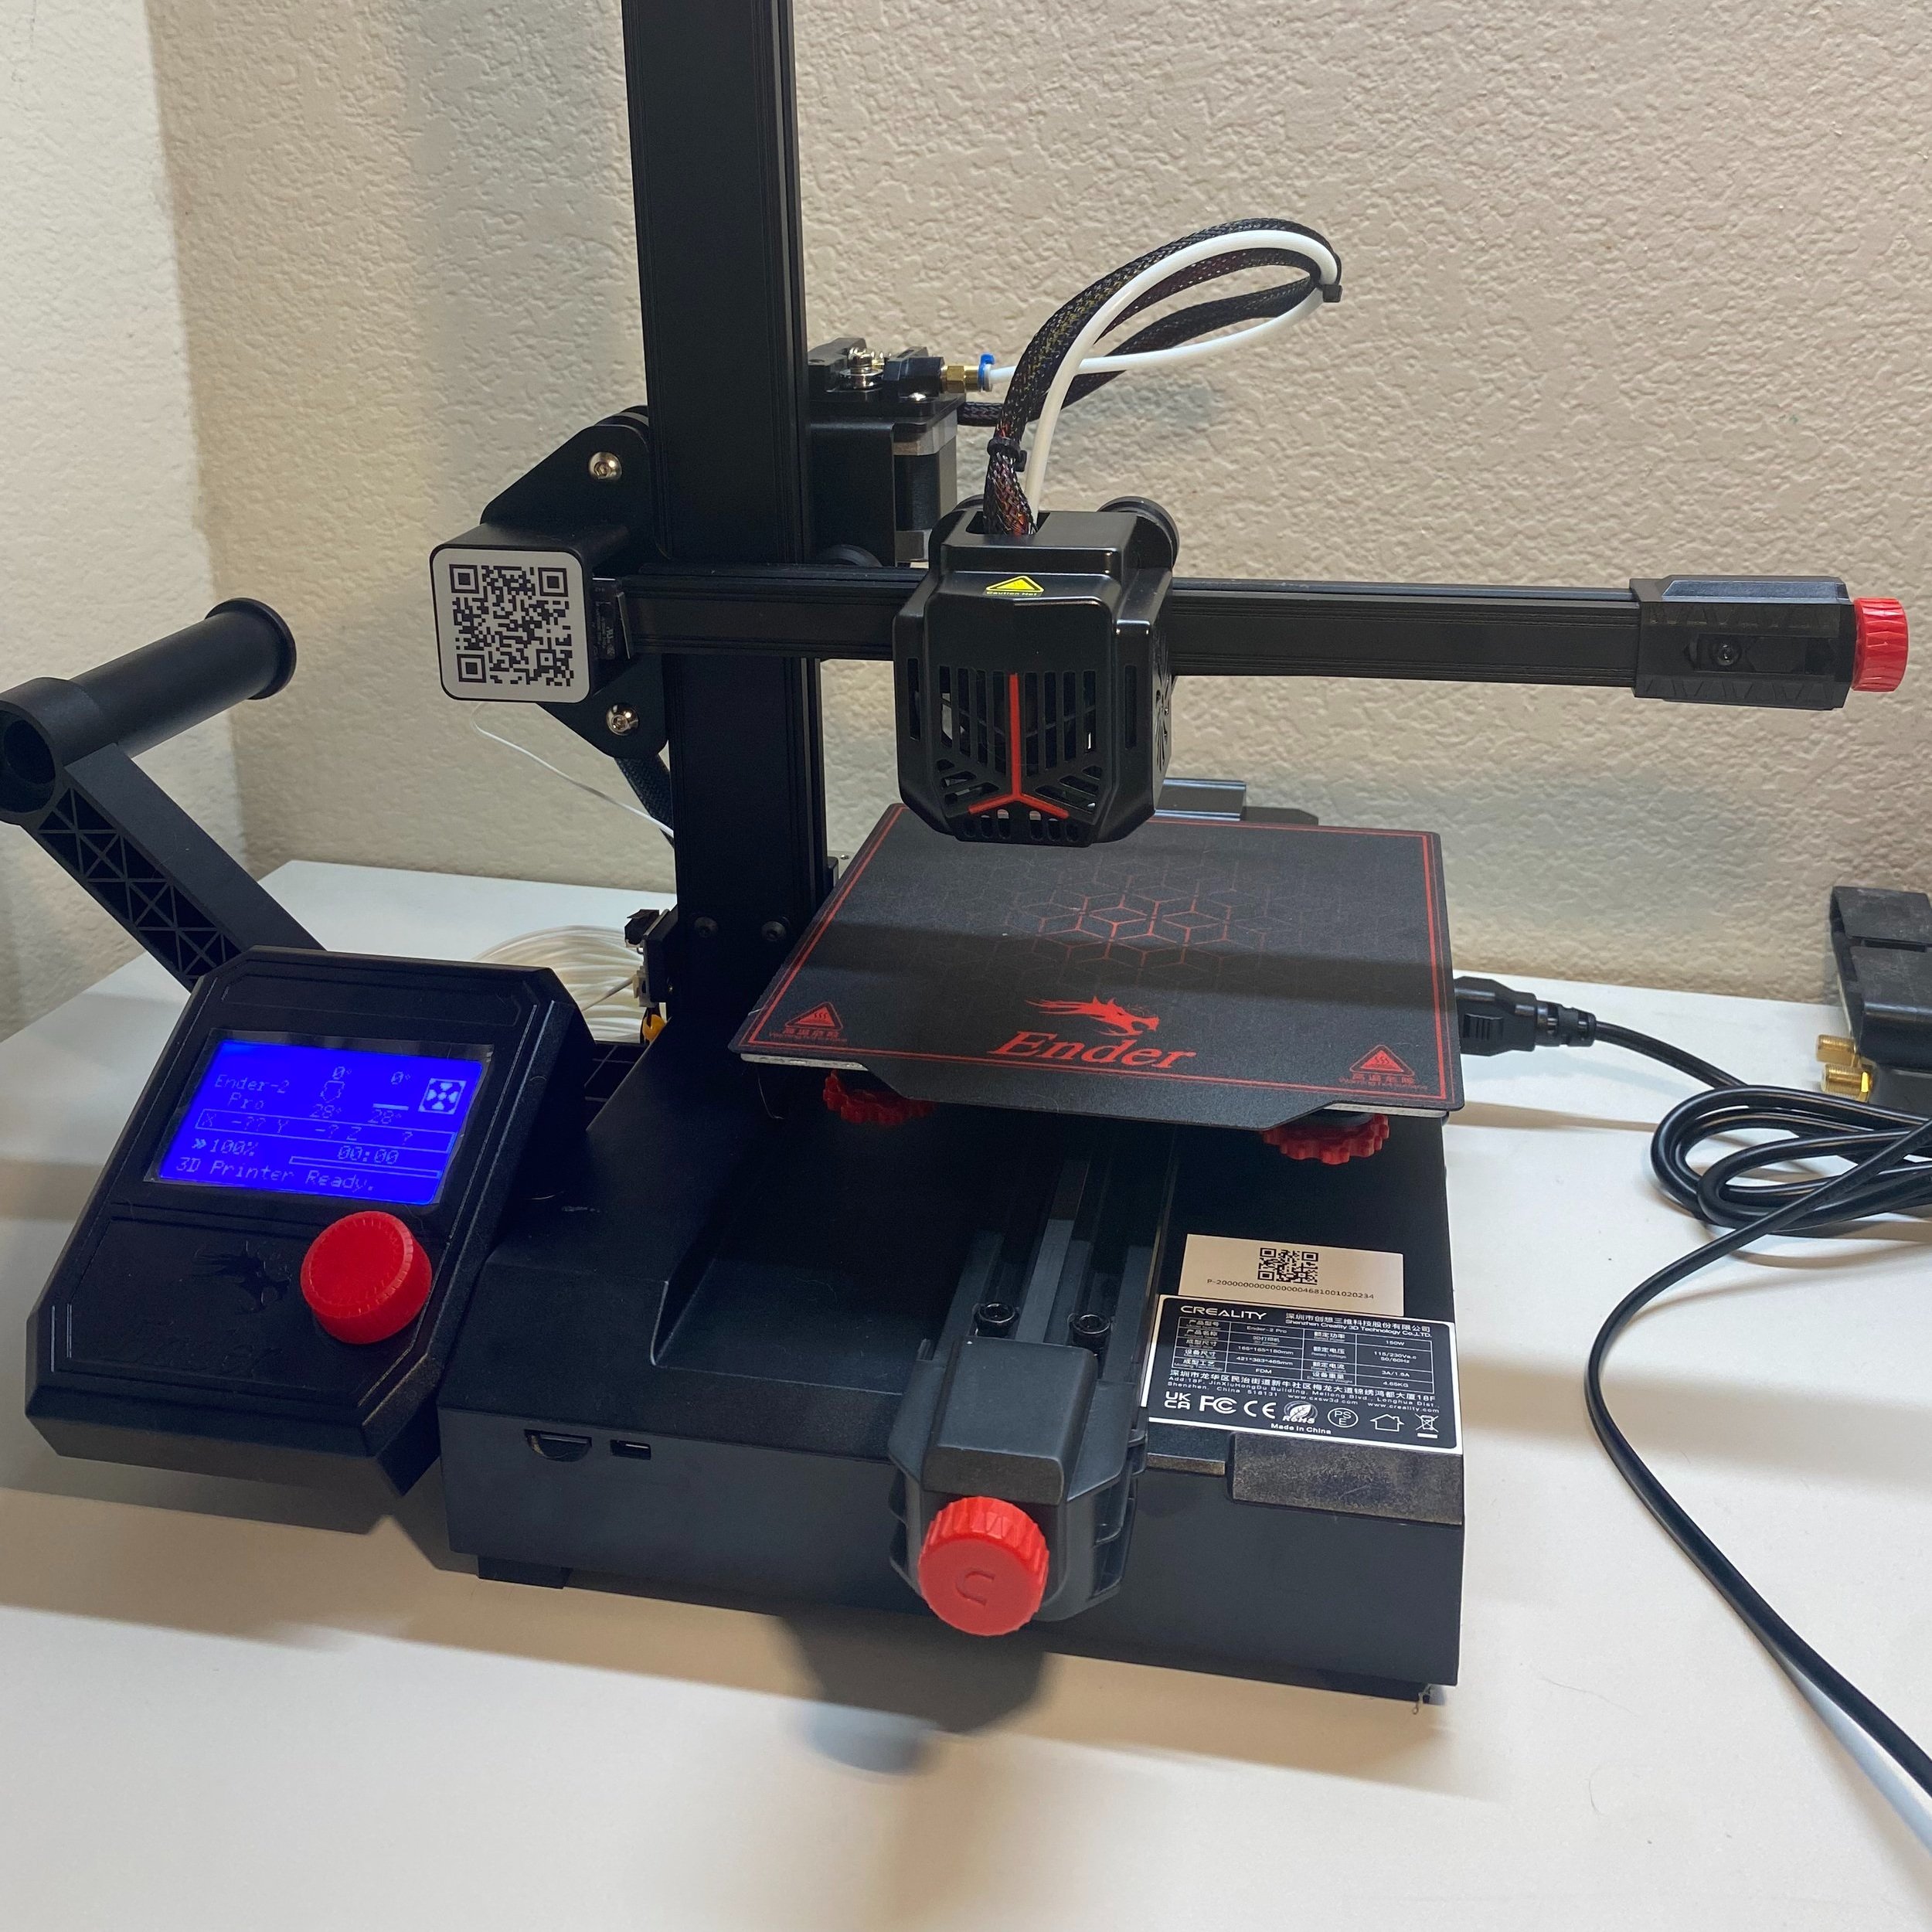
The Ender 2 Pro includes a couple of features aimed at mobility, including a top-mounted handle and a foldable LCD and spool holder, which allow the printer to fold into a more compact form for transport.
Print Bed Surface

The Ender 2 Pro bed surface is magnetic and removable. By contrast, the Ender 3 surface is fused to the print bed.
While both printers feature a heated print bed, the bed material is a notable difference. The Ender 3 uses a matte build surface which has very good adhesion, however removing prints can be difficult. Additionally, this bed style is prone to damage if a print sticks too well, or if the nozzle ever gets too close to the print bed due to incorrect bed leveling. The Ender 2 Pro’s bed is similar, but somewhat addresses these issues by featuring a magnetic removable bed which you can remove and bend to help remove the print more easily.
For either printer, we recommend upgrading to either a glass or PEI bed. Glass will provide great adhesion when the bed is heated, but release the parts easily as the bed cools, making them much easier to remove. Glass is also very durable and is not susceptible to damage from removing parts. We typically use glass beds since they are great for printing large parts. We do need to occasionally spray the bed with hairspray to maintain the adhesion.
We have recently started using PEI bed surfaces and found that they do very well with adhesion for small, intricate parts. The parts stick to the bed even after they cool, but PEI beds can be removed and flexed to remove parts more easily.
Bed Leveling
Unsurprisingly, neither of these low-cost 3D printers include auto bed leveling, which is a nice to have feature that makes sure the first layer of your prints will always be the correct height. Instead, the Ender 3 and Ender 2 Pro require you to manually level the bed using the knobs on the base of the build plate. Fortunately, this isn’t something you will need to do with every print, but you may need to adjust it every so often. For more information see our article on the manual leveling procedure.
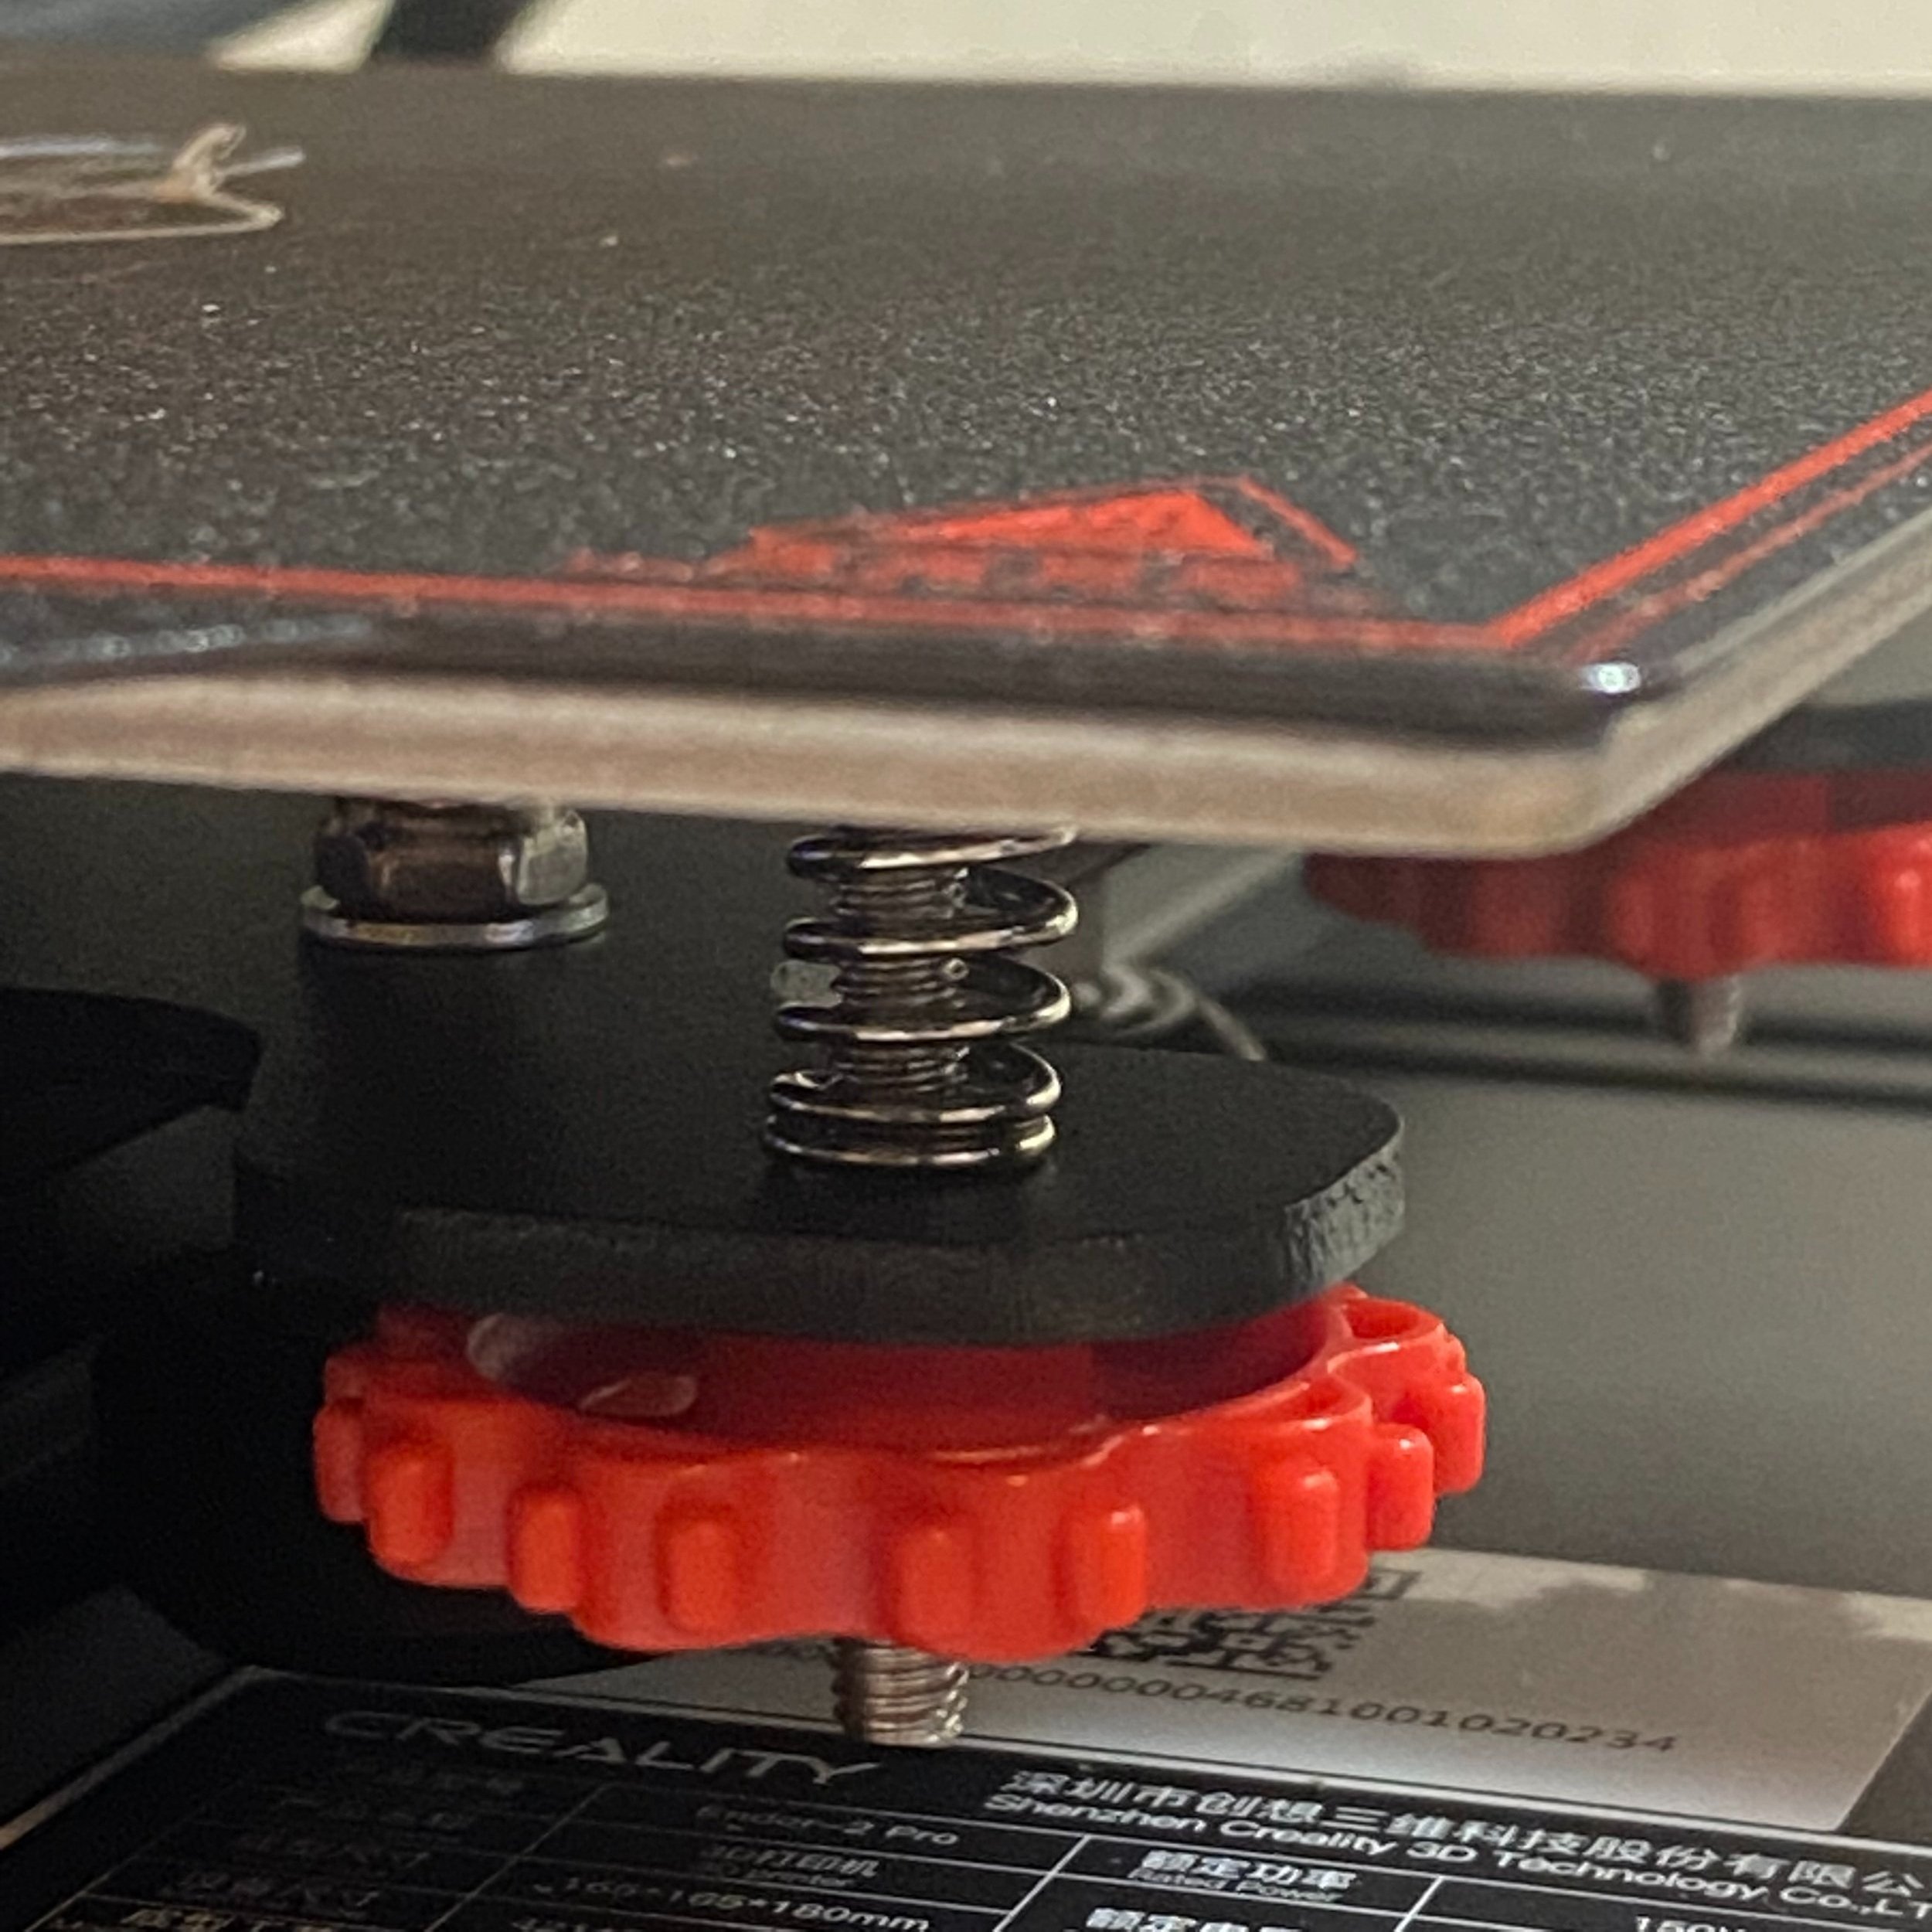
Both printers use thinner springs which aren’t as effective at holding the printer level over a long period of time.

As an upgrade, we recommend installing more rigid springs to improve the bed leveling on these machines.
Both printers use lower quality thin springs for the bed, which you may want to upgrade to reduce how frequently you’ll need to level the bed. You can find these springs on Amazon, and installing them is a very simple process that just requires removing the four bed nuts and lifting the bed from the printer.
Other Features
The Creality Ender 2 Pro is equipped with thermal runaway protection, a safety feature which ensures that the heated bed and hot end will not overheat if the temperature sensor malfunctions. Since this feature is not present on the Ender 3, we recommend you do not leave that printer running unattended for long periods of time. Both 3D printers are also equipped with power recovery, allowing you to resume a print if the printer shuts off due to a power failure. Both printers run on 24V DC power, so be sure to use 24V components when replacing parts such as heater cartridges or fans.
Ambient Sound

The Ender 2 Pro is the clear winner if you are looking for a quiet printer. It includes an upgraded silent mainboard with improved quiet motor drivers that drastically reduce the sound of the printer motors. Printers without these drivers produce a song-like sound while the motors are moving, which can be difficult to ignore. In contrast, the ambient sound of a fan tends to fade into the background.
Beyond this, enclosures are a great way to reduce the sound of a printer. Creality offers a custom fit enclosure for the Ender 3 which can further reduce the sound of the printer, and is compatible with both of these machines. Also, if you’re planning to print in ABS, an enclosure is critical since keeping a higher ambient temperature prevents parts from warping at the corners.
Print Quality
You may think that you’ll have to sacrifice on print quality with a budget 3D printer, but both of these machines are capable of producing very good prints without too much calibration. One thing we have seen is that higher end machines tend to have larger cooling fans, which will allow you to print overhanging features with better quality, however these printers do just fine with most applications. We’ve included a few sample prints from each printer to give you an idea what you can expect. Overall, the print quality is about the same between both machines.

Our first print using the included gcode file on the Creality Ender 2 Pro. The print looks perfect except for some minor stringing between the ears, which we didn’t see on other prints (this typically relates to retraction settings and is easily fixed).

A sample Benchy print from the Ender 2 Pro without any modifications.

This Millennium Falcon print shows the details that the Creality Ender 3 is capable of.

A sample Benchy print from the Ender 3 without any modifications.
Budget 3D Printer Trade-offs
When purchasing a budget 3D printer, there are a few things you’ll have to do without that come with more expensive models:
No automatic bed leveling - Neither of these printers include automatic bed leveling, which is a convenient feature that makes sure your first layer is the right height before each print. First layer height is a frequent cause of print failures, since starting too high will lead to the print detaching, while starting too low can restrict filament flow and cause jamming. Leveling manually is not hard, but you’ll need to pay more attention to leveling and being sure the first layer looks good.
Limited build volume - While the Creality Ender 3 offers a fairly large build volume for the price, Creality offers many larger machines, with many printers capable of printing 300x300x300 mm or larger, such as the Ender 3 Max, which is very affordable for its size. If you are planning to print functional parts, a larger build volume is one of the most compelling reasons to go for a more expensive 3D printer.
Some less reliable stock parts - In order to lower the price as much as possible, some components such as the plastic extruder assembly and power supply may not last as long as the more premium parts on higher cost 3D printers. Fortunately, these parts are not too expensive and can be replaced if needed. We have found that the core parts of the printer such as the hot end assembly, LCD, and mainboard, are just as reliable as those found on other 3D printers.
Older user interface - Both the Ender 3 and Ender 2 Pro have the same interface, utilizing a knob-controlled single-color LCD. More premium 3D printers tend to use larger multi color LCDs which use touch screens.
If you want to learn more about what to expect with a budget 3D printer, take a look at our article on budget 3D printers for a more detailed analysis.
Choosing The Best Budget 3D Printer
Before making our recommendations, review the differences for yourself in the table below:
Best First 3D Printer
We think the Ender 2 Pro is the best choice for a first 3D printer since it is much easier to assemble, and is small enough to fit on a desk when you don’t have a dedicated space to commit to a 3D printer. With your first 3D printer, you’ll be learning a lot about how printers work and dialing in the quality of prints, and having a mostly-assembled printer will make it easier for you to get started, and will minimize the likelihood of issues caused by incorrect assembly.
Best Printer for Tinkering
If you are looking to experiment with upgrading your 3D printer, the Creality Ender 3 (Amazon) is the best option for you. You can apply many upgrades yourself, such as a glass bed and upgraded power supply, and come out saving money on the printer even after the cost of upgrading. The Ender 3 has a large community and more history of upgrades for you to build on.
Overall Recommendation
We think the Creality Ender 2 Pro (Amazon) is the final winner due to the easier assembly and inclusion of modern features since it is a much newer machine. We feel that these advantages are worth the tradeoff of a smaller build volume for general use. However, it is really dependent on how much you anticipate printing larger parts. For example, functional parts tend to be larger, so if your goal is to print that type of part, the extra build volume of the Ender 3 makes it a more compelling choice for your needs.
If you are willing to increase your budget somewhat (into the lower 200s USD), the Creality Ender 3 Neo (view on Amazon) is a great choice that offers the build volume of the original Ender 3 with many of the newer features of the Ender 2 Pro. The Ender 3 Neo even adds a number of features that neither of the printers discussed in this article have, including automatic bed leveling, a metal extruder, and a high quality carborundum glass build surface.
If you are interested in exploring any of the other 3D printers offered by Creality, take a look at our more general Choosing A Creality Printer guide for an overview of the options and our thoughts on each.