
Creality Ender 3 Max Assembly Guide
The Creality Ender 3 Max is one of our top recommended 3D Printers for several reasons. It’s a 3D printer that has the unibody chassis and affordable price of the Ender 3 series, but with the larger 300 x 300 x 350 mm print area of the CR-10 series. It has many modern features of more expensive printers, and is also one of the easiest printers to set up and get started with. If you are looking for more information on the features of the Ender 3 Max, take a look at our Ender 3 Max vs Ender 3 V2 comparison for a detailed look. If you have the printer already, or just want to get a sense for how hard it is to assemble, keep reading!
The Ender 3 Max is straightforward to set up since many of the components come pre-assembled. The full process typically takes about 15-30 minutes depending on your experience level, and only requires the Allen wrenches that are included with the printer. There are a couple things to be aware of that will help make the process go smoothly, which we’ll go through in this step by step guide.
Note: Creality Experts receives a commission for items you purchase from this page, at no additional cost to you. For more information, please see our affiliate link policy.
Unboxing the Ender 3 Max
The Ender 3 Max is securely packaged in foam box inserts. Remove the pieces from the top insert, then remove the insert itself to reveal the main pieces of the 3D printer. Remove the gantry frame assembly from the box, but use caution since it is connected to the printer base assembly. Once removed, you’ll be able to remove the printer base assembly from the box.
The top insert protects the printer and contains the smaller components.
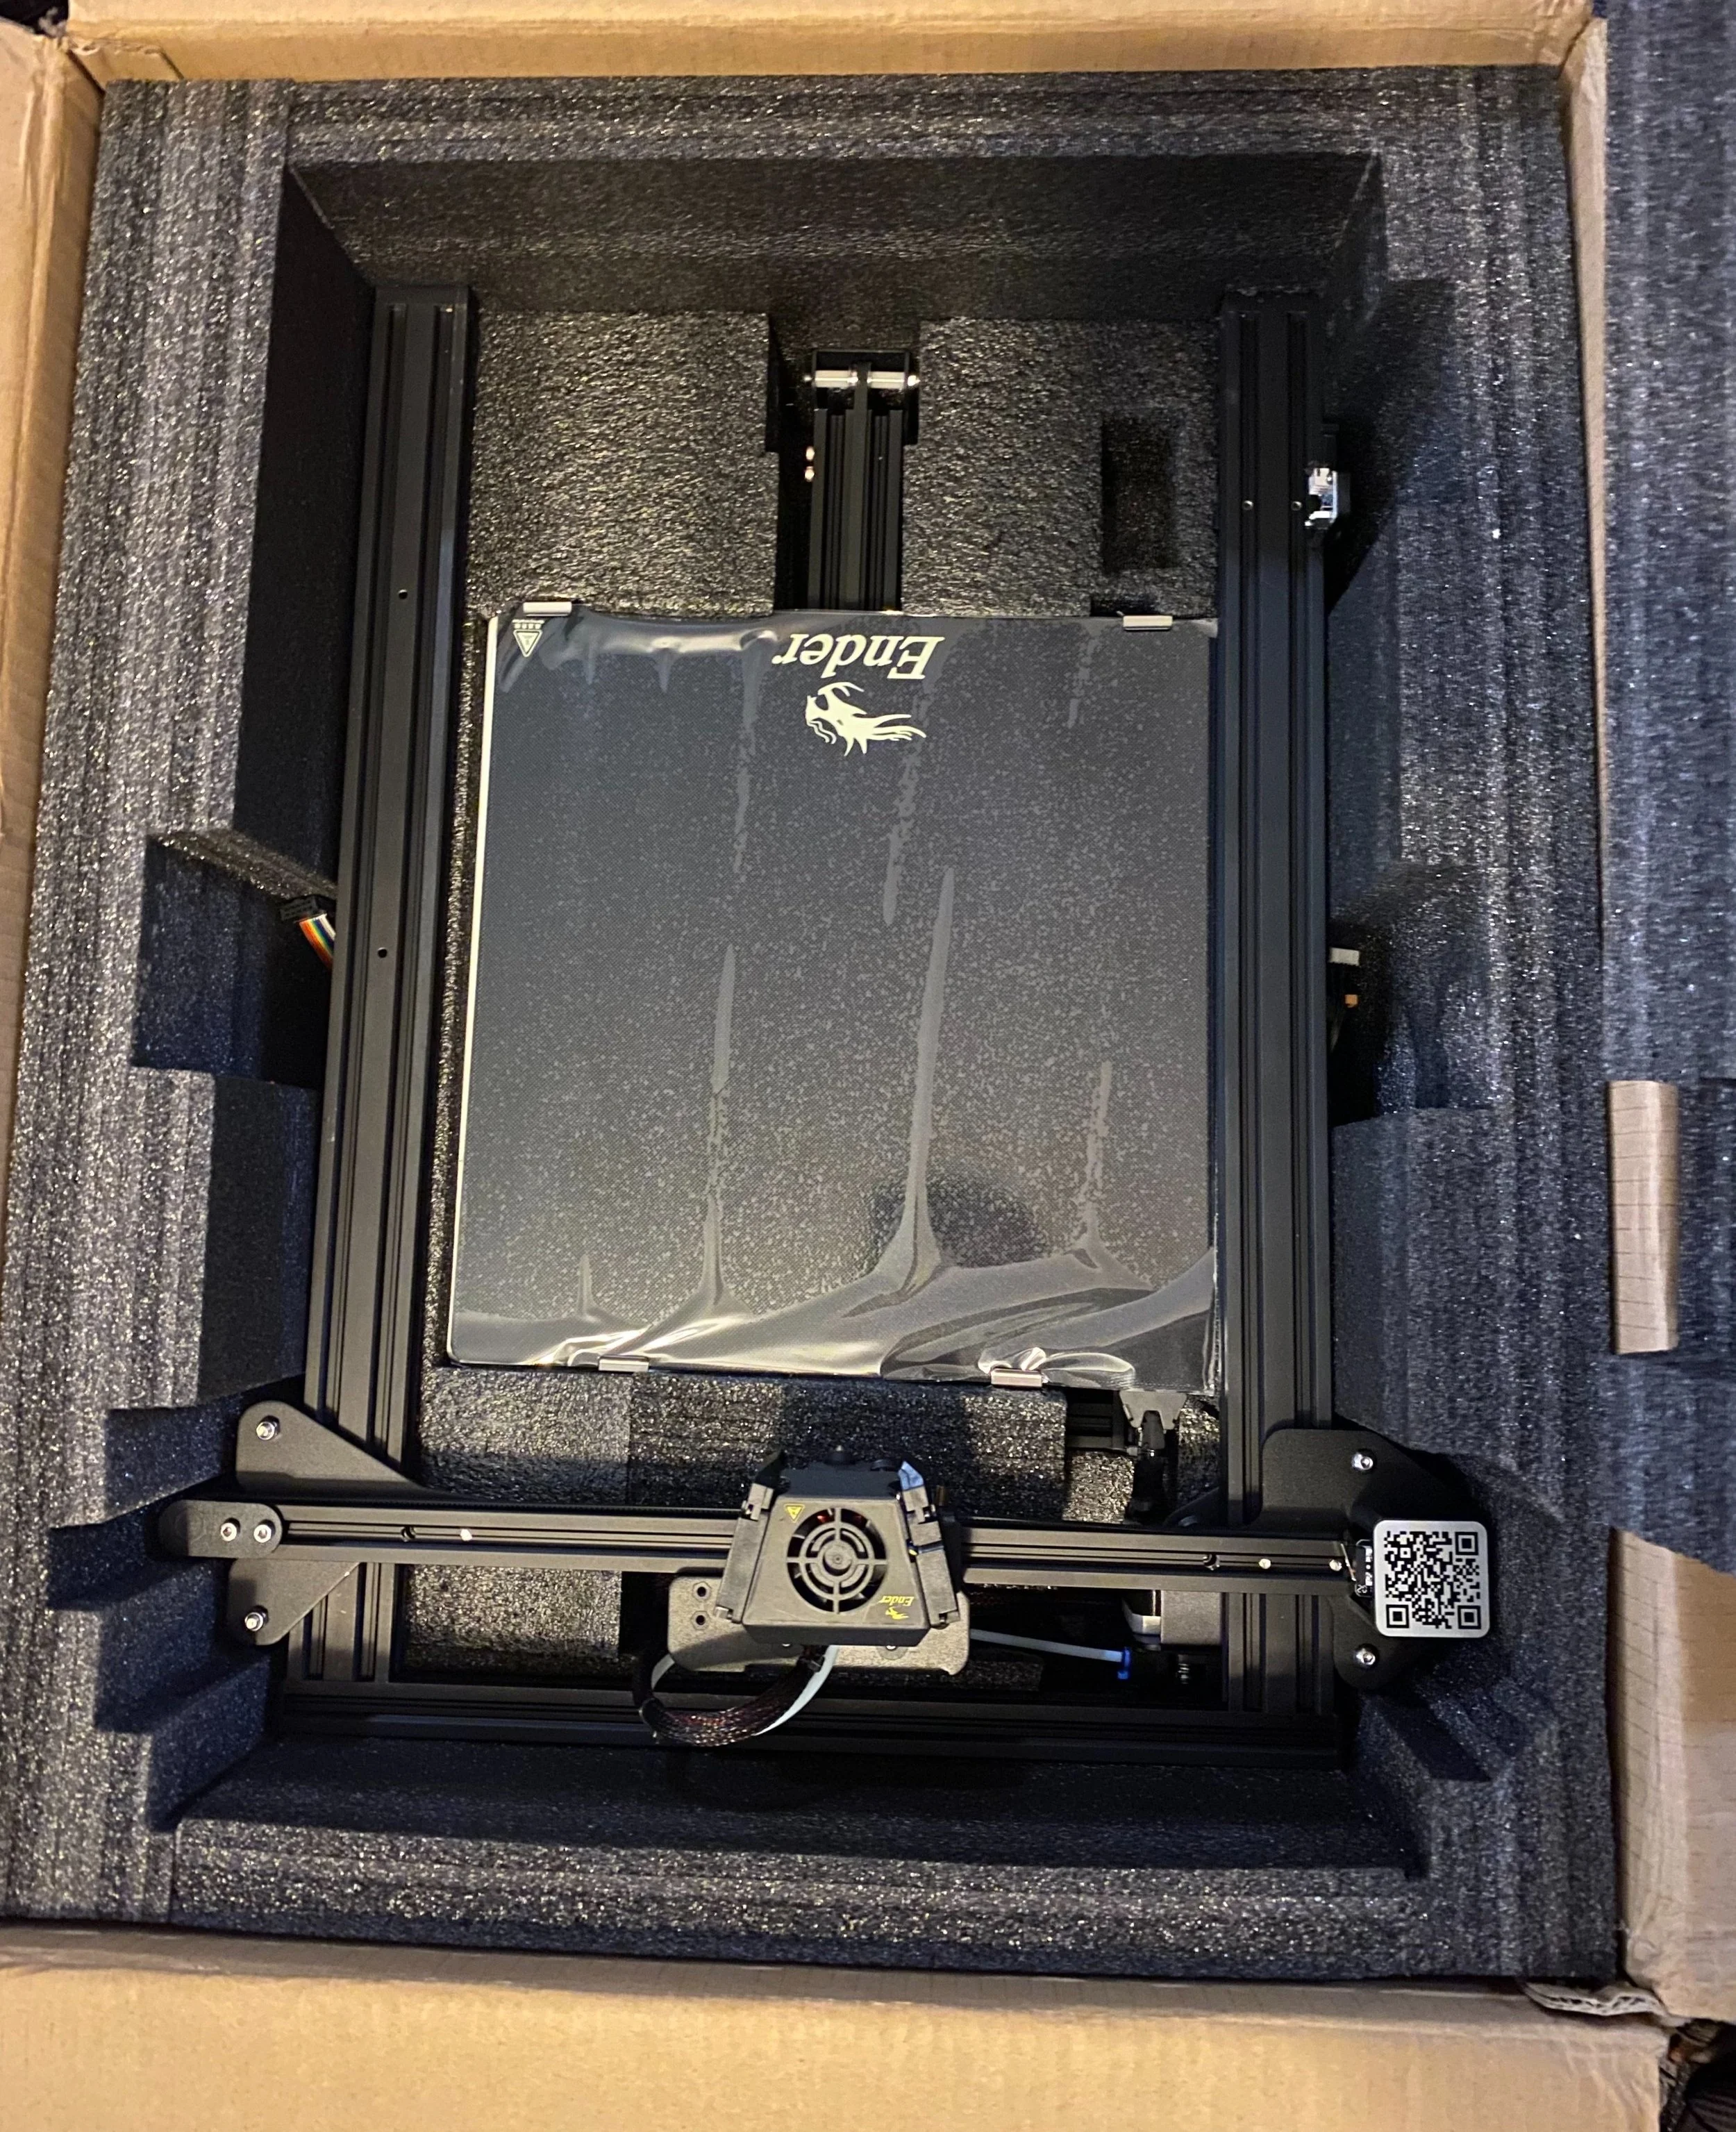
The main components of the printer are packaged under the top insert.
We’ll use the names in the image below when referring to the various parts in the assembly process:
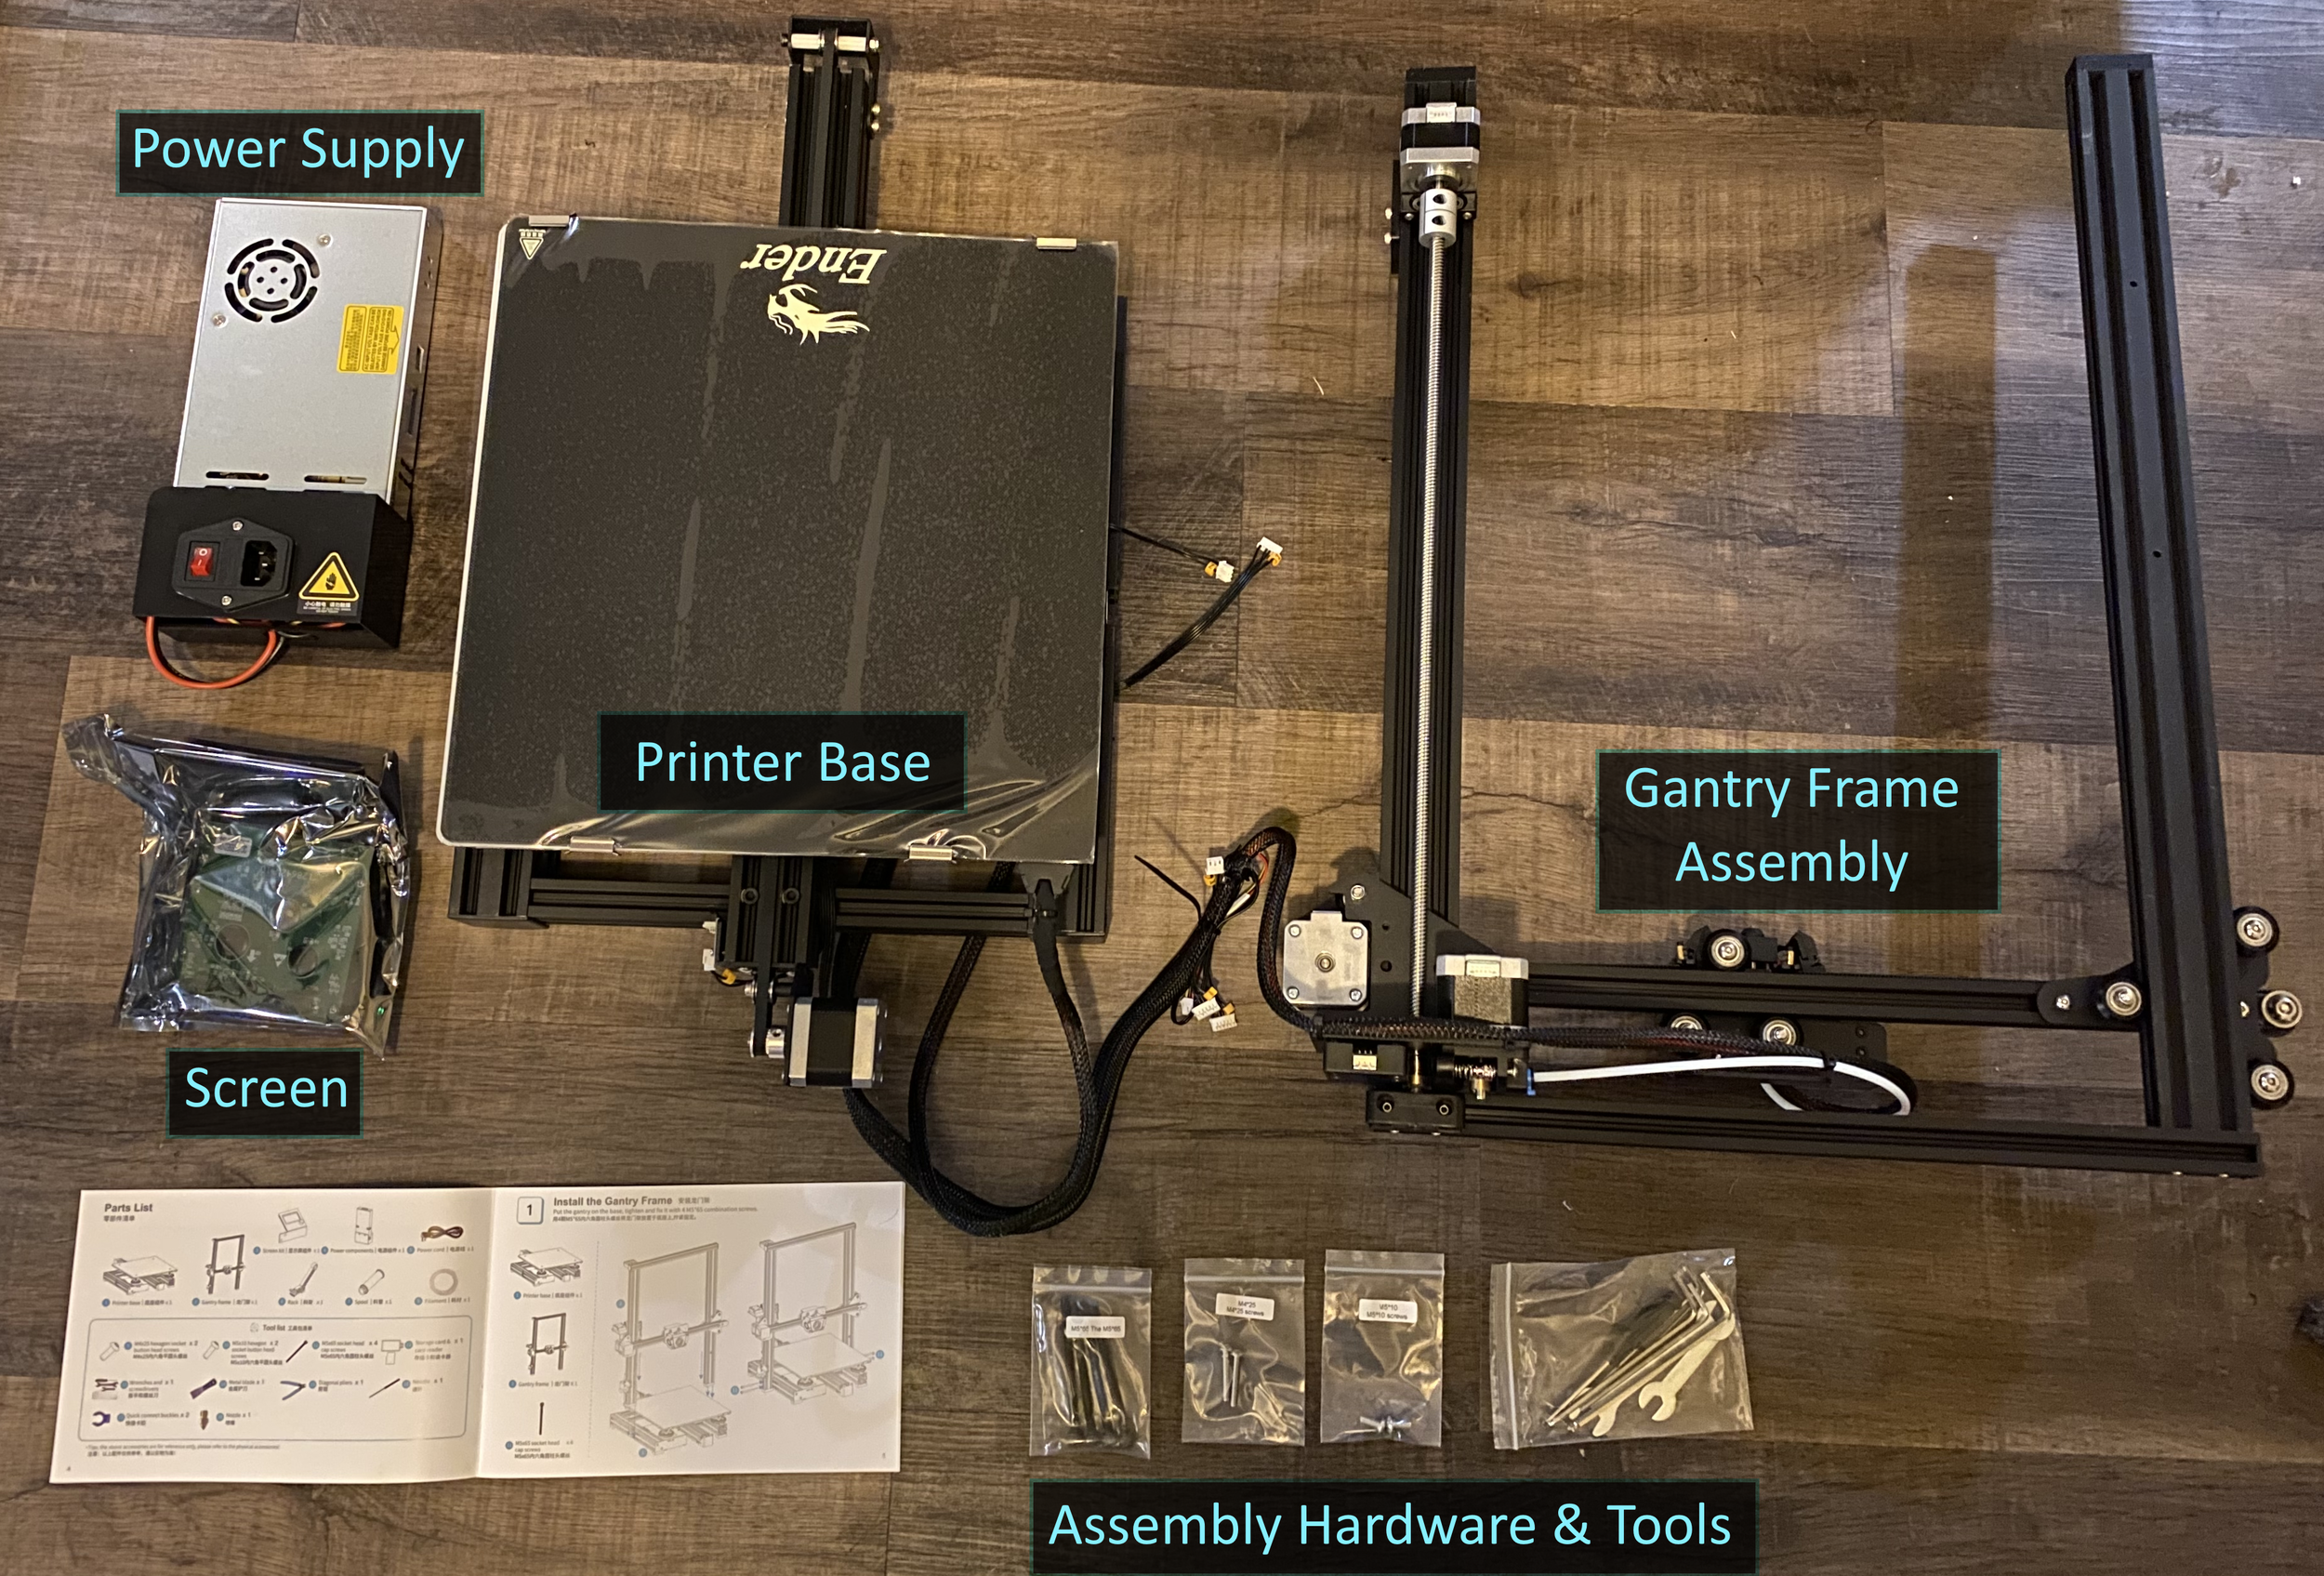
The components of the Ender 3 Max.
Assembly

Gantry Frame/Base Assembly Diagram (from the Creality Assembly Guide)
1. Mount the Gantry Frame to the Printer Base
The Gantry Frame is mounted using the 4 longest screws, two on each side of the Printer Base. The base has slots on each side where the two beams of the Gantry can slide in. Make sure that the pieces are oriented correctly as shown in the diagram, since they will fit in reverse as well.
When attaching these components, also be sure the cable connecting them is routed under the side of the Printer Base, and does not cross in front of the printer Gantry.
Note: We’ve included some of the diagrams in the instructions that are included with the printer. The full manual is available here:

Look for the indentions on either side of the printer base.
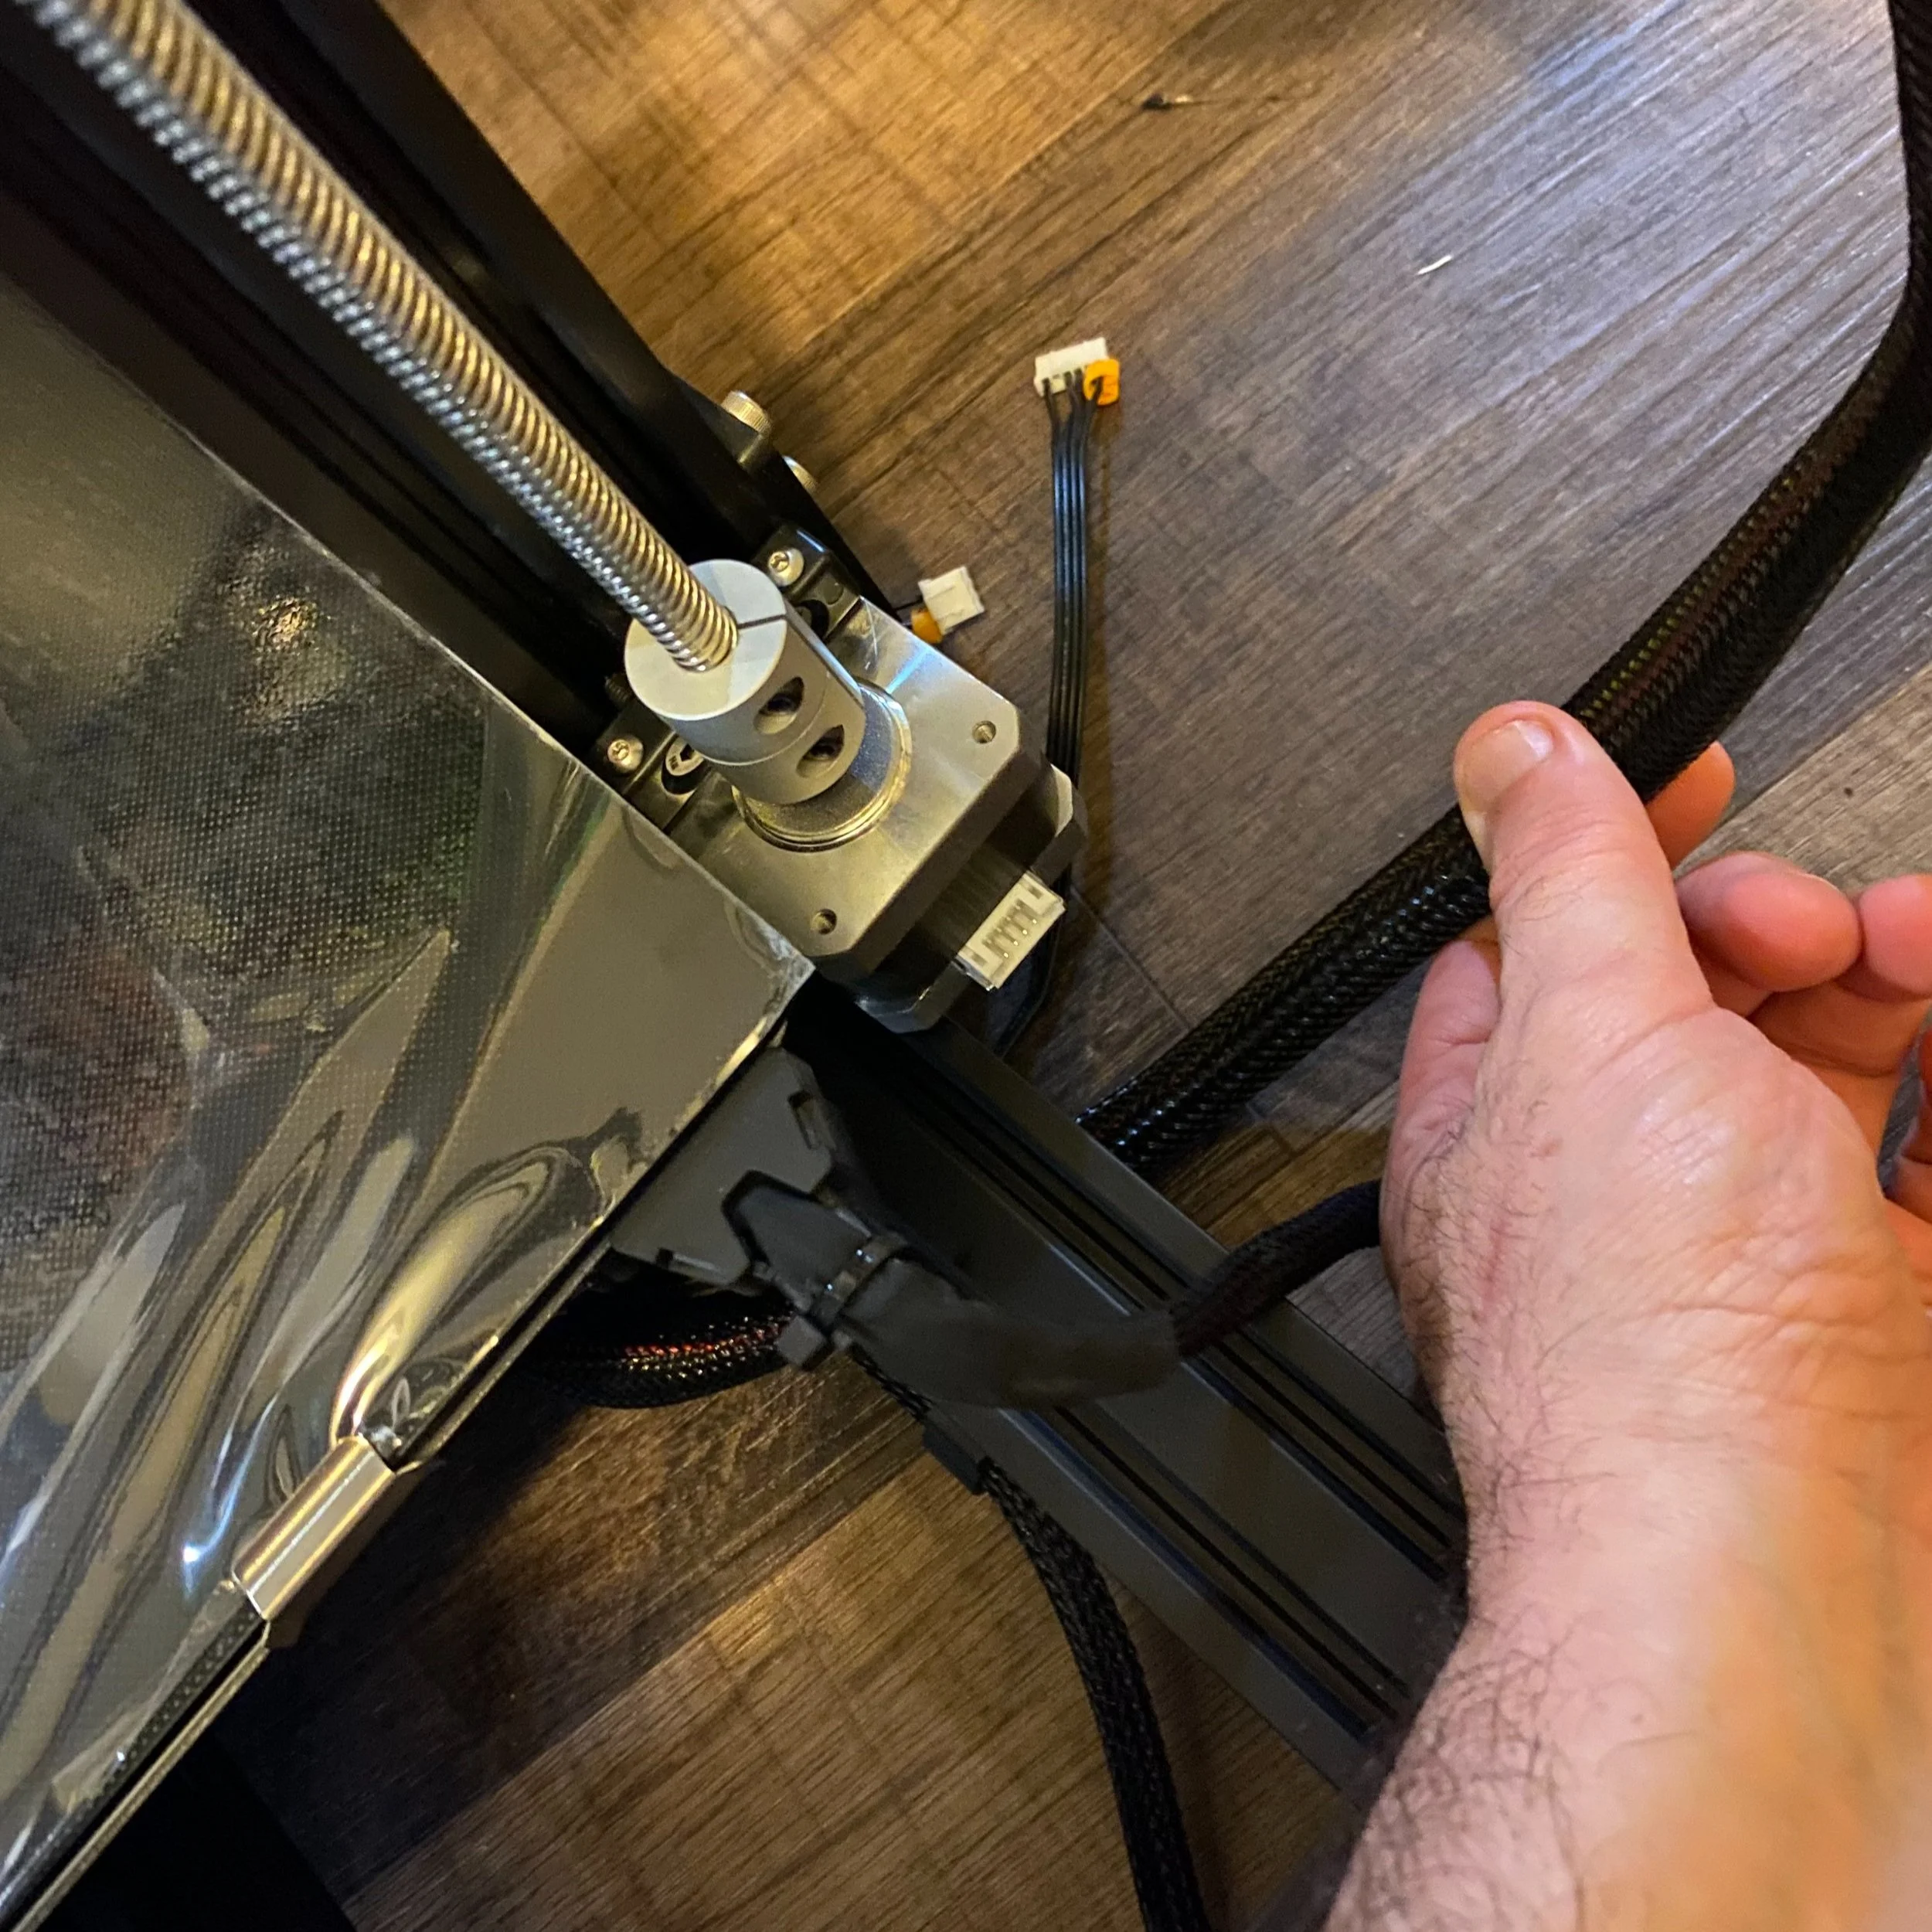
Make sure the connecting cable runs under the side of the base, and not in front of the gantry.
Install two black screws on either side to secure the pieces. You may want to prop the printer on something to get more range of motion for the Allen wrench.
2. Mount the Power Supply to the Gantry Frame

Mounting the Power Supply (from the Creality Assembly Guide)
Before mounting the power supply, find the red and black power connector cable. The cable may be wrapped within the plastic enclosure of the power supply. In this case, pull it out before mounting the Power supply.
The power supply is mounted to the right side of the gantry frame. You’ll see two holes on the frame where you use two 25mm screws (the larger ones) to mount the power supply.
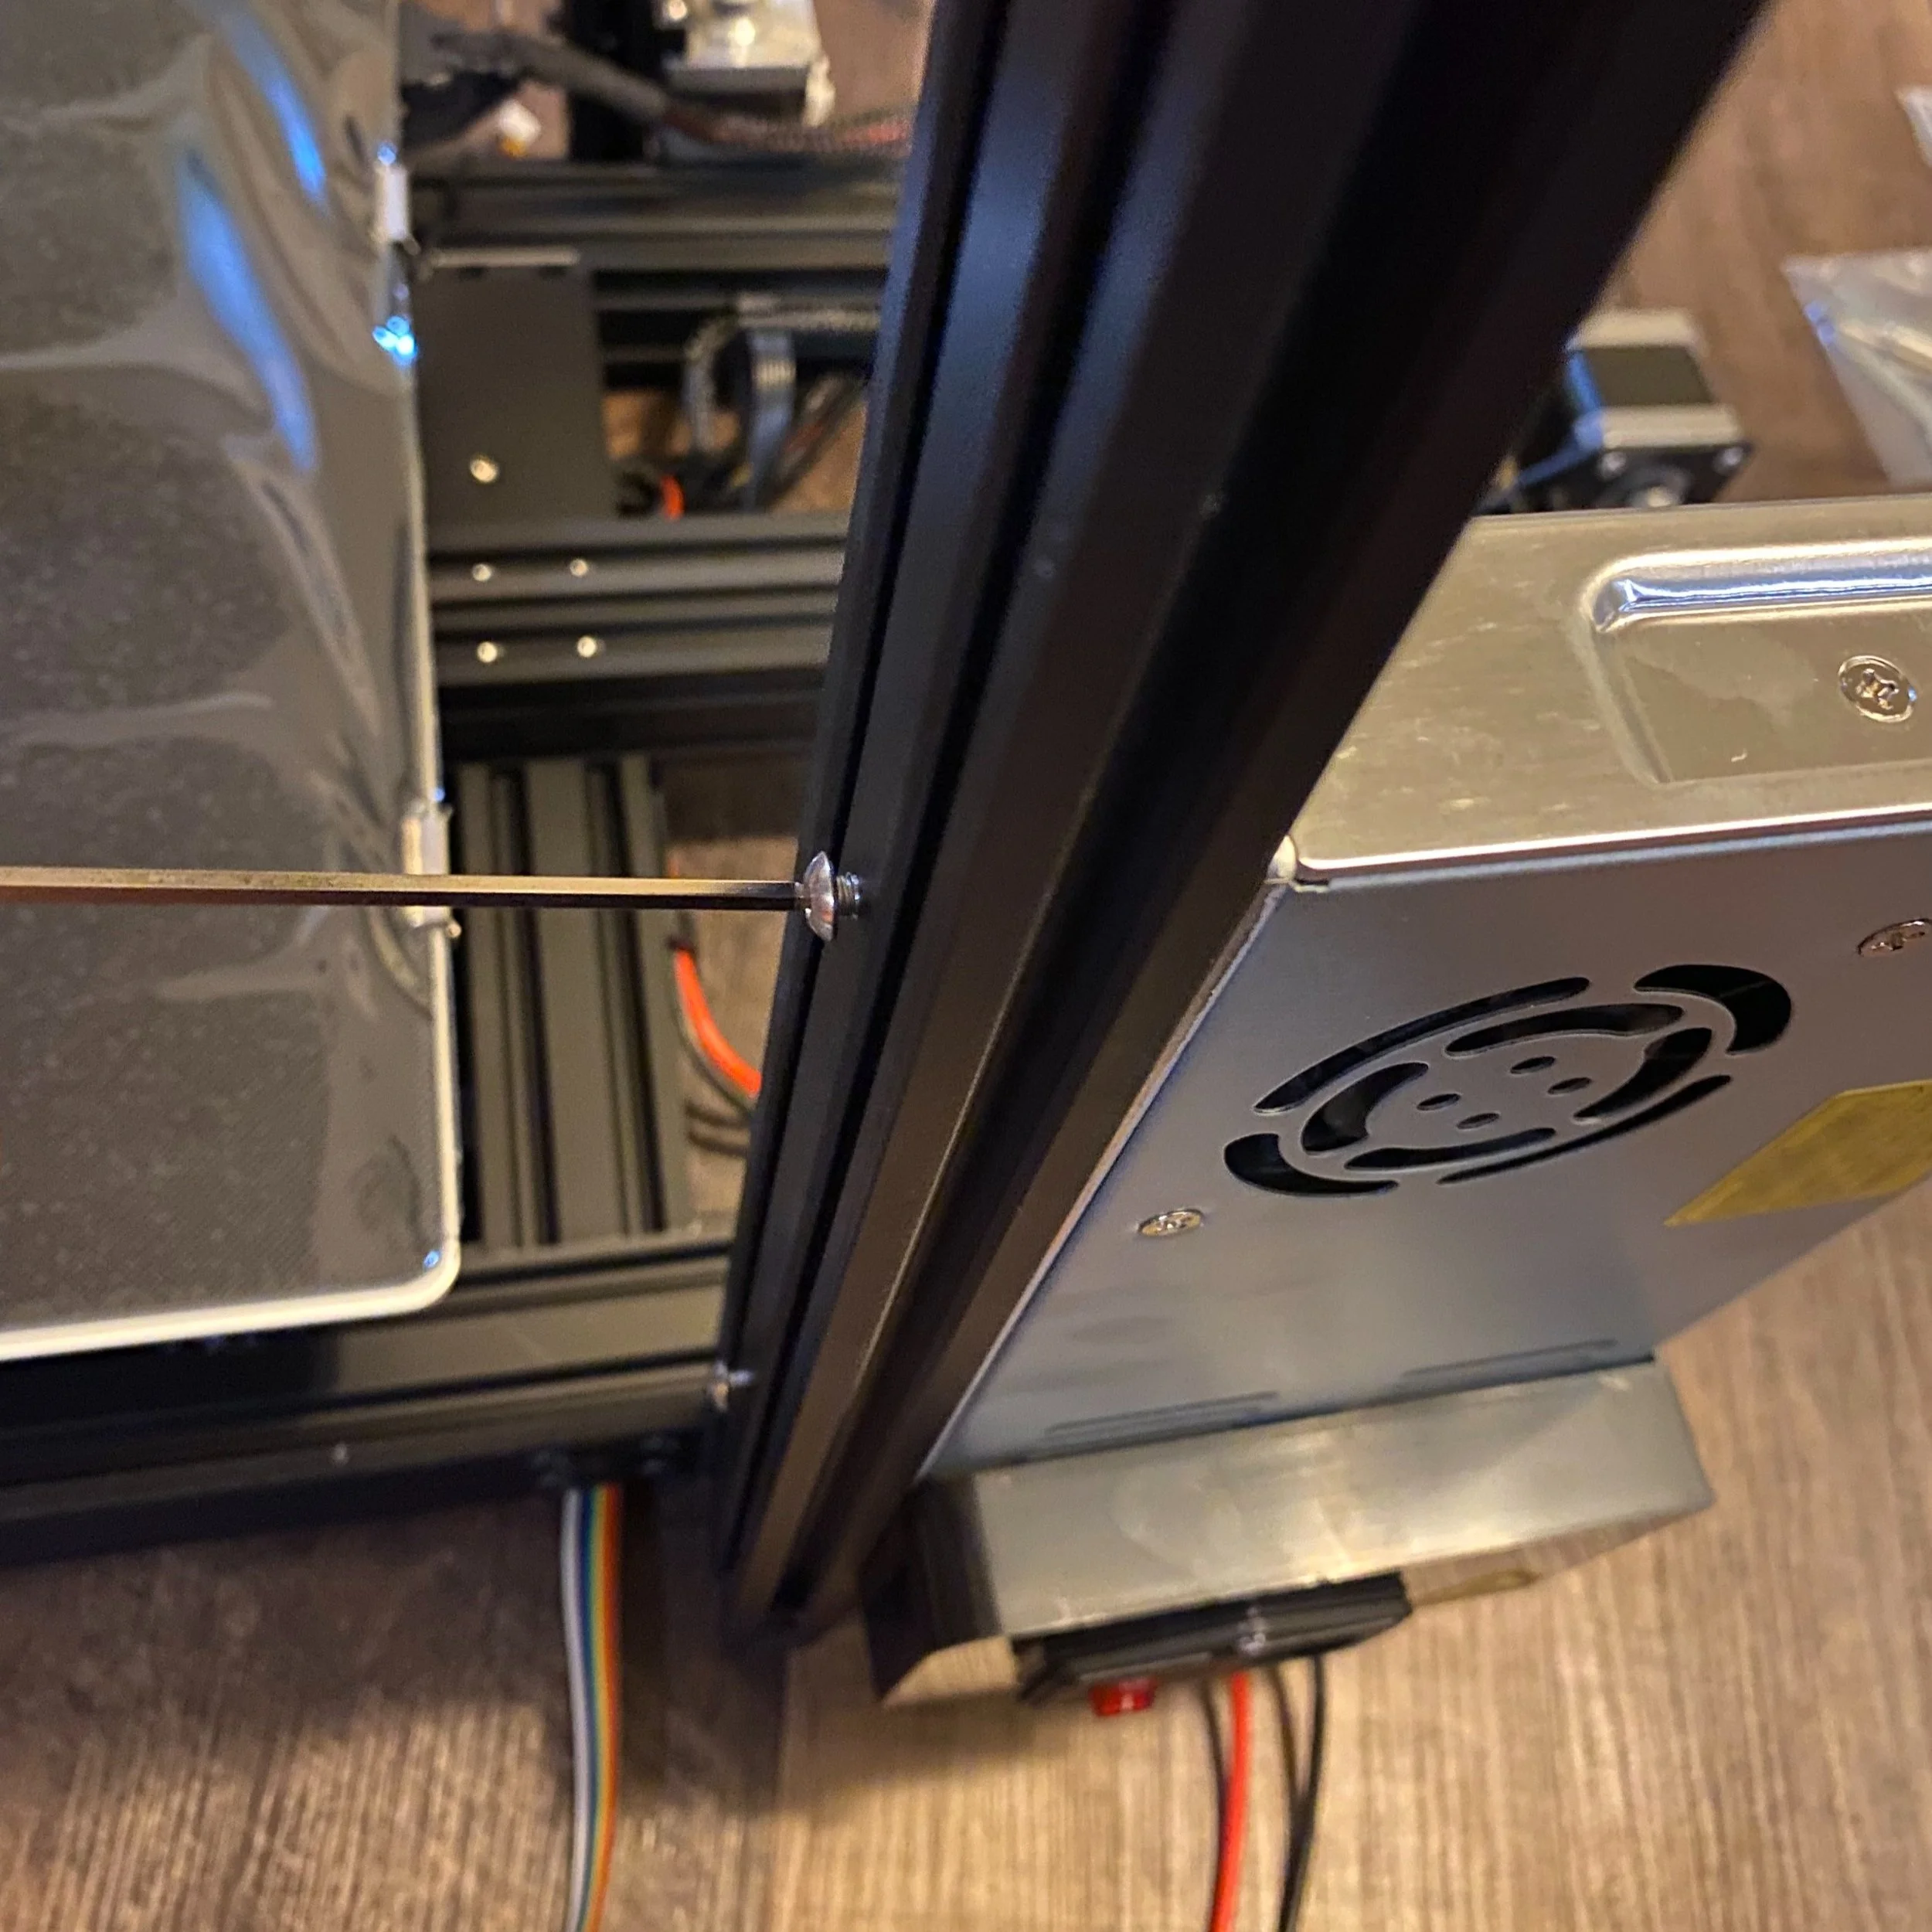
Once mounted, connect the red and black cable to the matching power cable on the printer base. Make sure that the cable is routed underneath the printer base to ensure it cannot be pulled when the printer bed is moving.
Check that the voltage setting on the power supply matches your local mains voltage. The switch is located on the rear of the printer (near the “4” in the diagram). In the USA, this should be set so that 115V is visible.
Mount the power supply with the two 25mm screws.
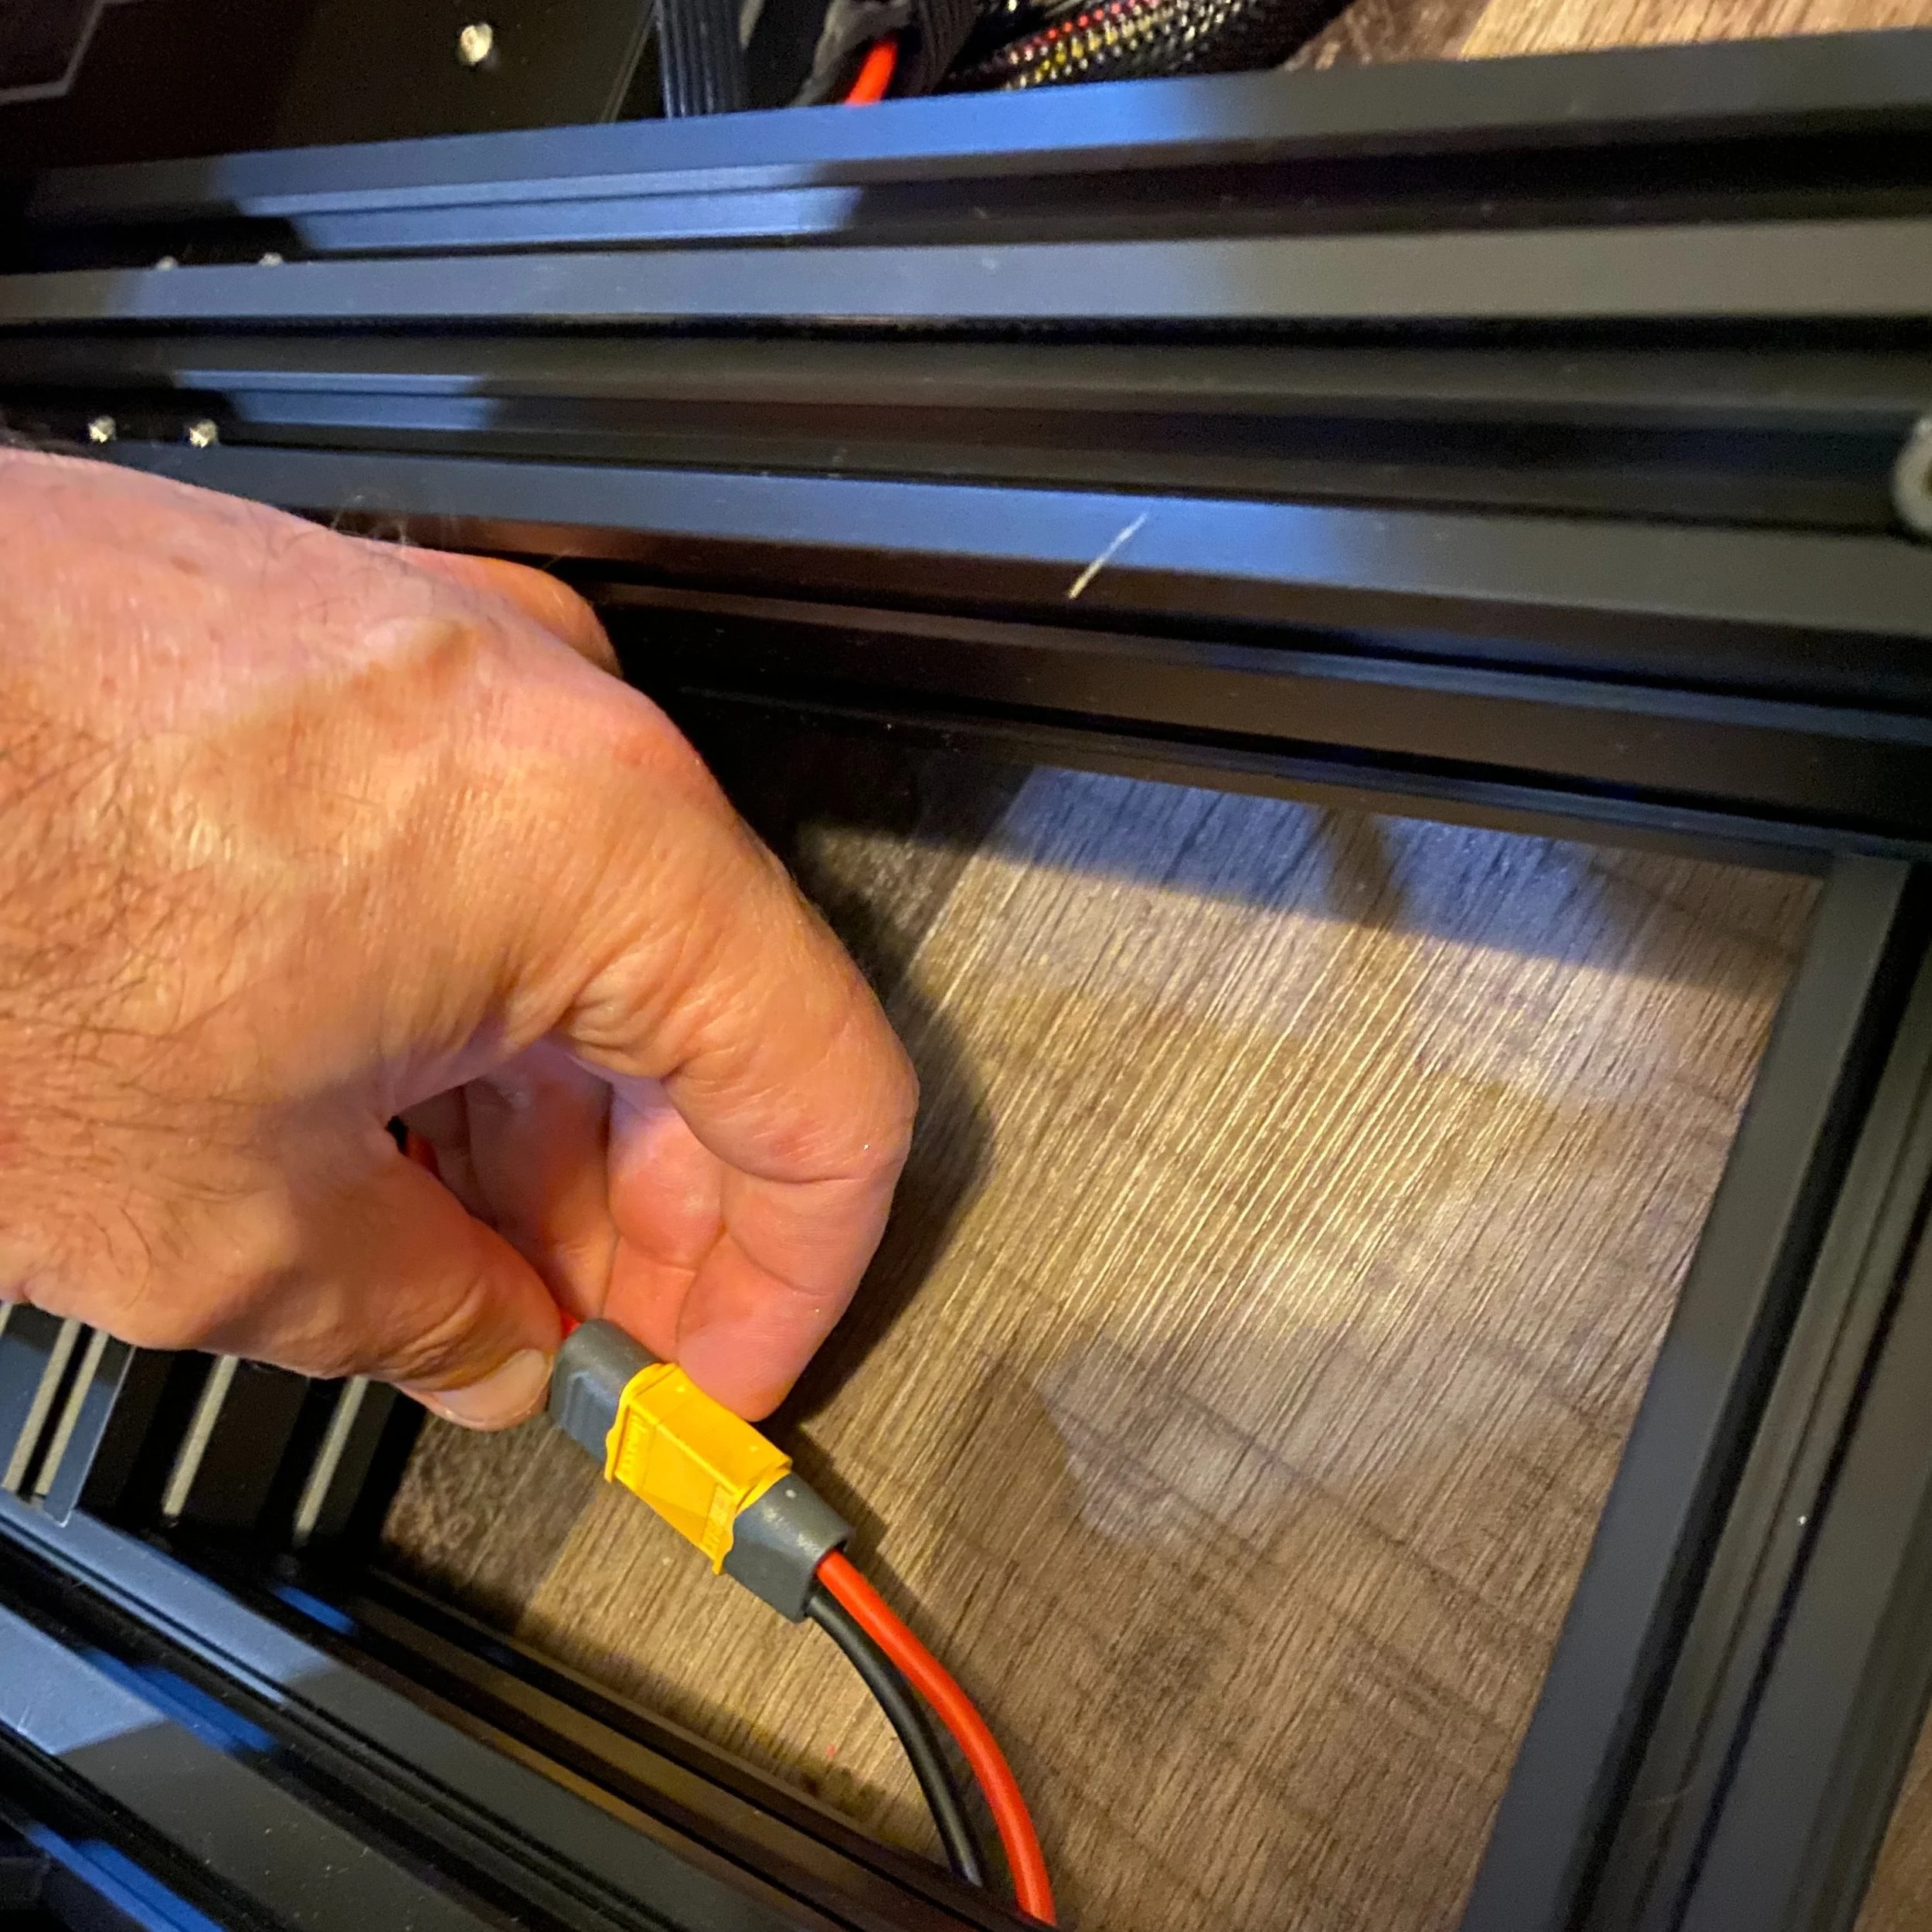
Connect the power cable, ensuring it is routed under the bed frame.
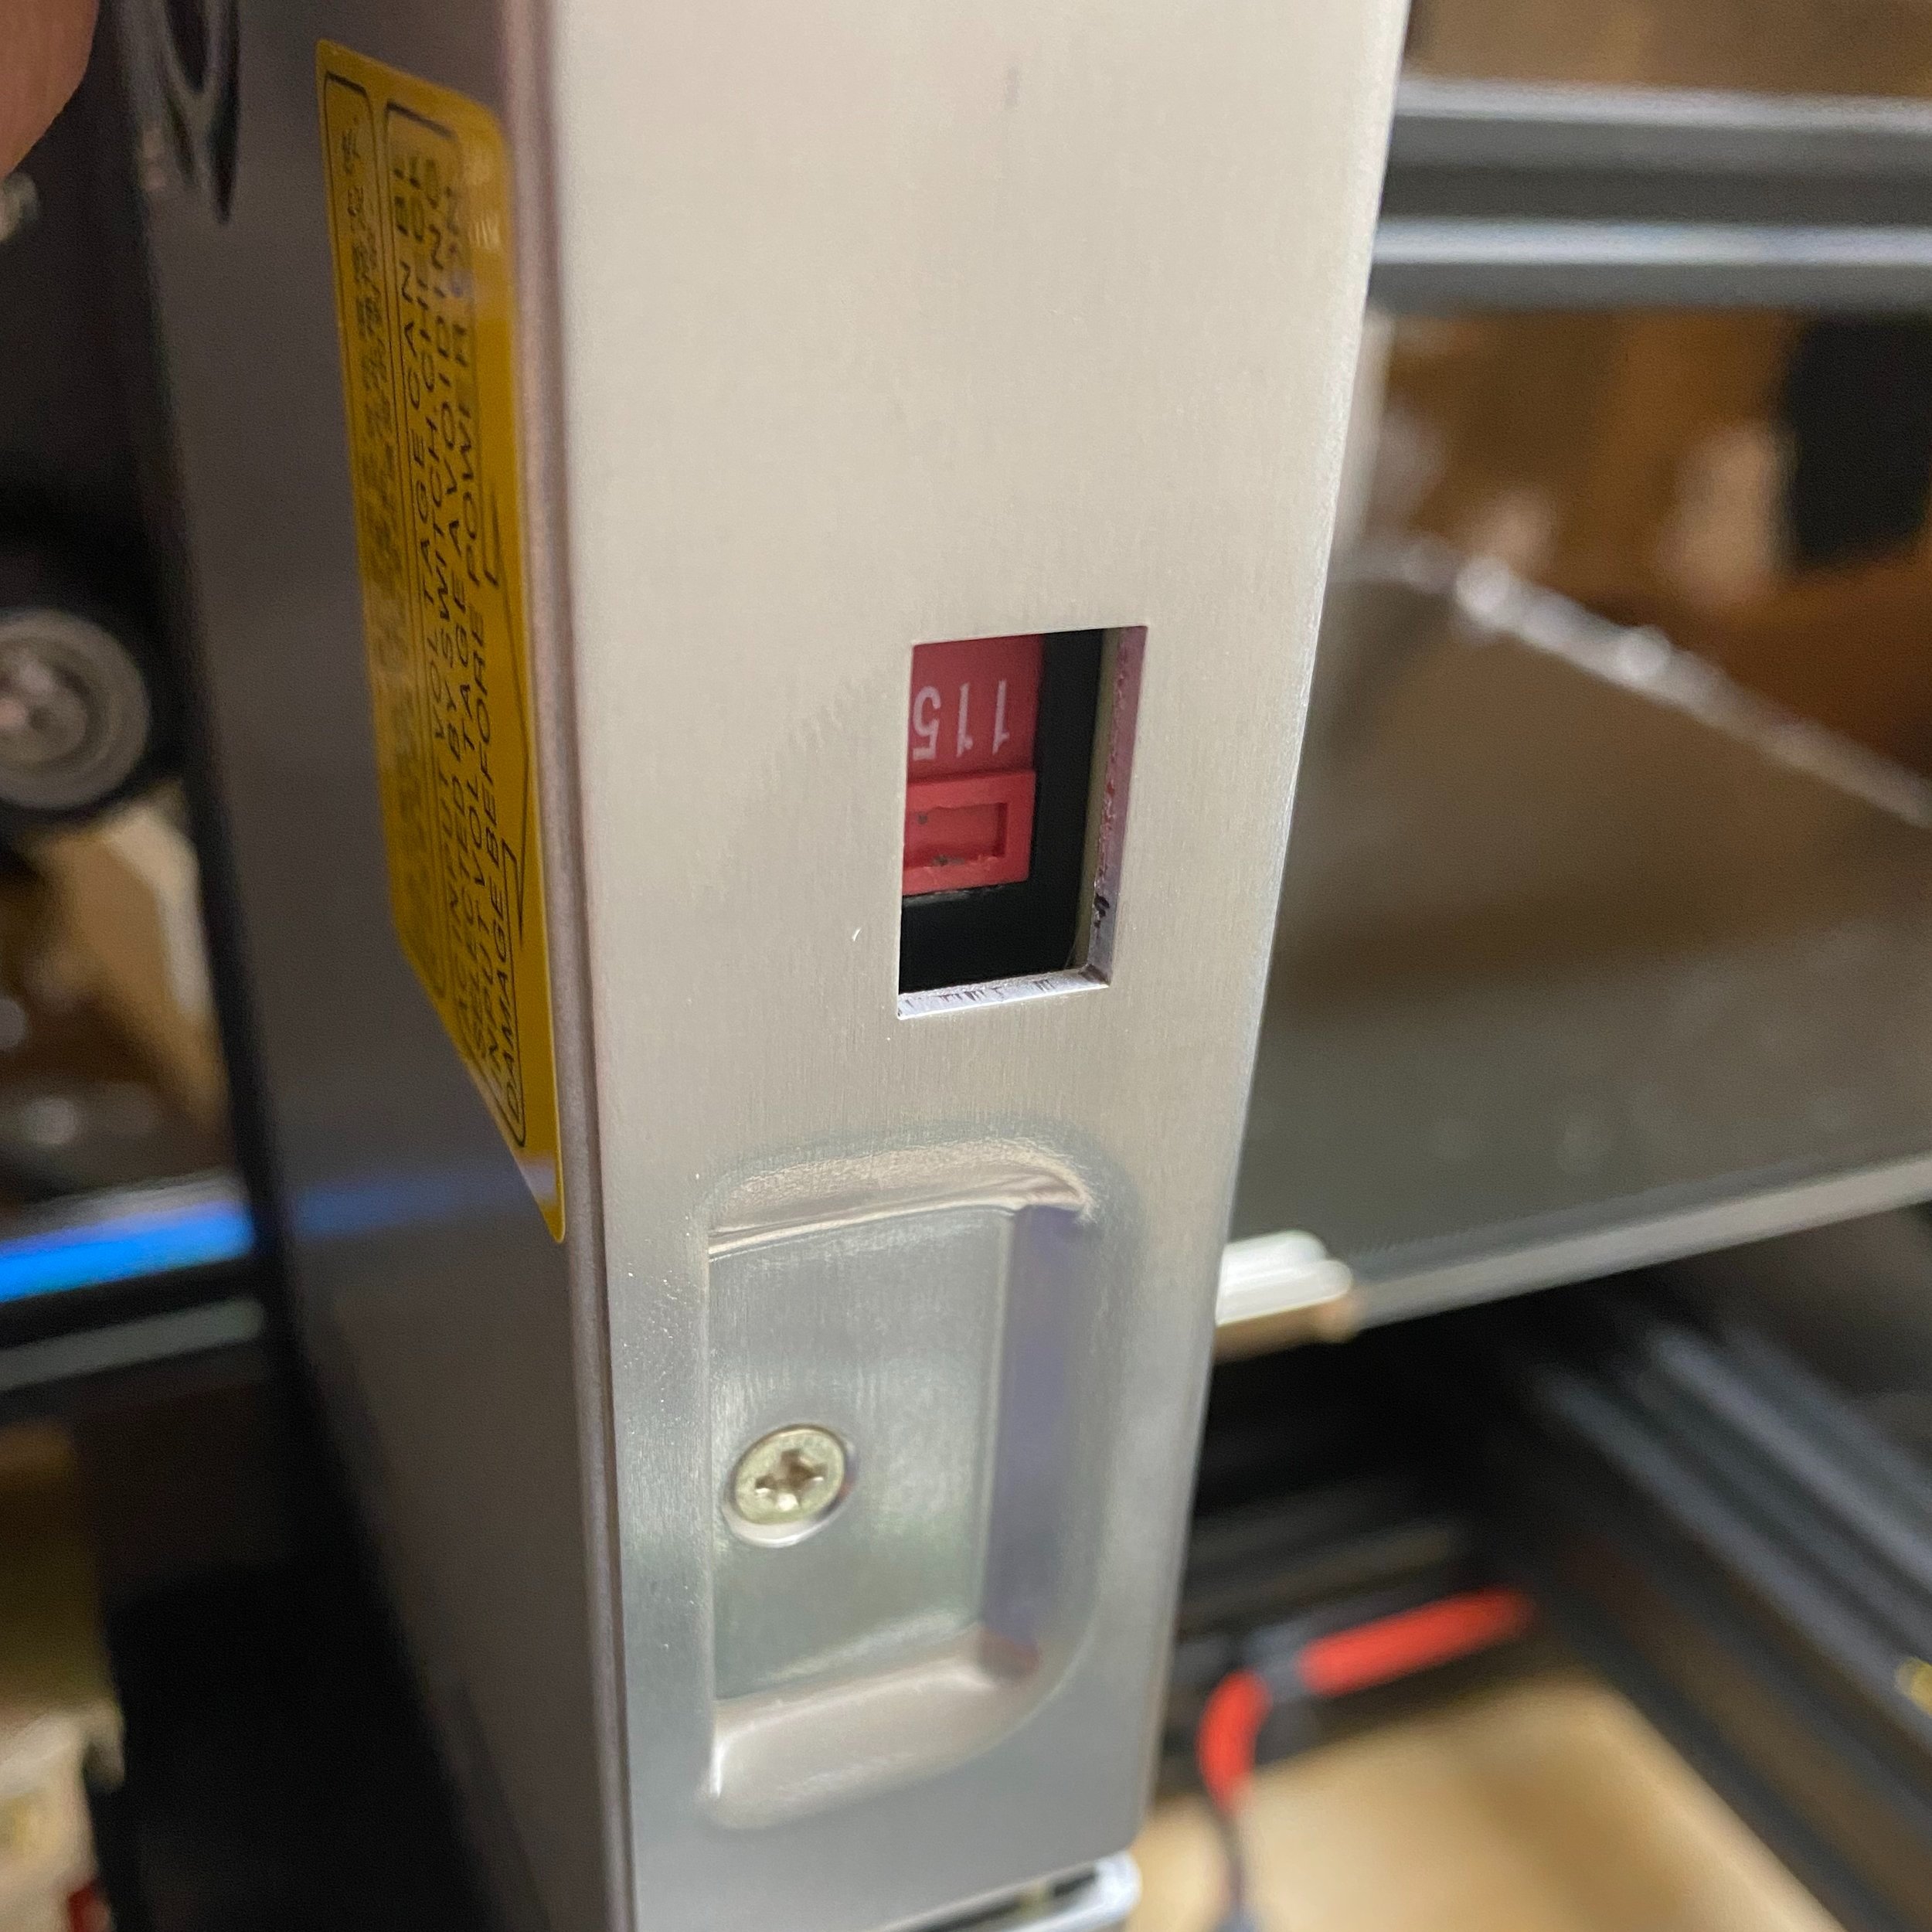
Ensure the voltage is set based on your local mains voltage (115V for USA).
3. Mount the Screen

Mounting the Screen (from the Creality Assembly Guide)
Unwrap the screen from the protective bag, then mount it to the front of the base using the two 10mm screws.
Once mounted, plug in the screen cable to the connector closest to the printer, or the left side if you are facing the front of the printer. If you do not install this cable to the correct port, the cable will fit, but the LCD will not show anything when the printer is powered on.
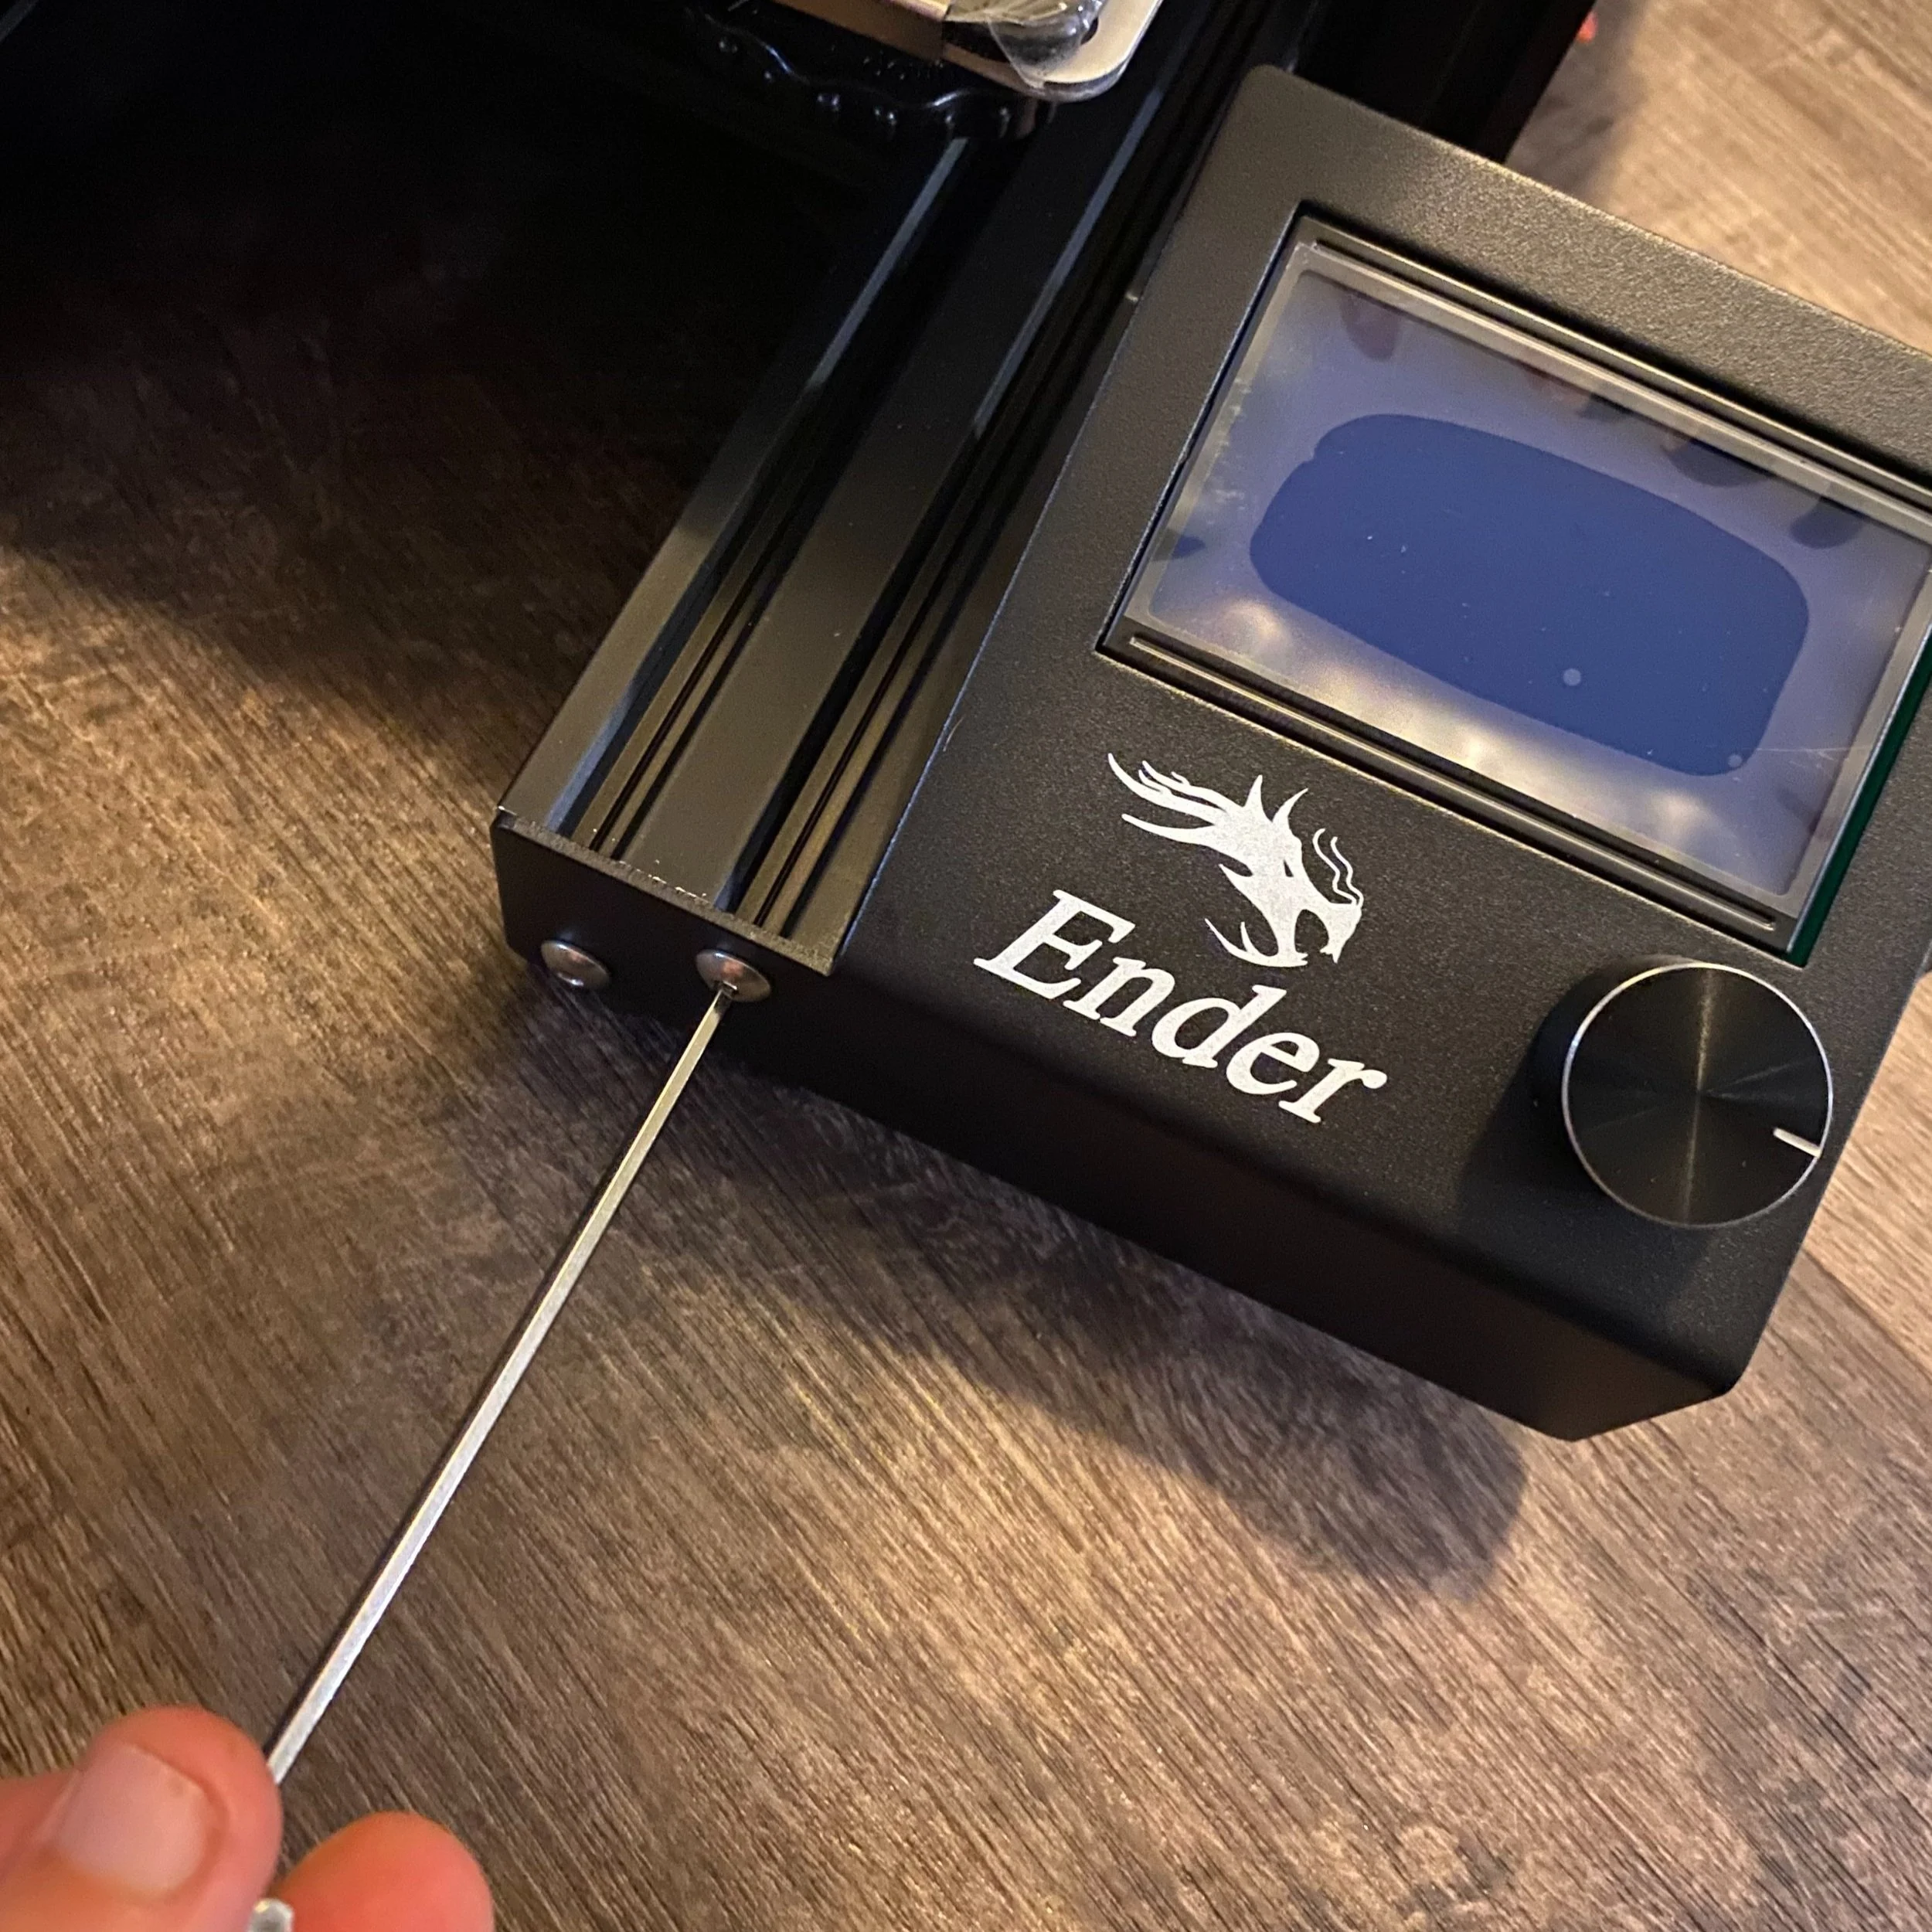
Mount the screen with the 2 small 10mm screws.
Attach the ribbon cable to the leftmost port.
4. Remove the Protective Covering From the Print Bed
To remove the bed, pull on the outer edges on the two front bed clips to rotate them, releasing the bed in the front. The clips can be hard to remove, so use a tool like a pair of pliers or the included snips. Pull the bed toward you to remove it from the two rear clips. Peel off the protective plastic coating, then reinstall the bed.
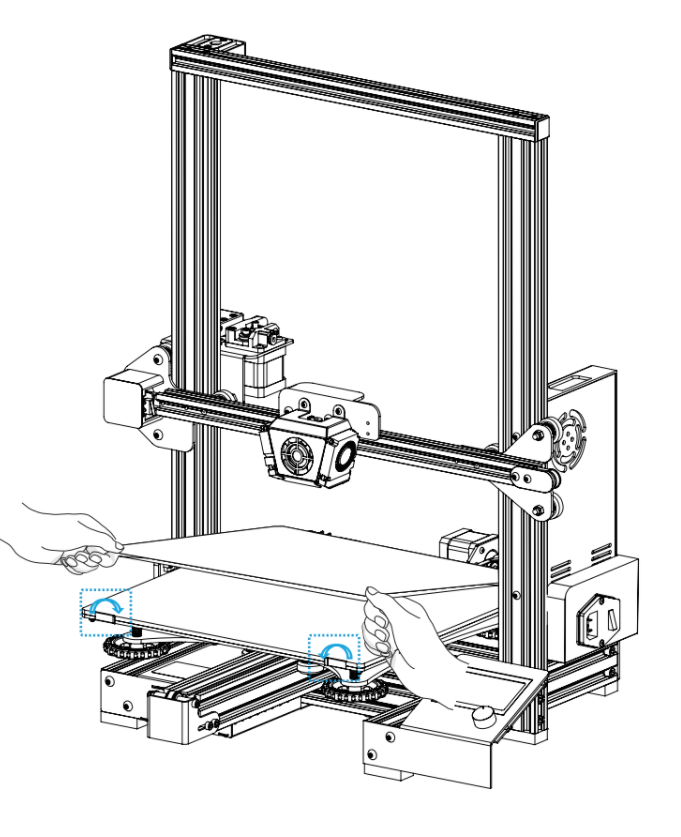
Removing the Glass Plate (from the Creality Assembly Guide)
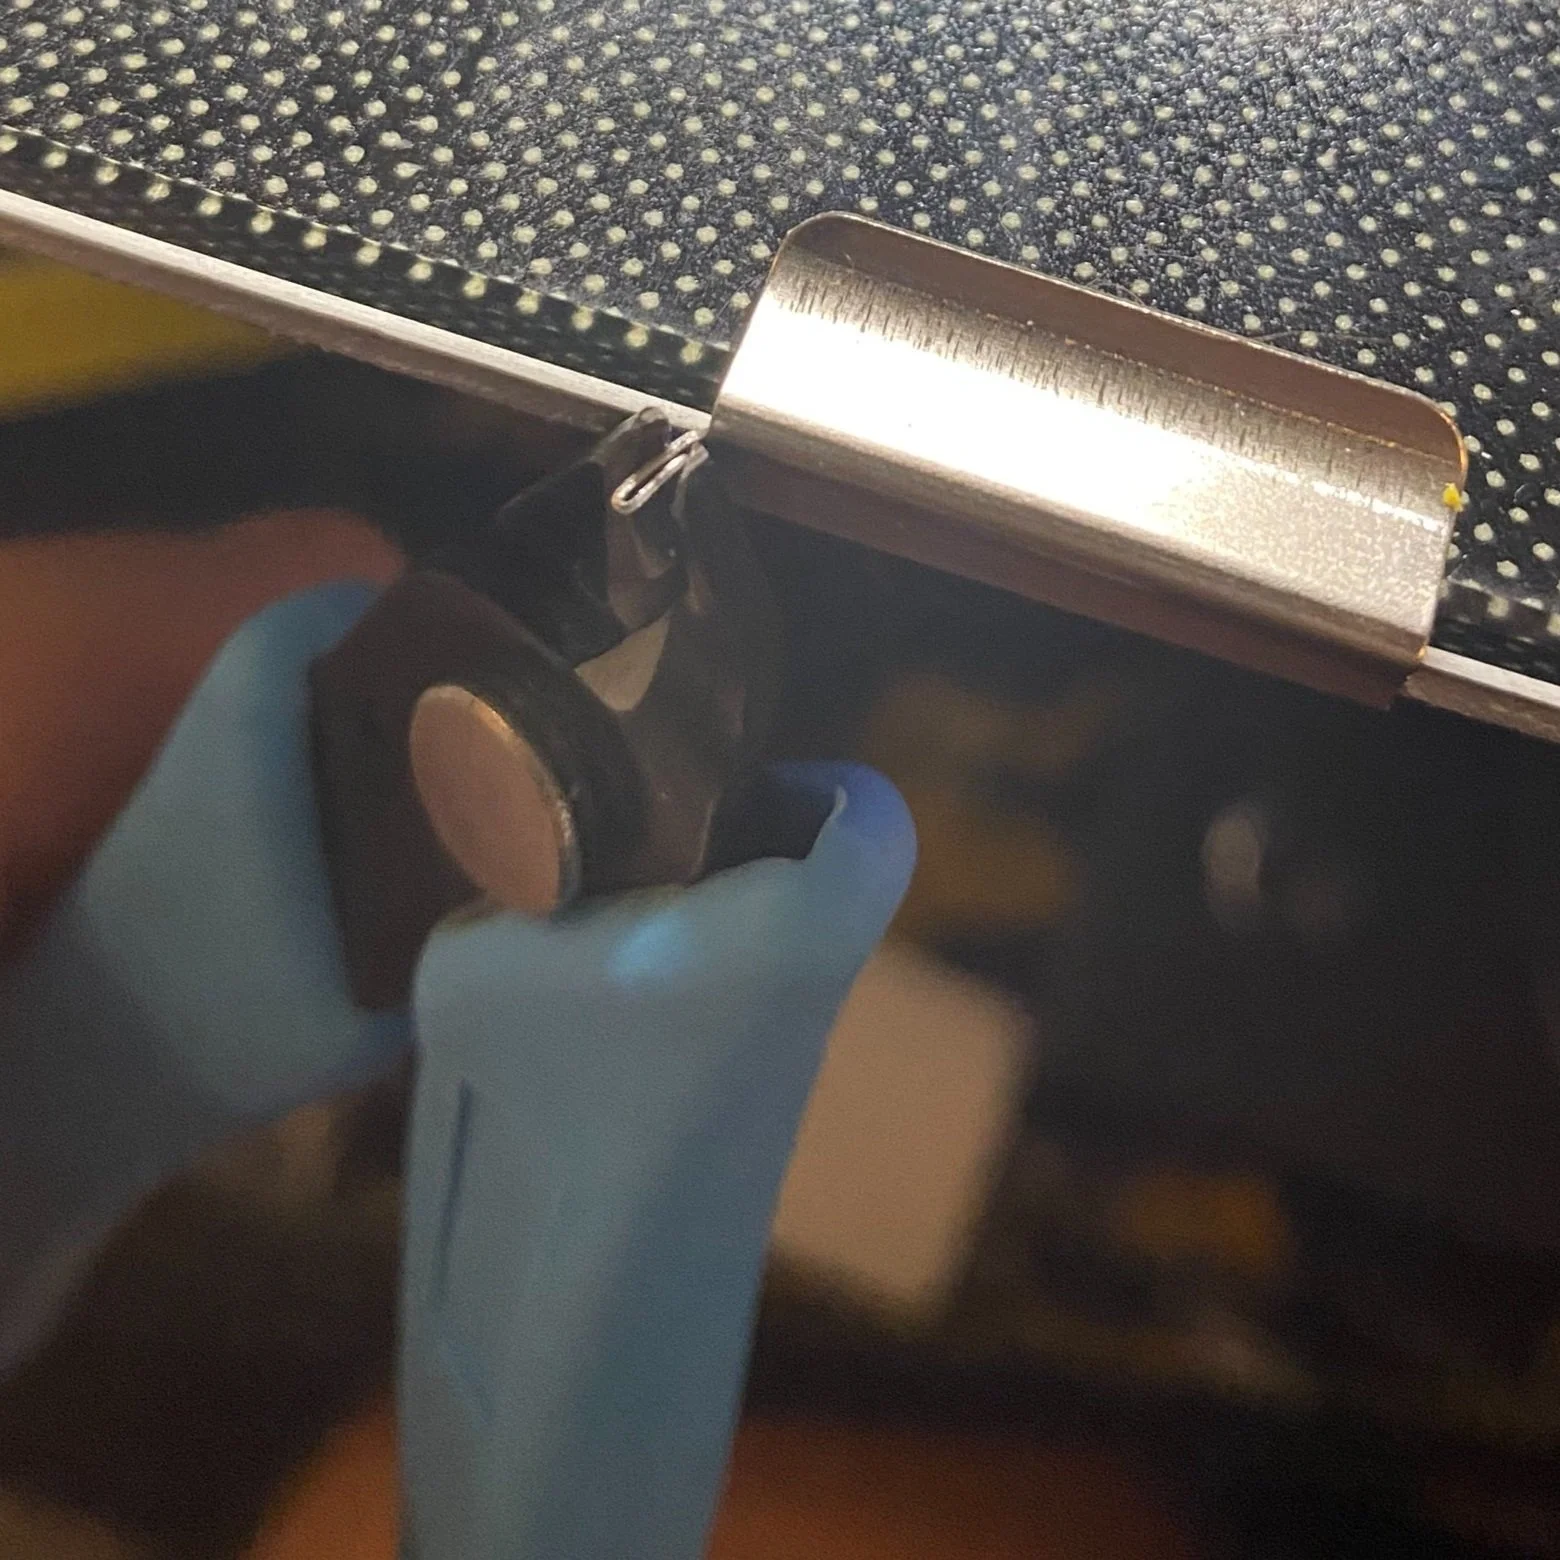
Use a tool to pull the bed clips out to release the bed.
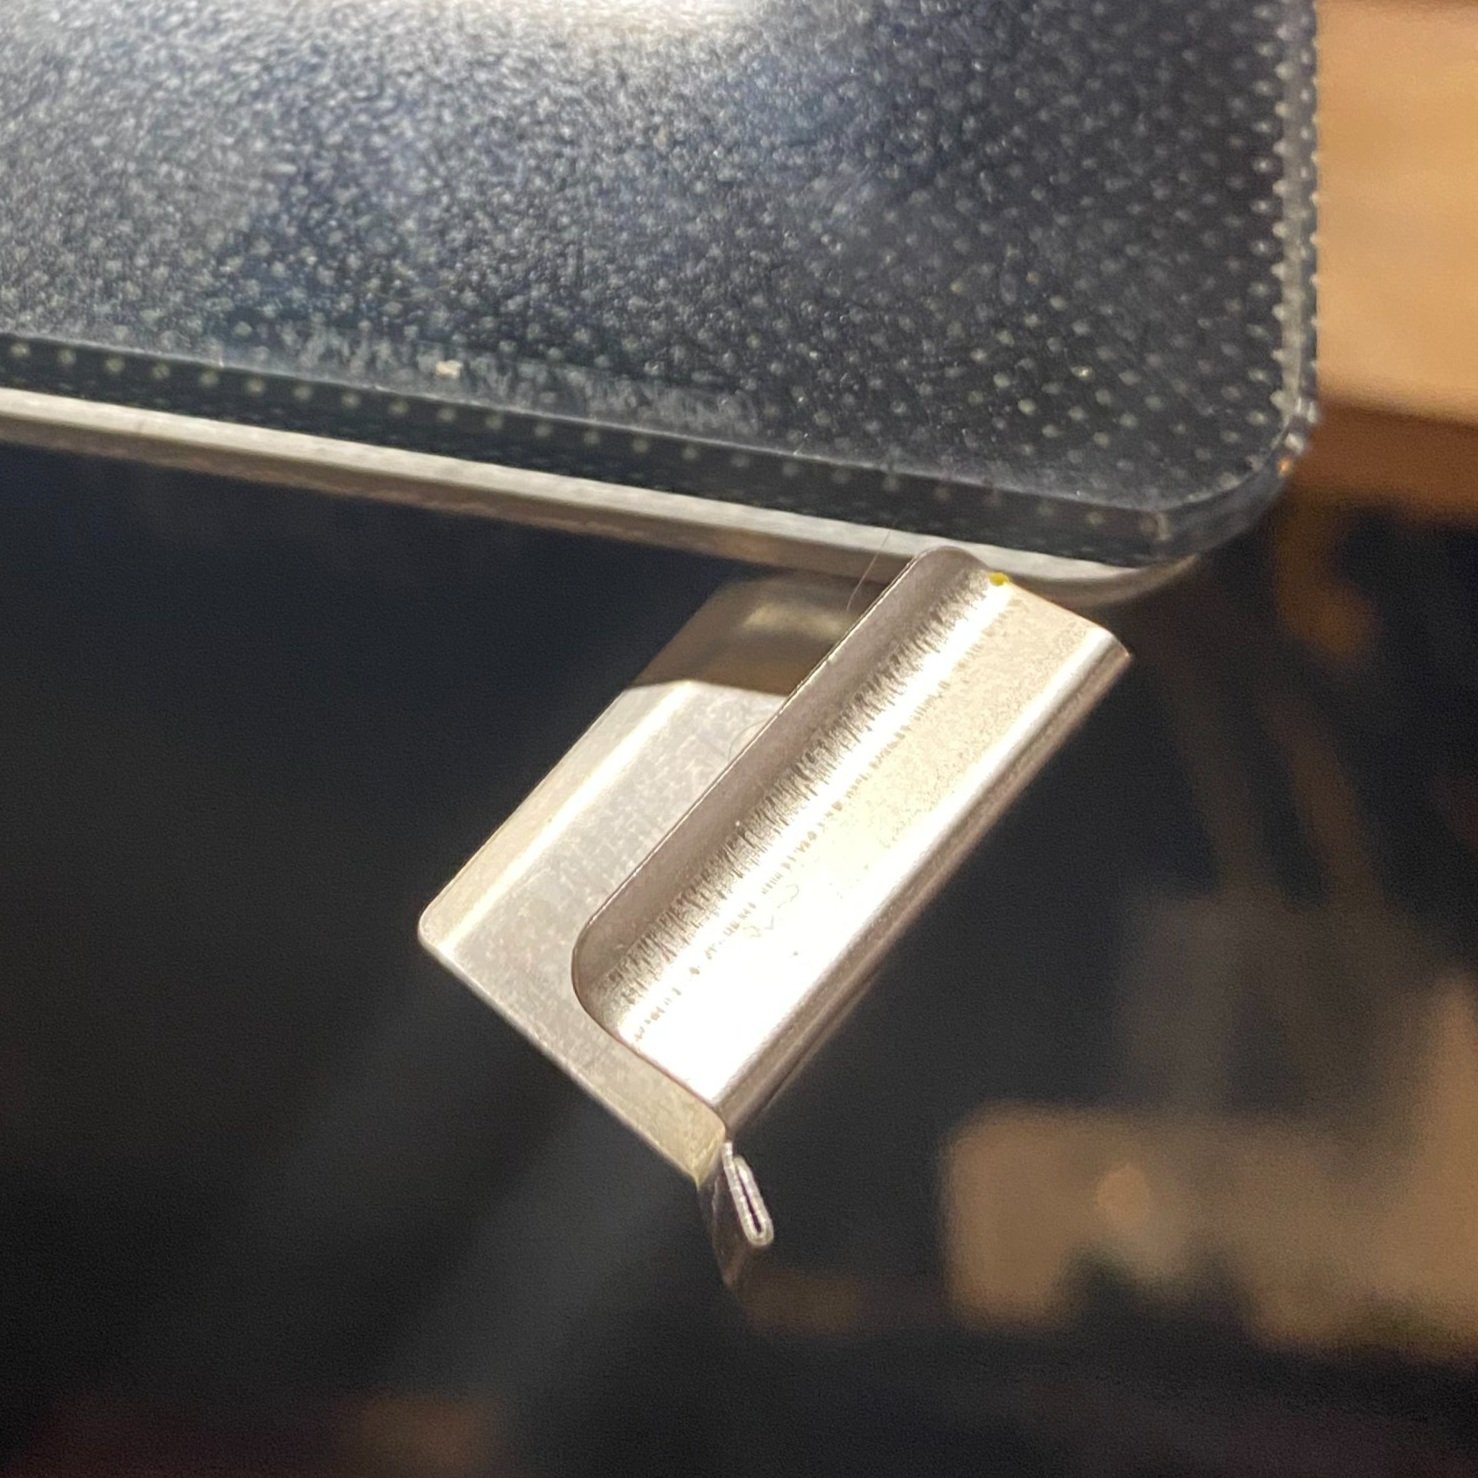
The released position.
5. Mount the Spool Holder

Mounting the spool holder.
The spool holder comes in two pieces which attach with a twist lock mechanism. Once assembled, mount the spool holder on the left side of the printer onto the base frame behind the gantry. Mount it at an angle to lock in the top, then push it down into the frame.
6. Connect the Remaining Electronics Cables
The 3D printer is now assembled, and all that remains is connecting the electronics, including the motors and the end-stops (small switches which tell the printer when it has reached the farthest point in each dimension).
Knowing the meaning of each of the letters conceptually will make the assembly process easier:
X - Movement from Left to right by the hot end carriage
Y - Movement from front to back by the print bed
Z - Movement up and down using the threaded lead screw on the left side of the gantry
E - Extrusion of the plastic filament
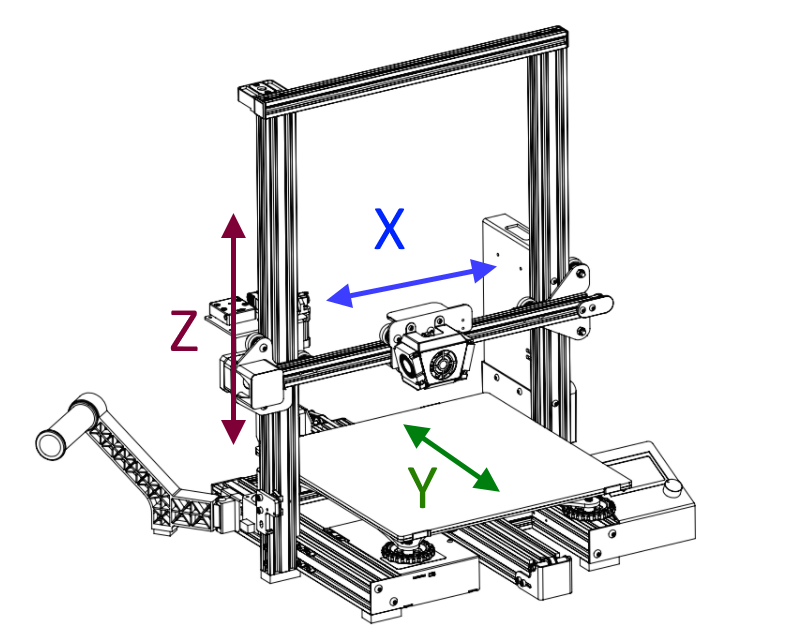
The three axes of a 3D printer (from the Ceality Assembly Guide)
Start with the cable connections on the Gantry Frame. Note that each cable is labeled with a yellow plastic piece with a letter to ensure you wire everything correctly.
E (extruder motor)
Filament Runout sensor
X Motor
X Endstop
Note: If the cables are not long enough to reach, double check that the cable is routed under the side of the base, and doesn’t cross in front of the gantry as shown in the overview diagram below.

Connecting the motor and endstop cables (from the Creality Assembly Guide)

Connecting the extruder motor and filament sensor.

Connecting the X motor and endstop.
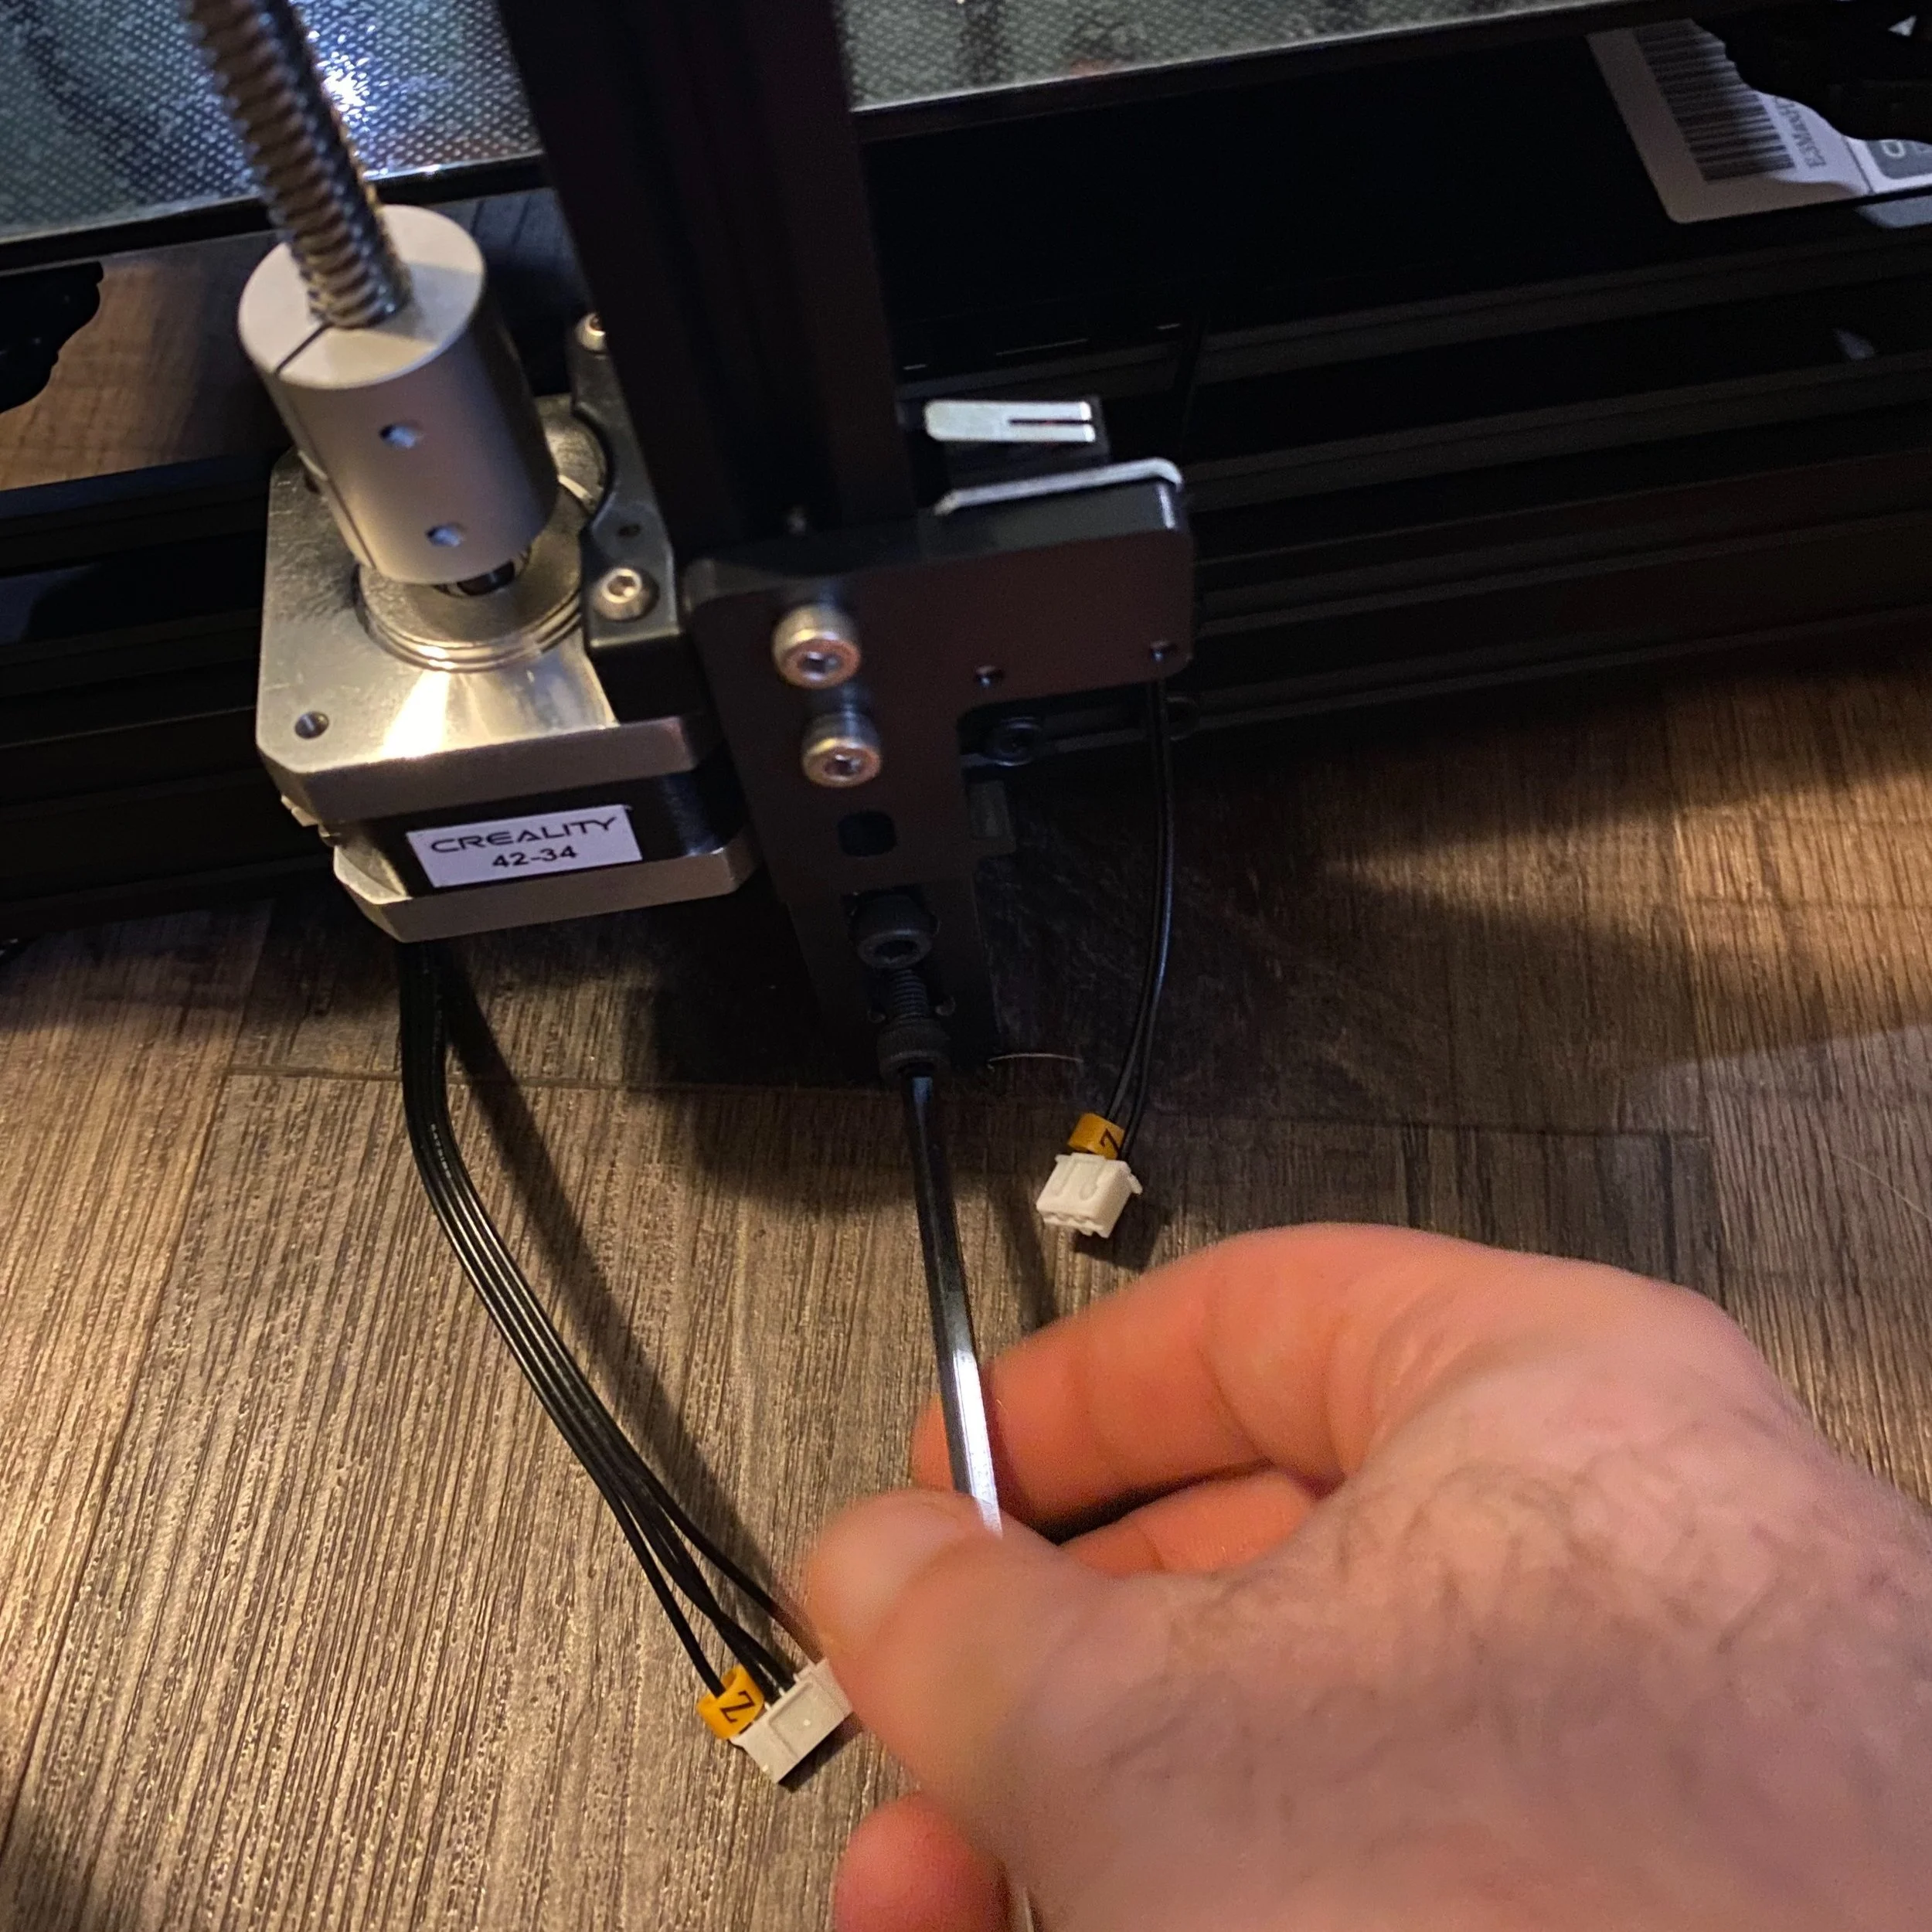
Now, connect the cables on the base of the printer:
Z Motor
Z Endstop
Note that the Y axis motor and endstop are already plugged in for you.
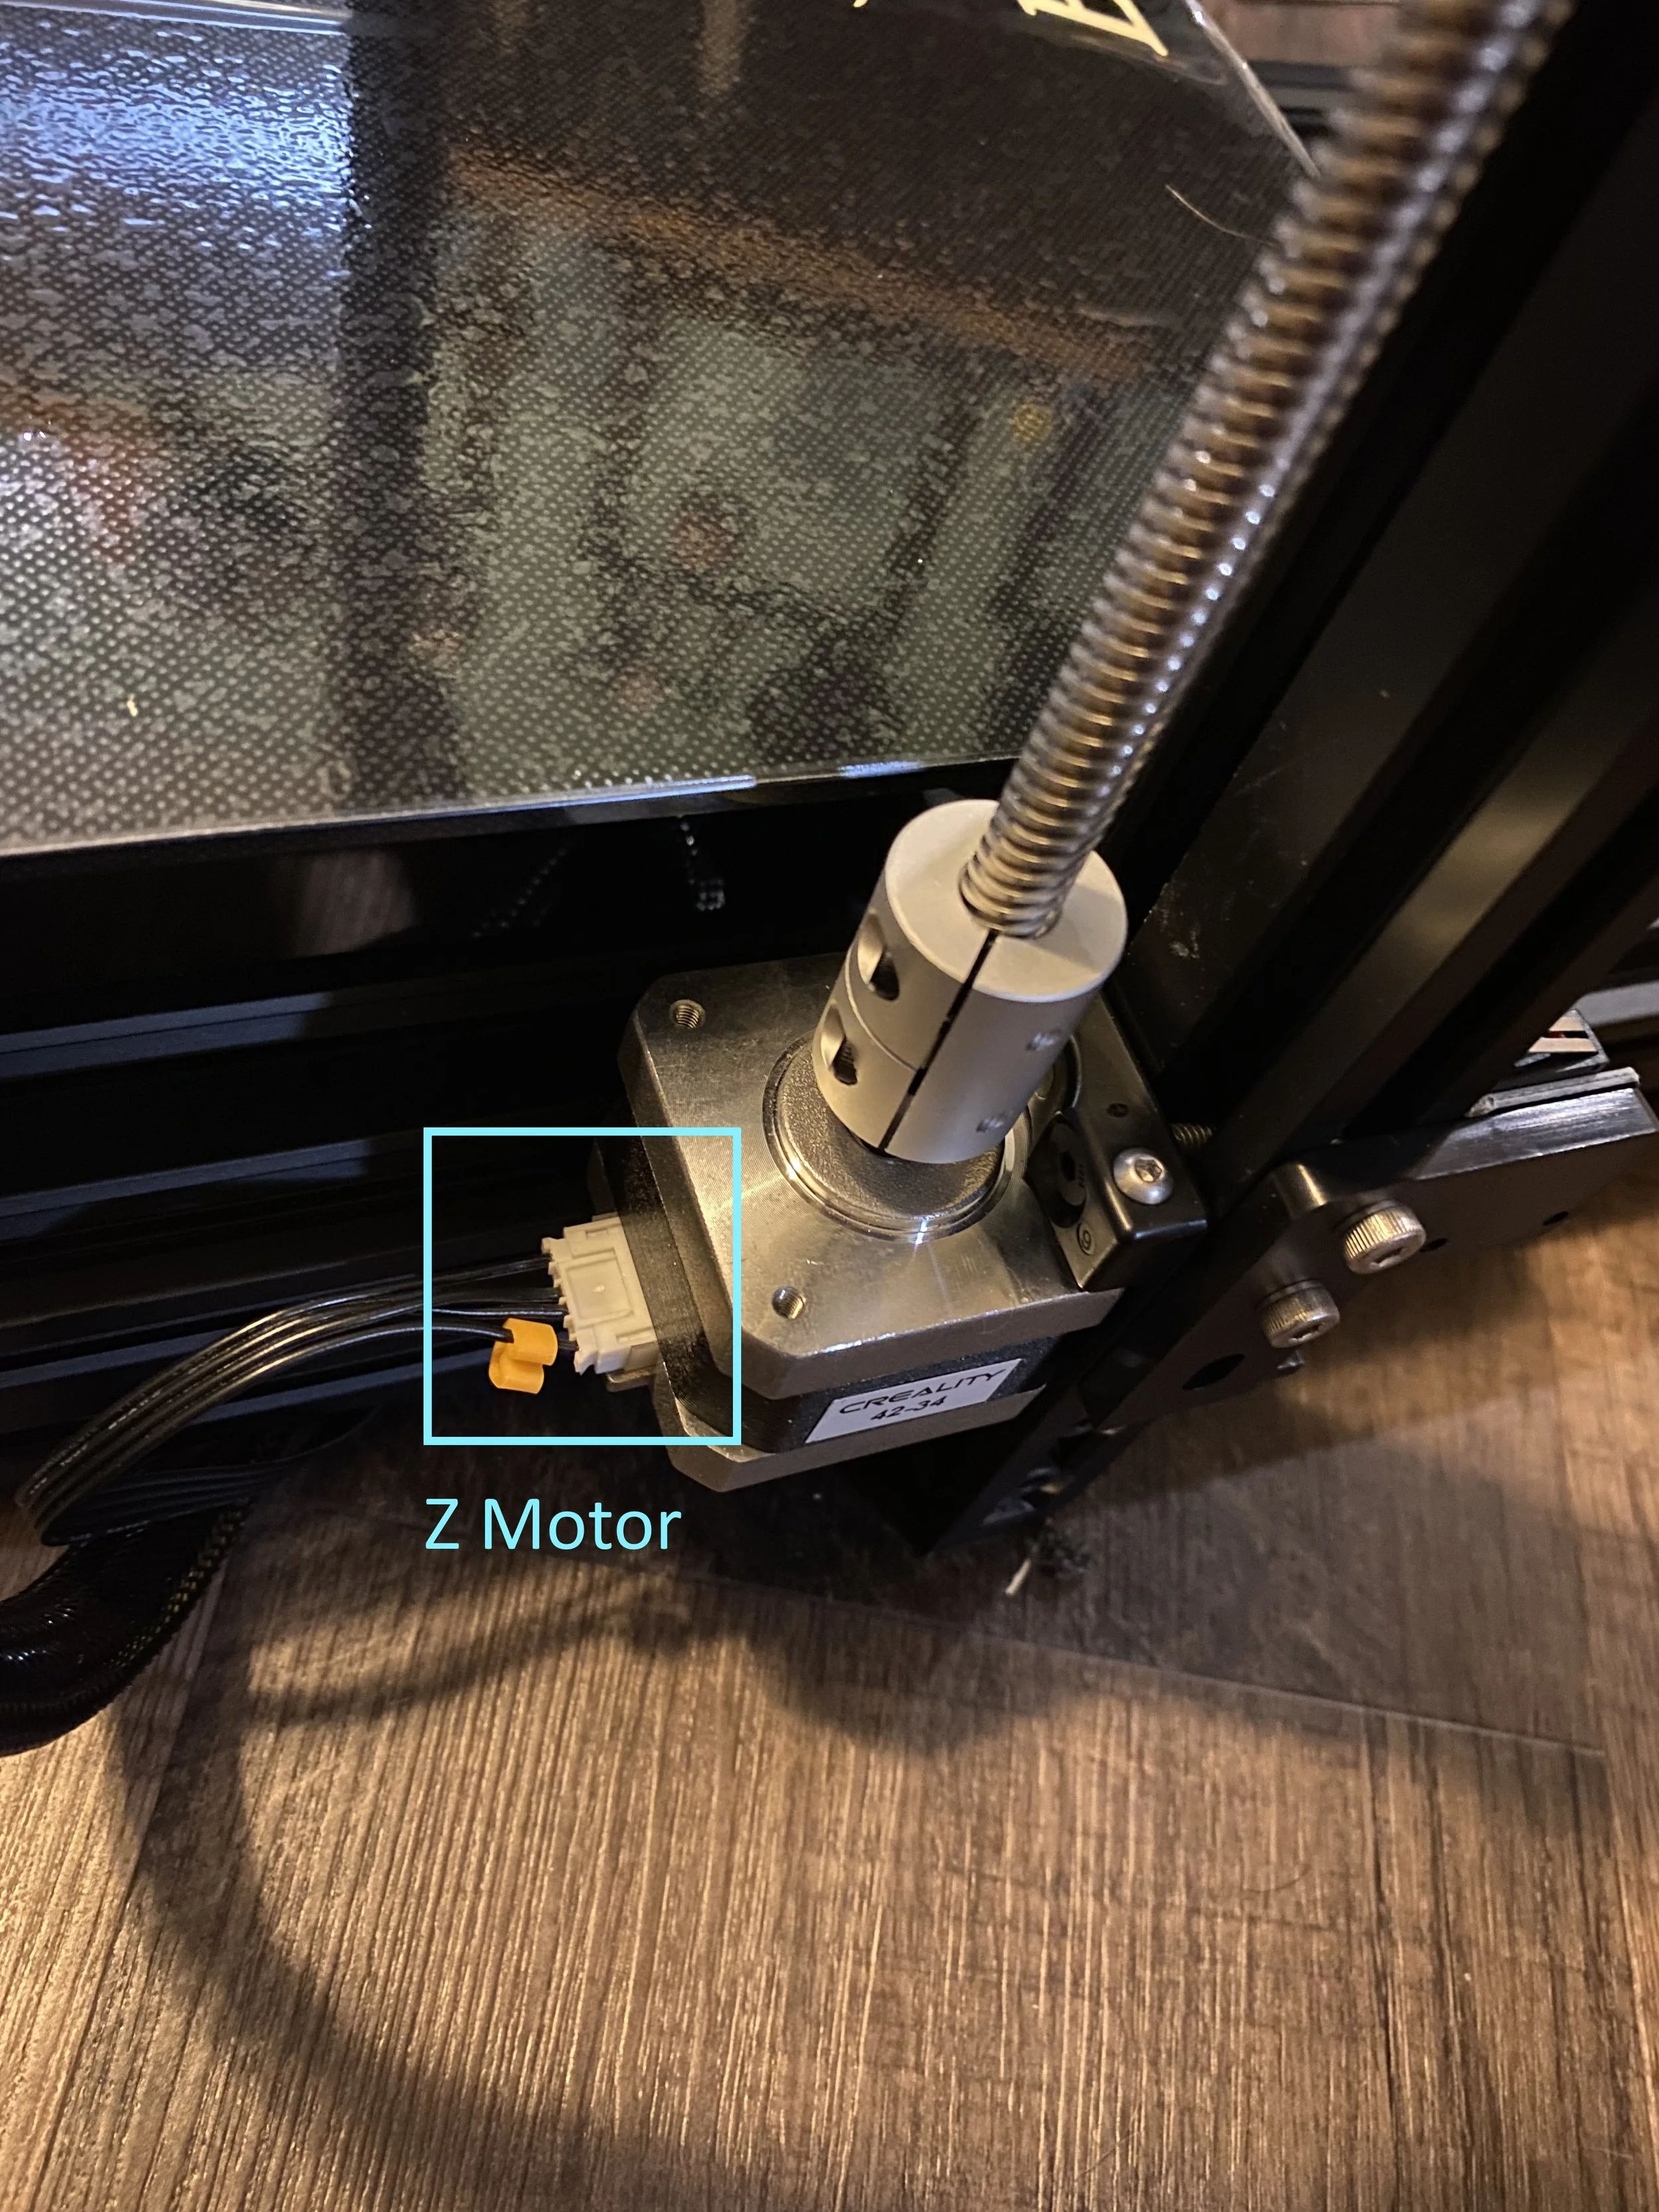
Connecting the Z motor.

Connecting the Z endstop.
The Ender 3 Max is now fully assembled! Now, it’s time to test the printer out and start a test print.
Testing the 3D Printer Hardware
Connect the included power cable to the power supply and plug it in, then power on the printer using the switch next to the power plug. Note that the power supply fans will not start spinning until needed. If the screen does not show anything, power off the printer, then check these two common issues:
Check that you set the power supply to the correct mains voltage (115V in USA, see step 2 in the assembly section)
Check that you plugged the LCD cable into the correct leftmost port (see step 3 in the Assembly section).
Once the screen shows the main menu, the best way to test that all the motors and end-stops are connected is to auto-home the printer, which moves all three axes to their starting points by hitting the end stops.
To home, push the control wheel to access the menu, then select Prepare >> Auto Home. (rotate the wheel to select options in a menu).
If you notice that any of the axes don’t move, check that the corresponding motor cable is completely plugged in
If you hear grinding from any Axis, note the source of the sound, then turn the printer off. Check that the end stop for the problem axis is plugged in securely.
If you had any problems, auto-home the printer again after resolving the issue to make sure everything is working.
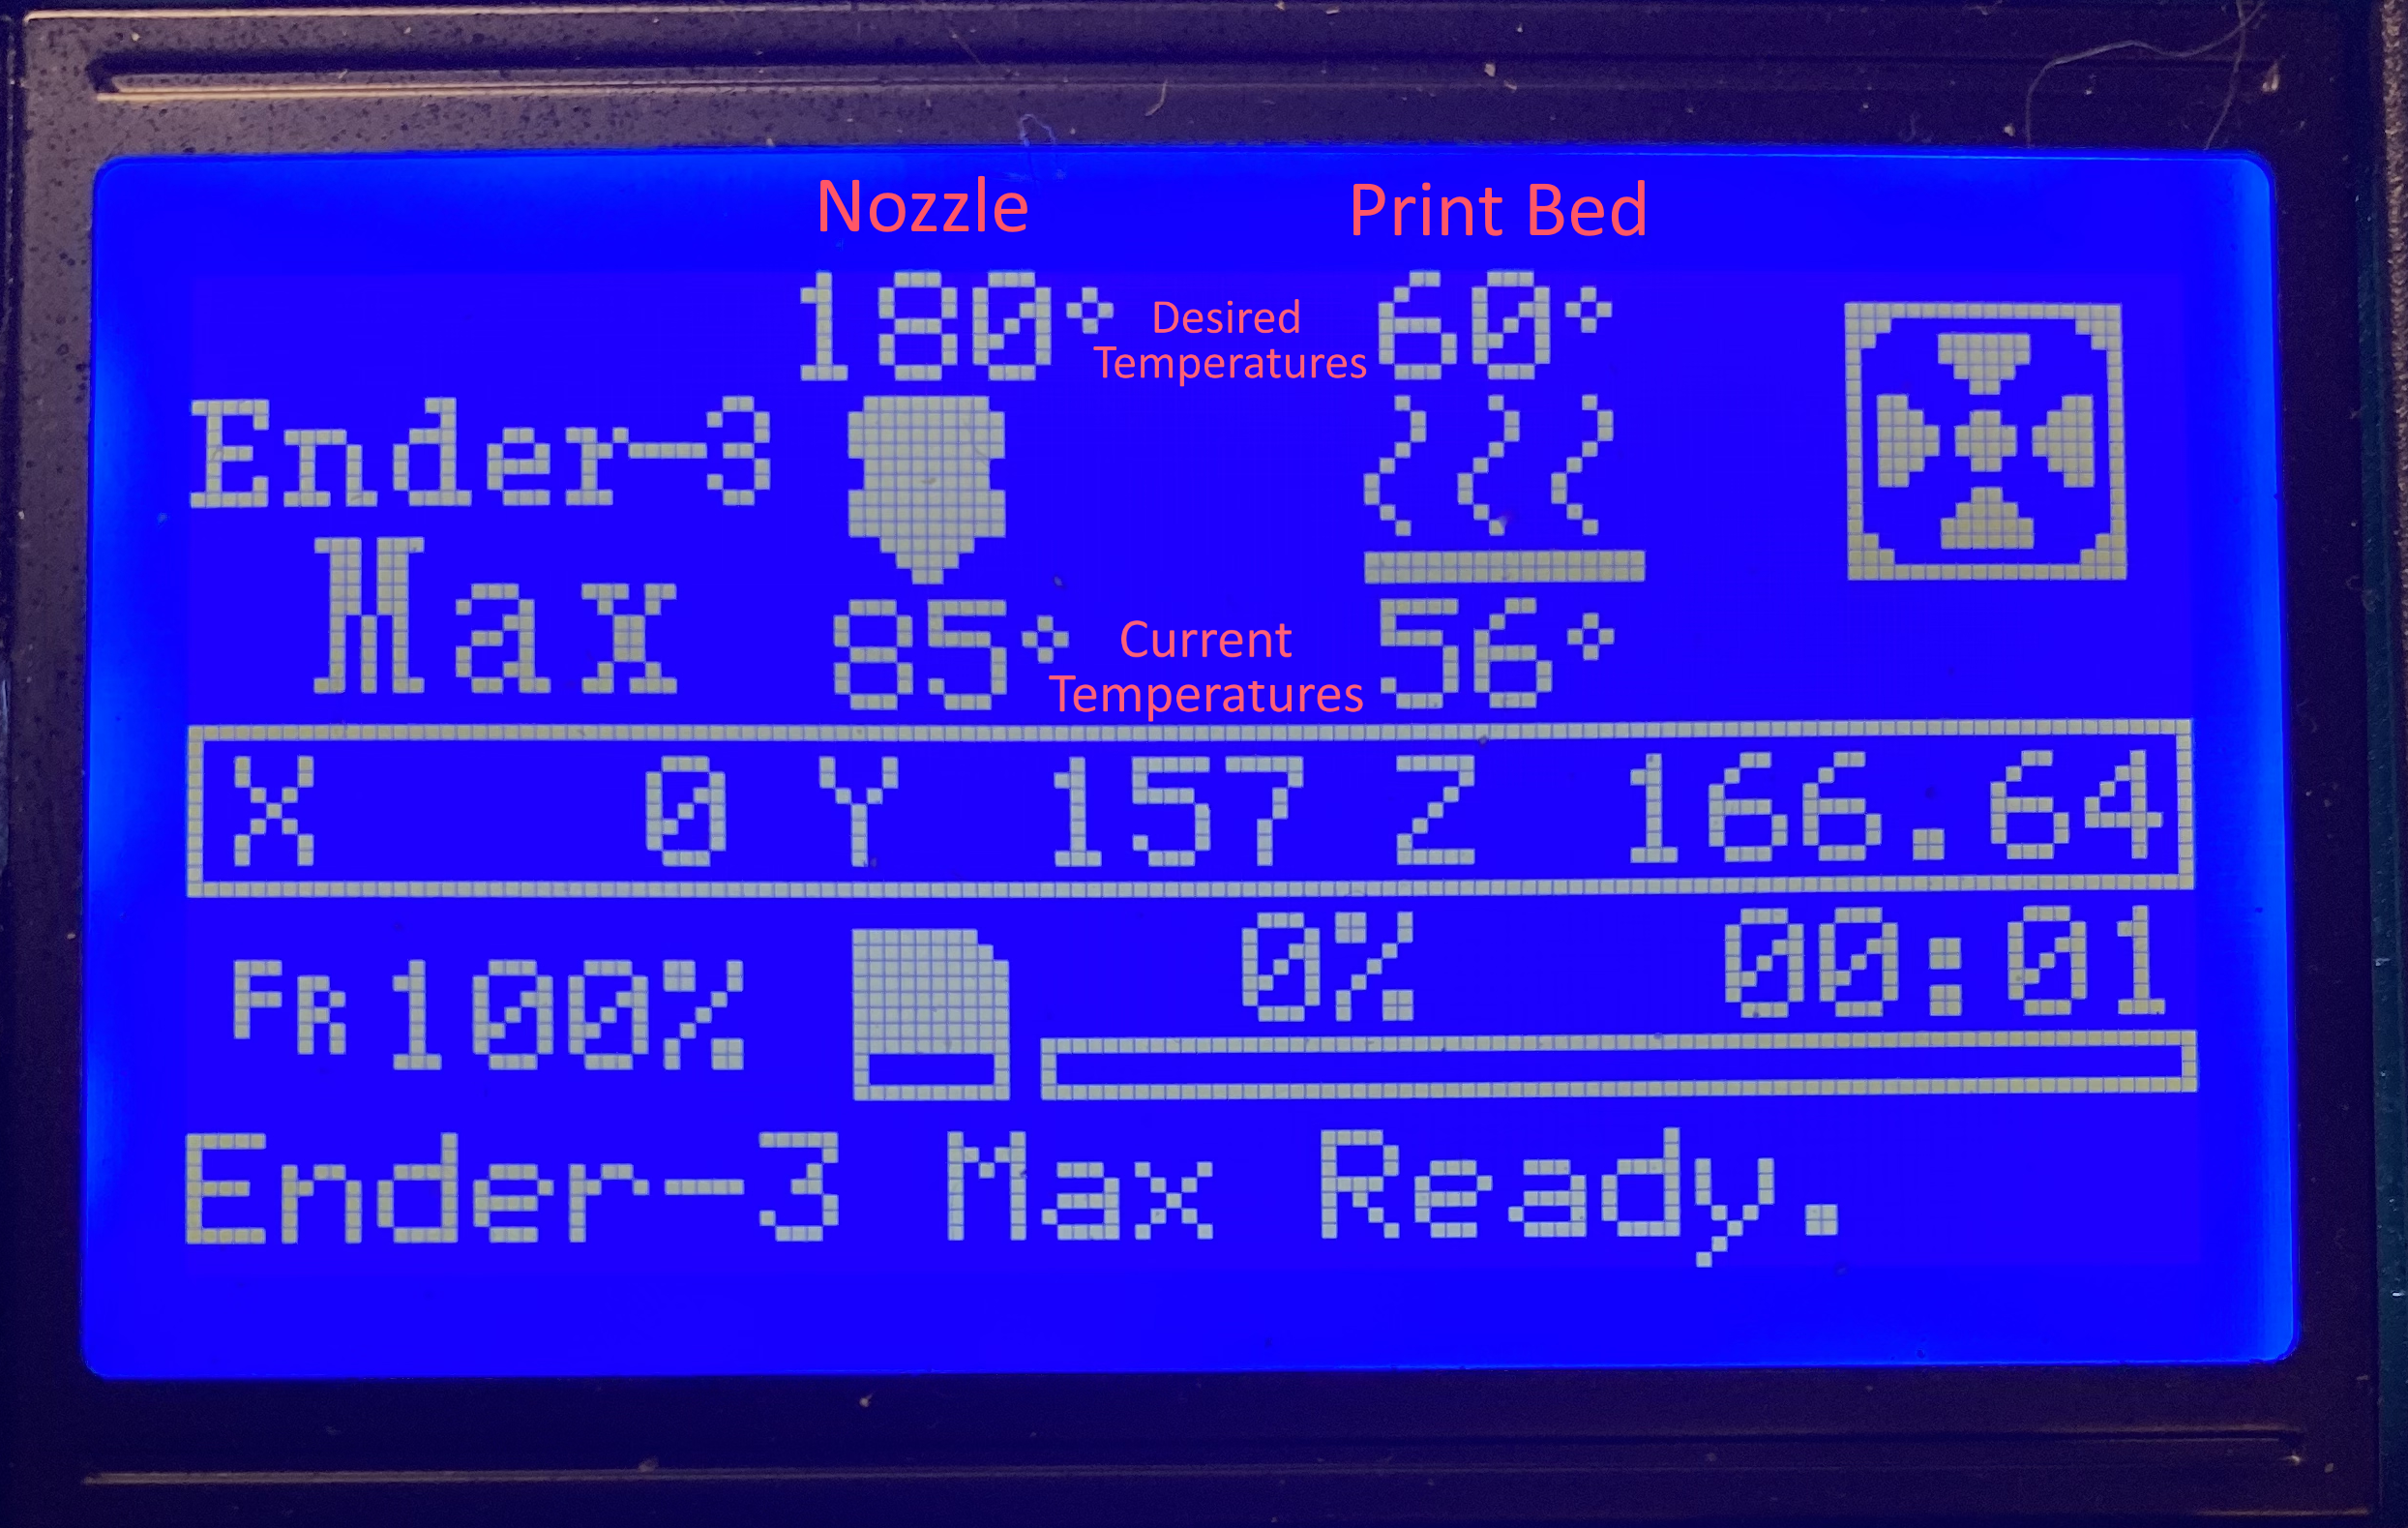
Reading the temperatures on the Ender 3 Max screen.
Finally, test that the heat bed and nozzle are working correctly by heating both. You can do this quickly using Prepare >> Preheat PLA. Once selected, watch the temperatures of both the nozzle and the bed to ensure they reach the set point, and then stay there.
You’ve now verified that the Ender 3 Max is working! Next, we’ll level the print bed and try a test print.
Leveling the Bed
Leveling the bed of a 3D printer is the process of calibrating the height of the print bed to ensure it is the correct distance from the print nozzle across its entire surface. The nozzle needs to be far enough away from the bed that there is a gap for the filament to come out, but also be close enough that the filament sticks to the bed. Getting the leveling as accurate as possible will improve print quality and reduce failures.
The basic process for leveling the bed is:
Follow the steps in the testing section to auto-home and heat up the printer nozzle and bed.
Unlock the motors by selecting Prepare >> Disable Steppers.
Move the print head and bed by hand to move the nozzle directly over one of the four leveling knobs.
Turn the leveling knob to adjust the height of the bed until there is a small gap. Use a sheet of paper to test the gap:
If the paper can’t fit under the nozzle, raise the bed by twisting the knob clockwise.
If the paper moves under the nozzle with no resistance, lower the bed by twisting the knob counter-clockwise.
If the paper can be moved with slight resistance, you are done!
Repeat this procedure for the remaining three leveling knobs.
Once completed, auto home the printer one more time, then repeat the process on all four knobs to fine tune the leveling.
For a more detailed look at leveling the printer, refer to Bed Leveling For Your Creality Printer. The Ender 3 Max is also compatible with the BLTouch auto leveling sensor, which makes the leveling process a lot easier and helps you get a perfect first layer every time. You can learn more about this upgrade on the Auto Bed Leveling Guide.
Loading the Filament
There is one last step before you can start printing: you’ll need to load filament into the extruder. You can use the small sample of PLA filament that is included with the printer, or buy a full-sized roll. We recommend that you start with PLA filament, since it is the easiest to print and is great for most applications. Make sure you order 1.75mm filament—there is also 2.85mm filament which will not work with this printer. Fortunately, most filament on the market today is 1.75 mm. To see the brands of filament we have had the best results with, take a look at our guide here: The Best Filament for Creality 3D Printers.
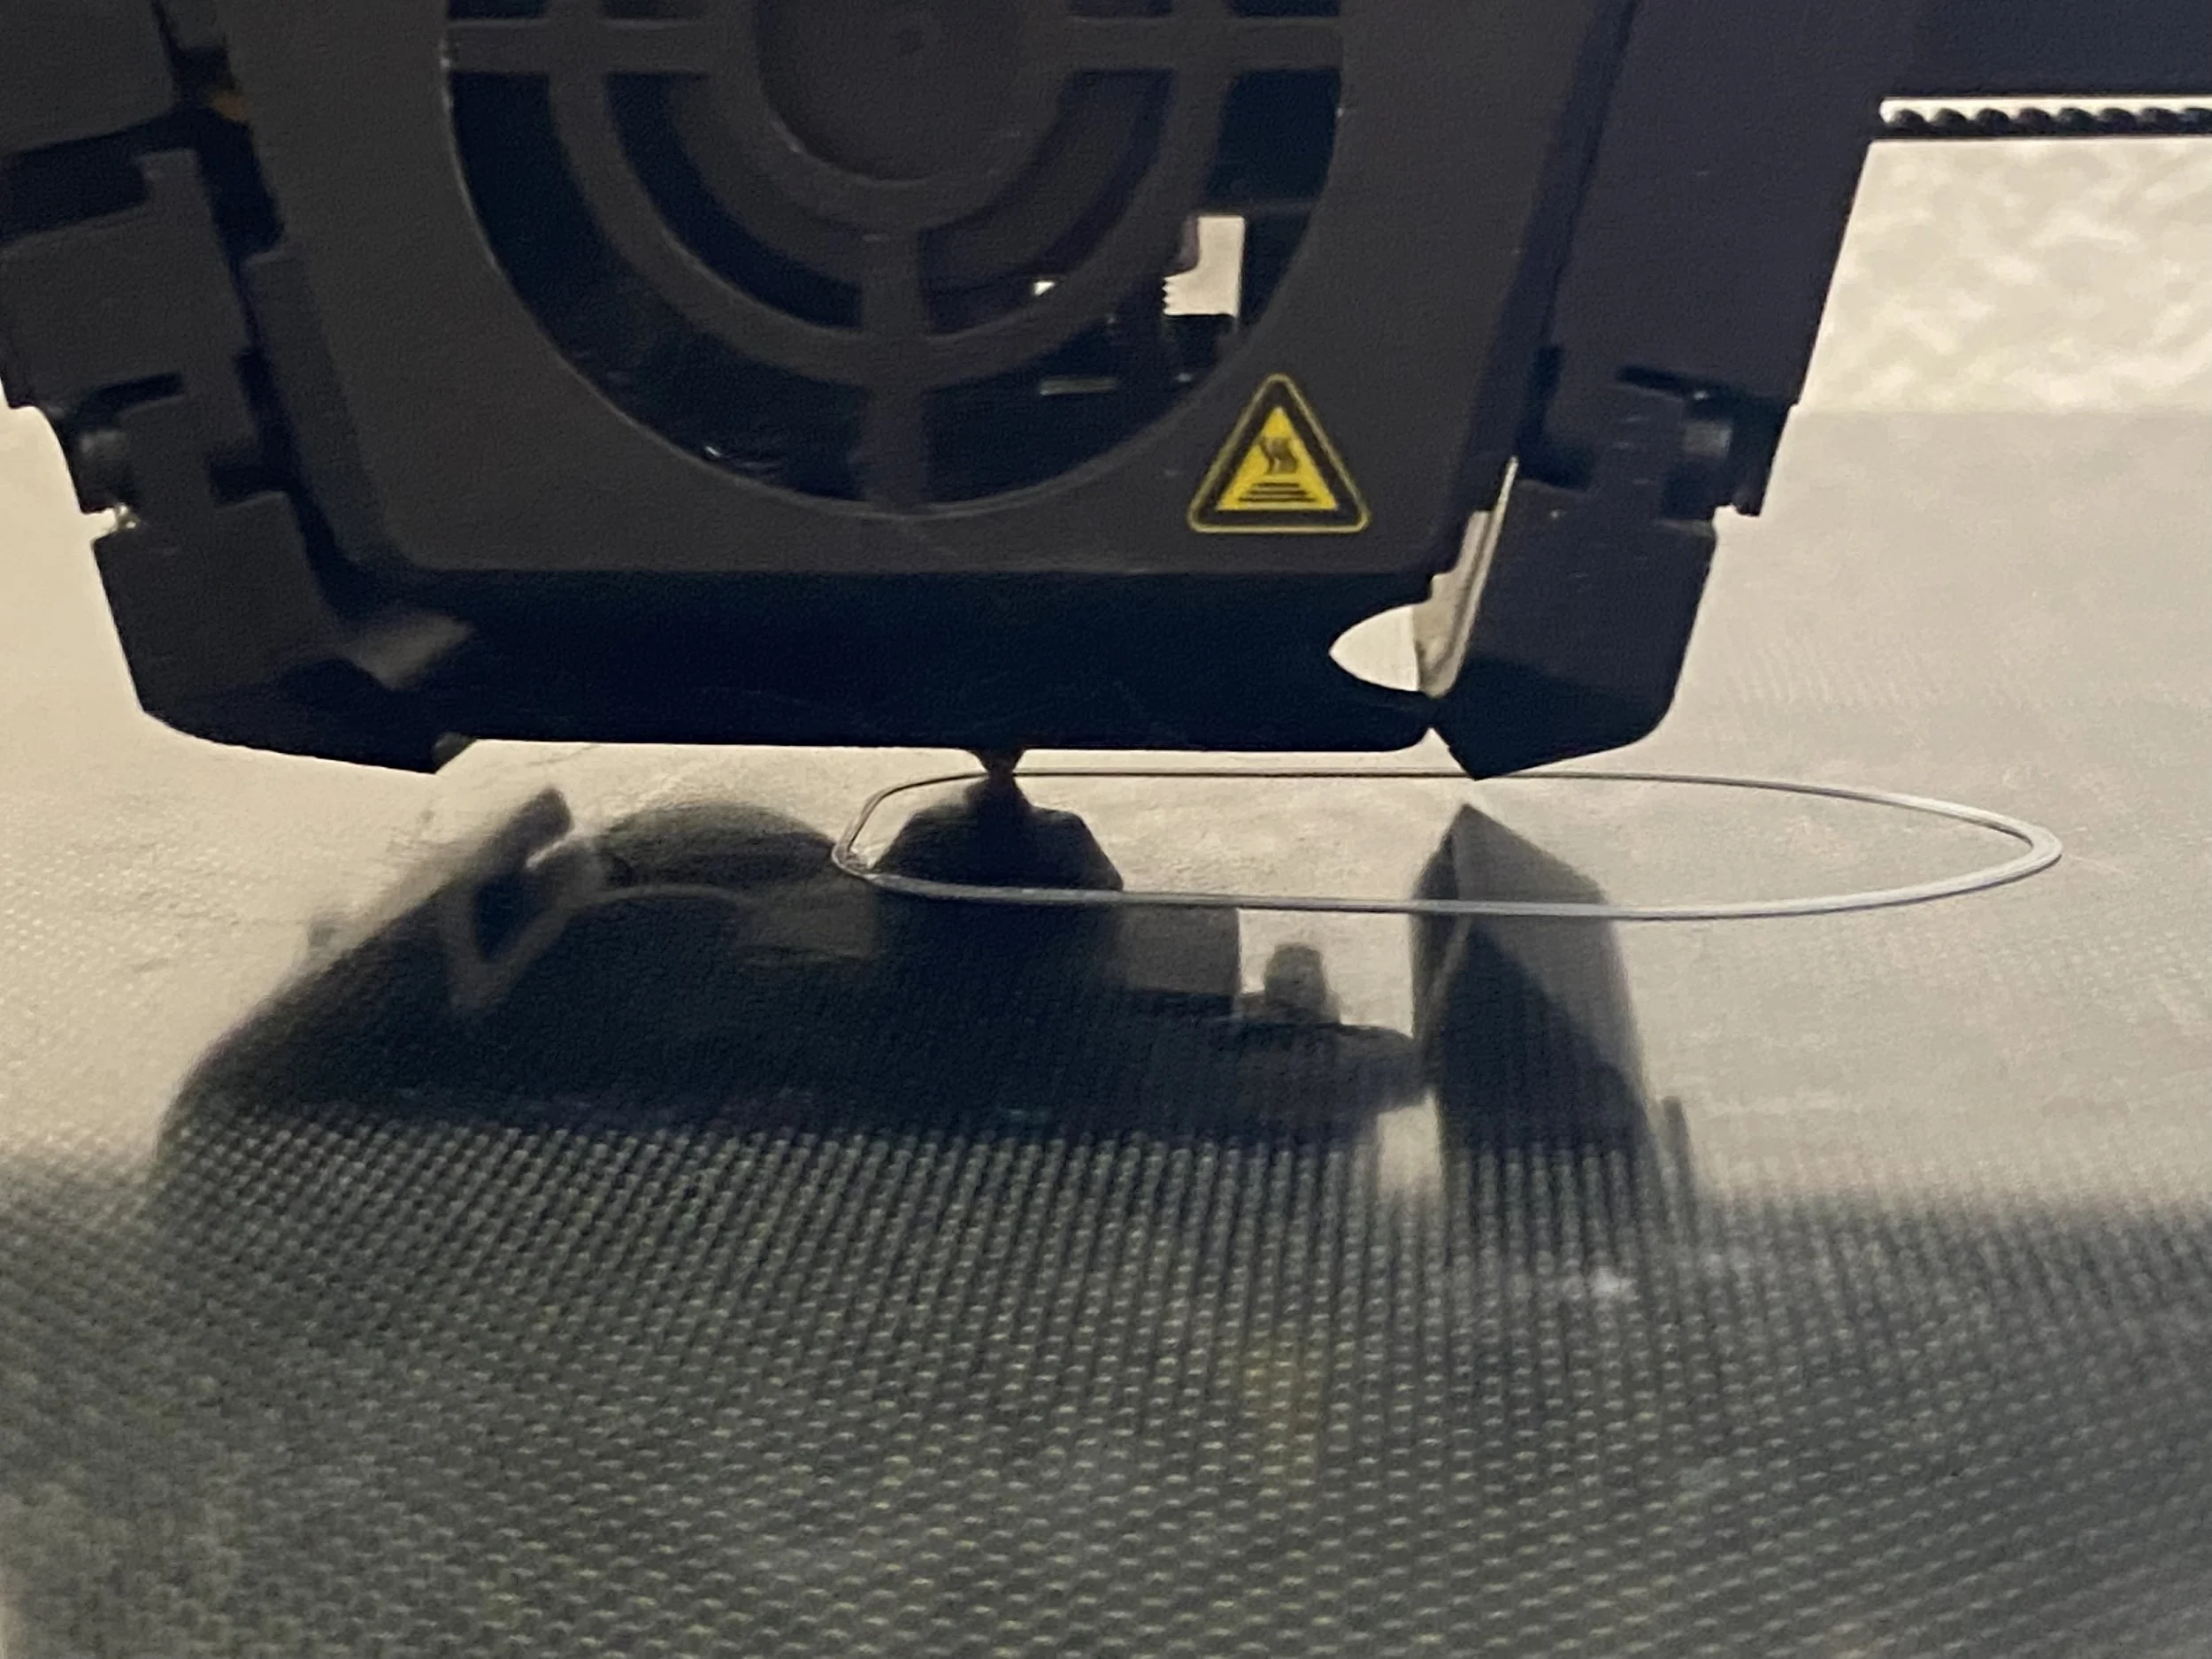
To feed the filament, place it on the spool holder, then push the end through the filament runout sensor and extruder while squeezing the finger lever on the extruder. Make sure the end of the filament is straight before doing so to ensure it feeds smoothly. Once the filament is past the extruder, continue feeding it until you feel some resistance. You should see some filament coming out from the printer nozzle, meaning the filament is fully loaded and you are ready to print!
Tip: If the filament is getting stuck in the extruder, it can help to sharpen the tip of the filament with your clippers, and make sure it is as straight as possible.
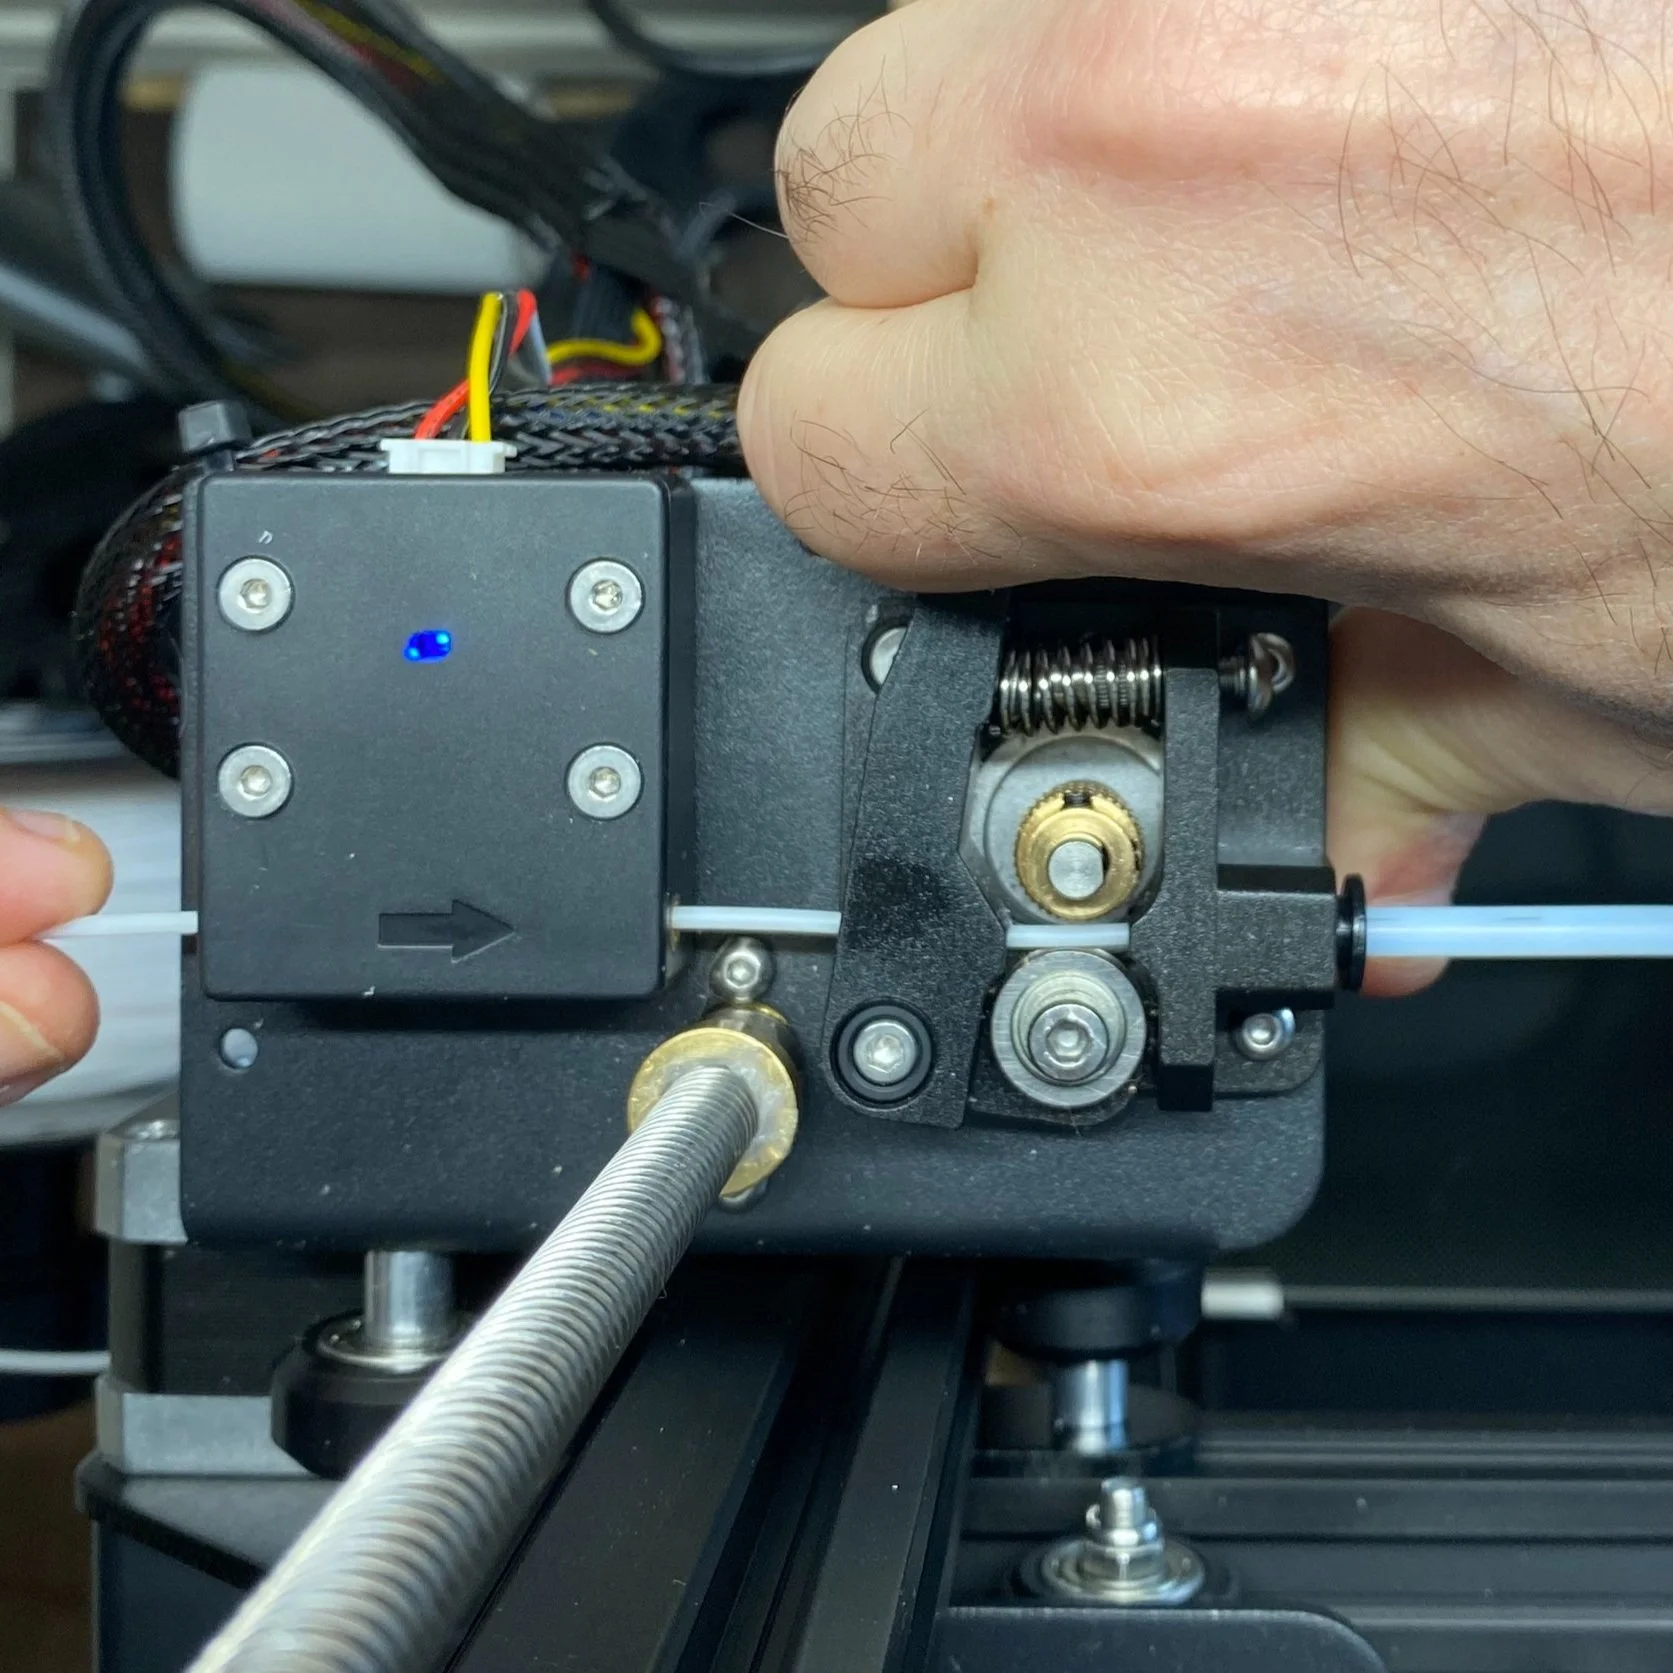
Load the filament by pressing the extruder arm while feeding with your other hand. Make sure the end of the filament is straight to make it load more smoothly.

Once the filament starts coming out of the nozzle and you feel resistance, it is fully loaded.
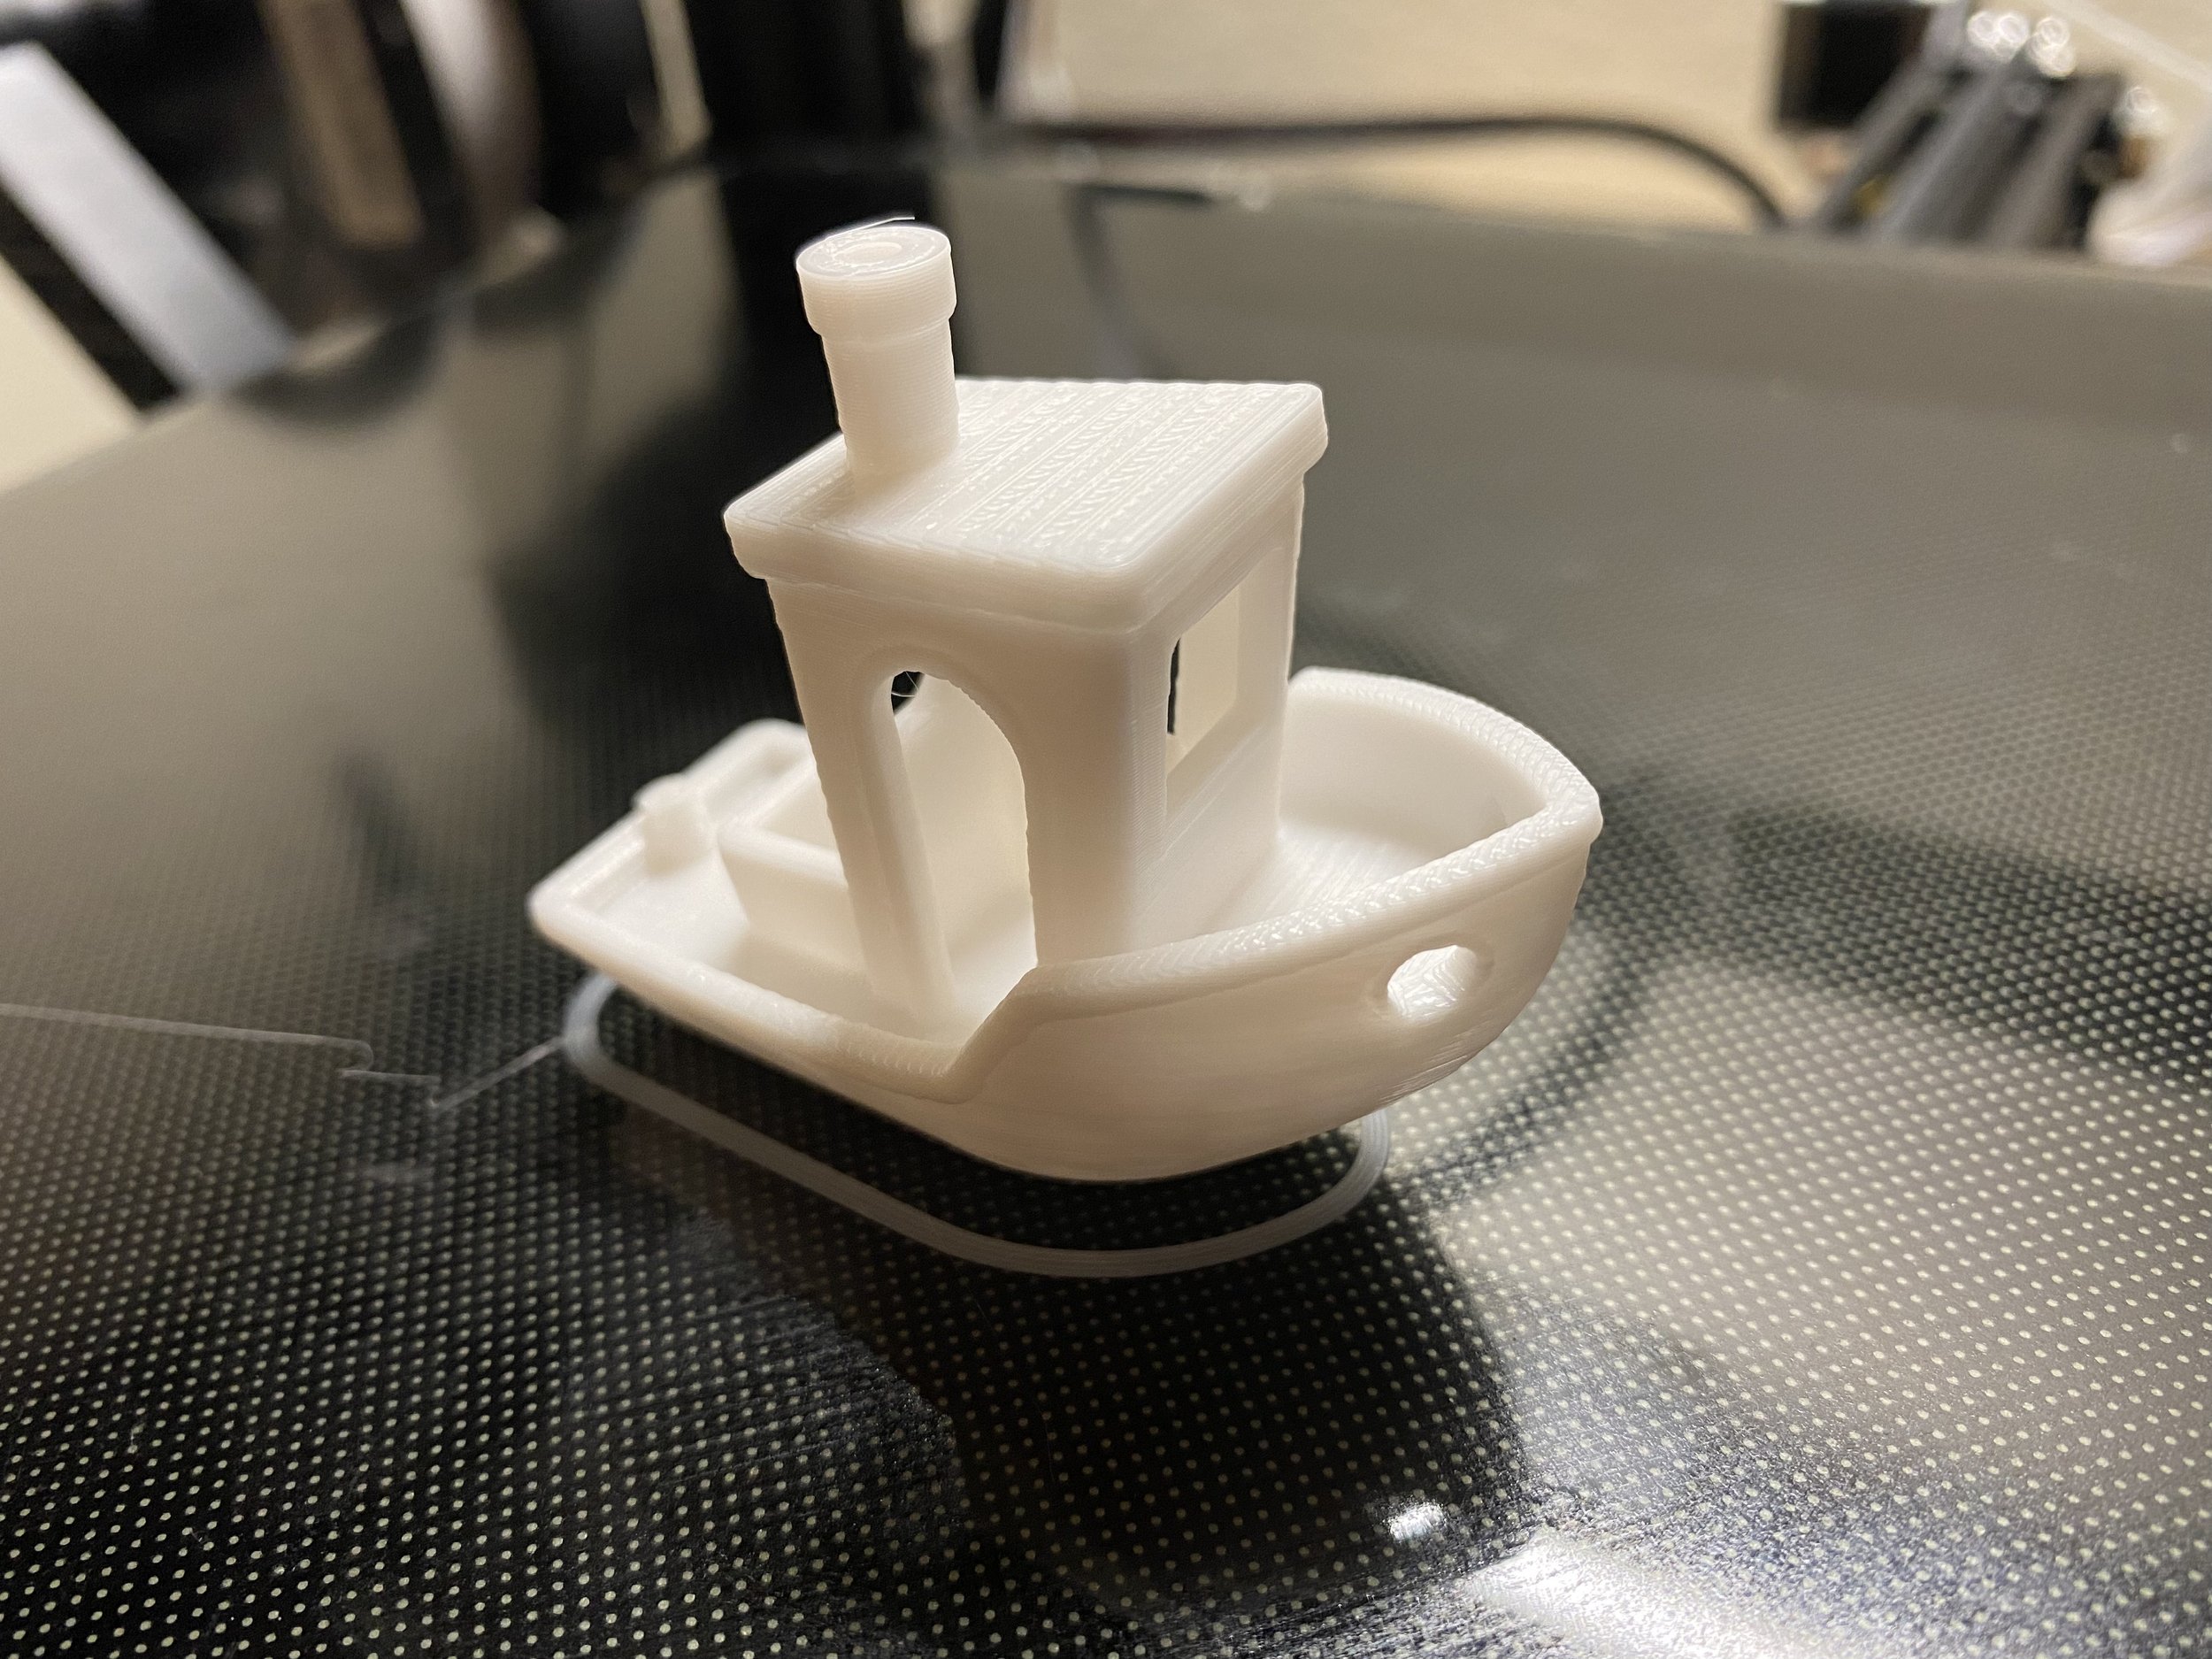
Running a Test Print
The SD card included with the printer includes some 3D models you can print in the “4. Model” directory, but these will require you to use slicer software to get them prepared to print. Slicer Software is what converts a 3D model into commands for the 3D printer, or gcode. If you aren’t familiar with slicer software, we’ve included a gcode file here which you can use to run a test print on the Ender 3 Max.
Note: The SD card includes Creality’s slicer software, Creality Slicer. We prefer using Cura since it is more widely used by the 3D Printing community and has more testing and support. If you’d like to test printing before looking into the slicer software, we built this gcode using the Cura slicer with the recommended settings for the Ender 3 Max.
Download: 3D Benchy Test Print gcode for Ender 3 Max
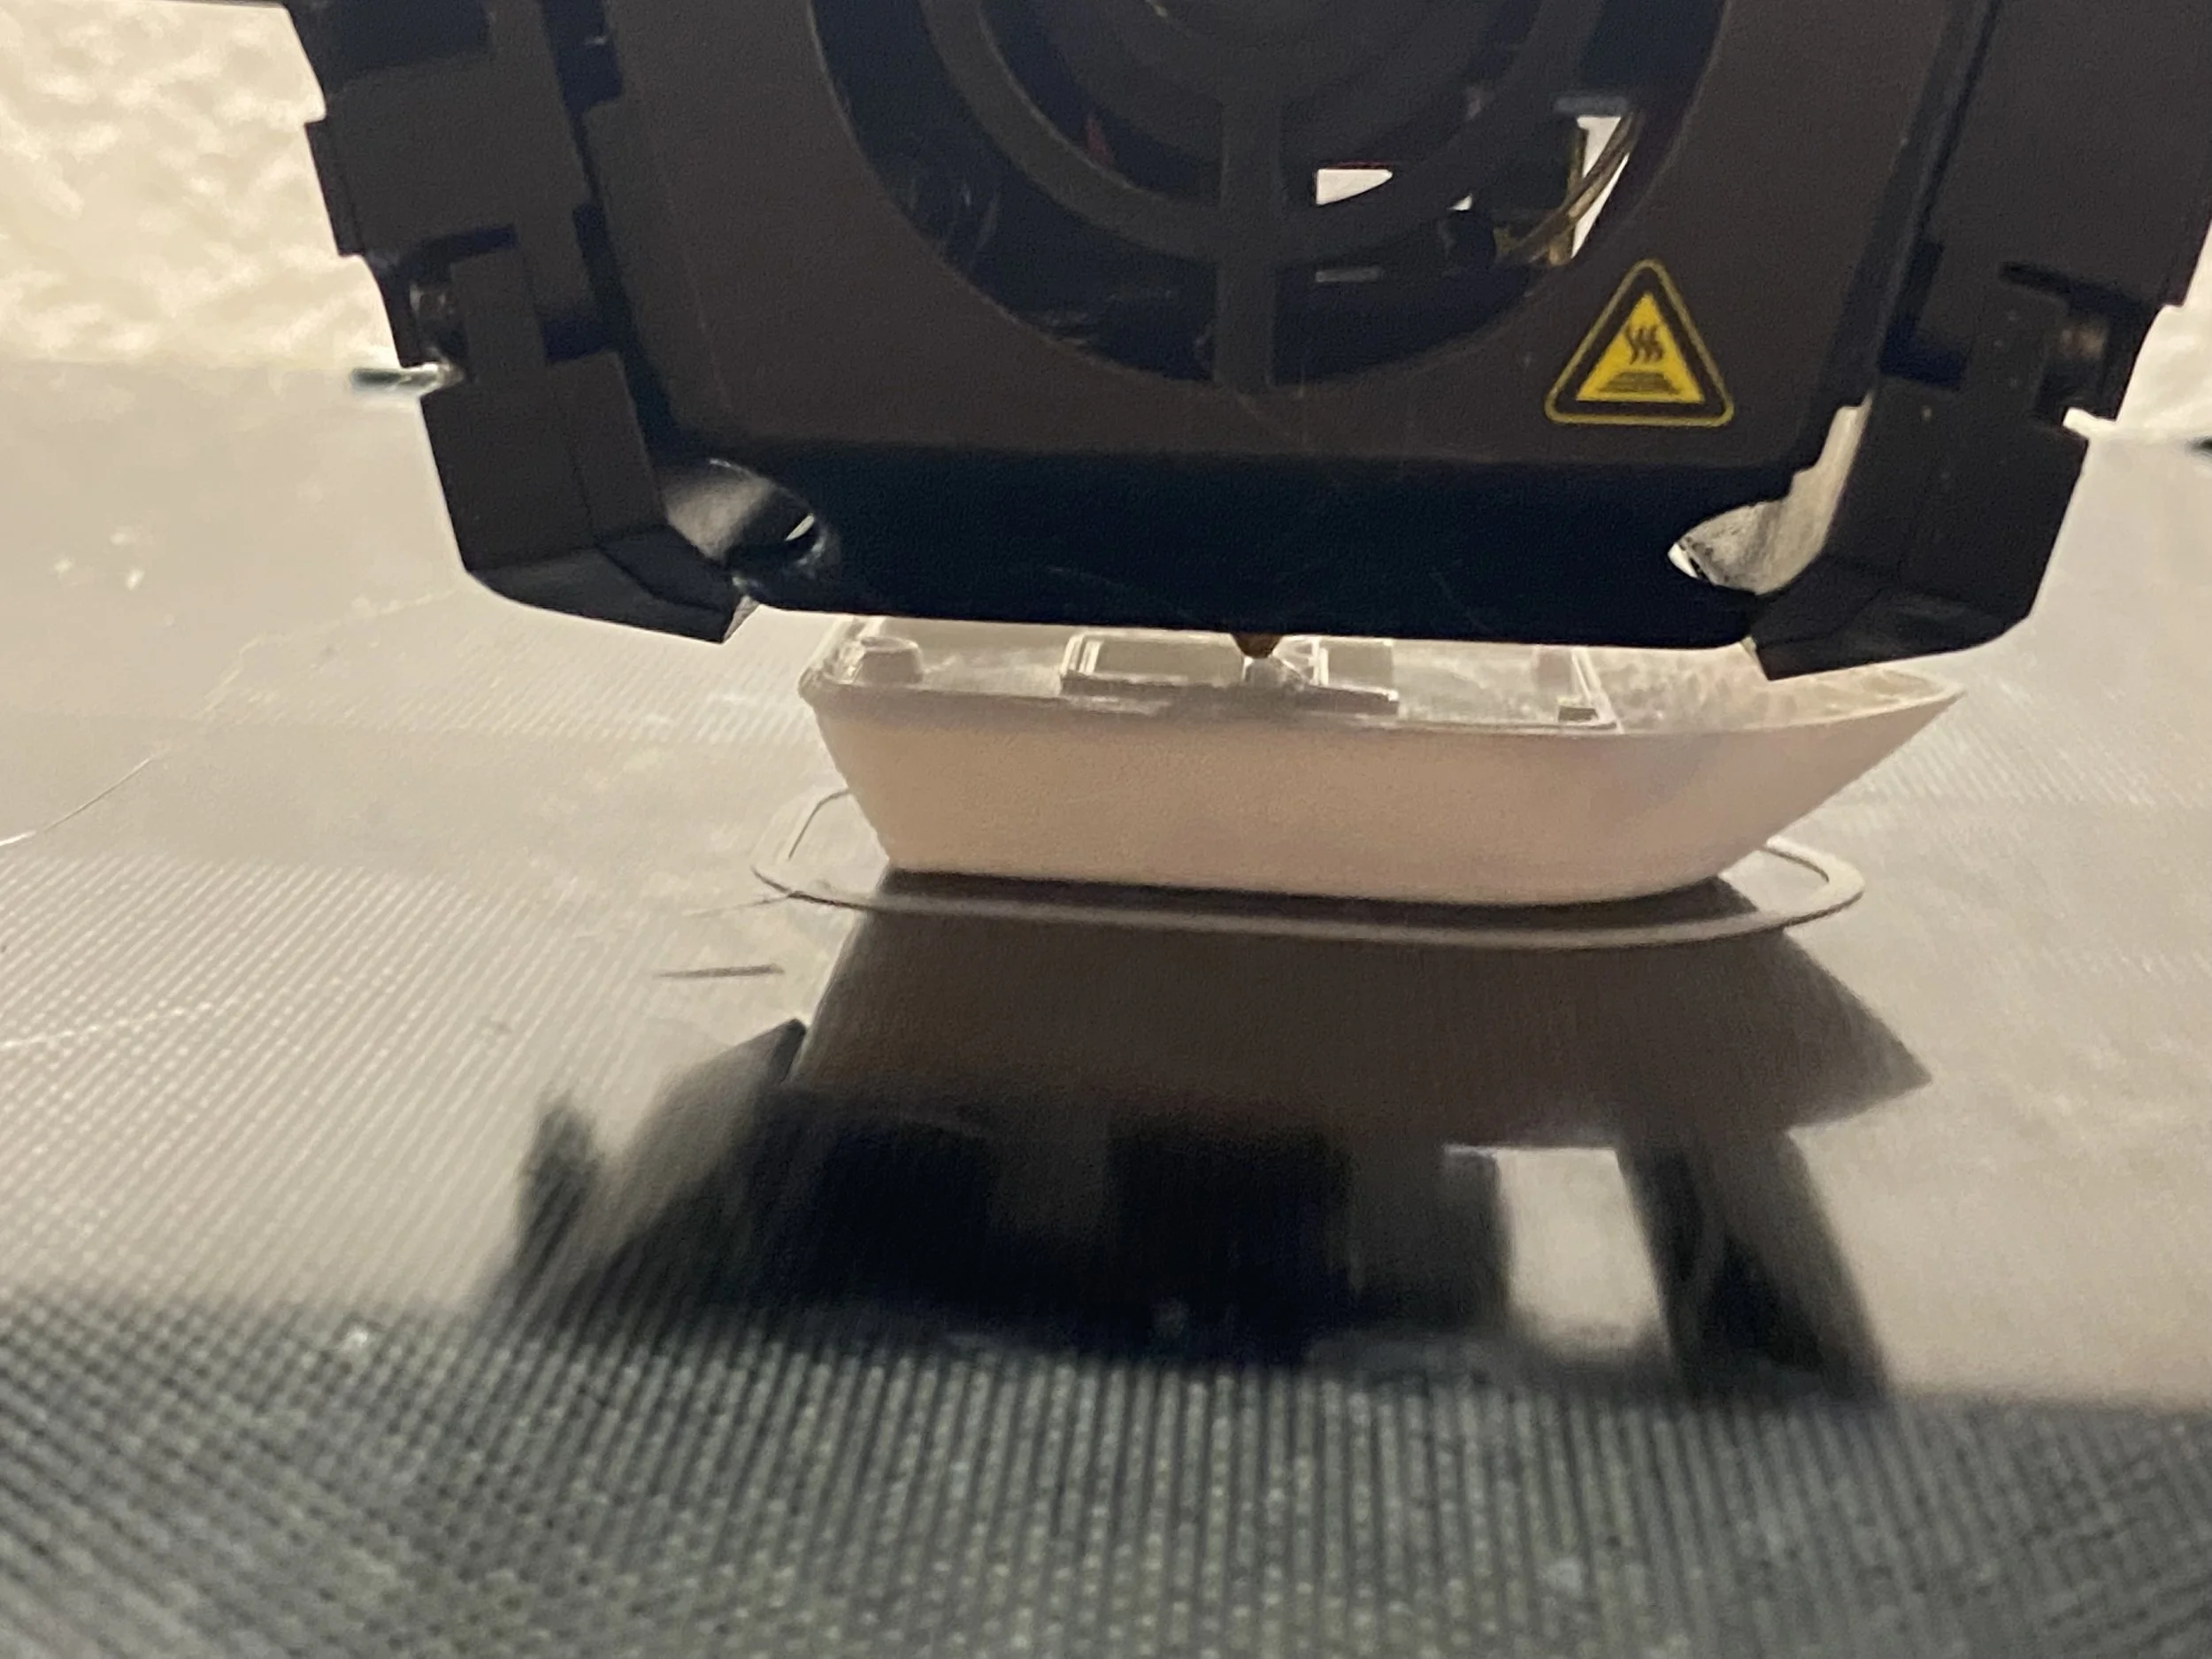
To print using this file, download it and put it onto the SD card. Insert the card into the printer’s SD card slot, then select Print from TF >> 3DBenchy.gcode. The printer will heat up first, then auto-home, then begin to print. It’s important to watch the first layer as it prints to be sure that the printer is leveled correctly. If needed, you can adjust the leveling knobs as the print starts to make any small adjustments.
What’s Next?
Now that you know how to print with your Creality Ender 3 Max, you can start exploring how to slice your own models. We recommend downloading the latest version of Cura from ultimaker.com to get started. Once you download and install it, you’ll see prompts to select your 3D printer model. The Ender 3 Max isn’t listed as of this writing, but you can use the Ender 3 profile without issue. The only change you’ll need to make is to increase the build volume to 300 x 300 x 350 mm. To do this:
Select the printer name (Creality Ender-3) on the top left.
Click Manage Printers.
Click Machine Settings in the dialog.
Update the X, Y and Z settings to 300, 300, and 350 respectively.
Close both windows.
You can now prepare a 3D model file, or STL file, to be 3D printed:
Drag the STL file into Cura. You can find models to print on the included SD card, or online from websites such as thingiverse.com.
Click Slice to generate the gcode printer commands for the model.
Insert your SD card into your computer, then click Save to Removable Drive on the bottom right.
Once completed, you can move the SD card to the printer and print using the Print from TF menu.
You can print many things with the default slicer settings, but its a good idea to learn more about the various printer settings and how they will impact the results. A good place to start is the Cura Getting started guide, which will walk you through the basic settings.
If you have any questions or feedback about this article, please let us know through our Contact Page!