Creality 3D Printer Extruder Overview
In this article, we will take a look at all of the extruders that are used on Creality printers, how they work, issues we have discovered, and whether we recommend upgrading them.
A 3D printer’s extruder is responsible for pushing the plastic filament into the hot end, where it is melted and deposited onto the print bed. It’s imprtant that the extruder provides consistent force to move the filament, since either too much or too little flow will result is poor quality prints, or total failure to print in extreme cases. For that reason, it’s important that your 3D printer has a high quality extruder, and that you know what problems might be caused by an issue with the extruder. Before getting into the details, lets look at some basic terminology you’ll need to know about 3D printer extruders in general.
Note: Creality Experts receives a commission for items you purchase from this page, at no additional cost to you. For more information, please see our affiliate link policy.
Extruders Overview
There are many different extruder designs, but they all share a few key characteristics:
They use pressure, usually from a spring, to push a motorized toothed pulley onto the filament in order to grip it and move it into the hot end.
They are powered by a stepper motor, similar to the ones that move the print head in the X, Y and Z direction. You’ll often see E as shorthand to refer to the extruder’s stepper motor.
There are two common configurations for extruders, Direct Drive and Bowden, and Creality produces 3D printers that use each type. While there are advantages and disadvantages to both types, we have found that direct drive takes the edge and is our preference. We’ll cover the advantages of each in more detail below.
Bowden
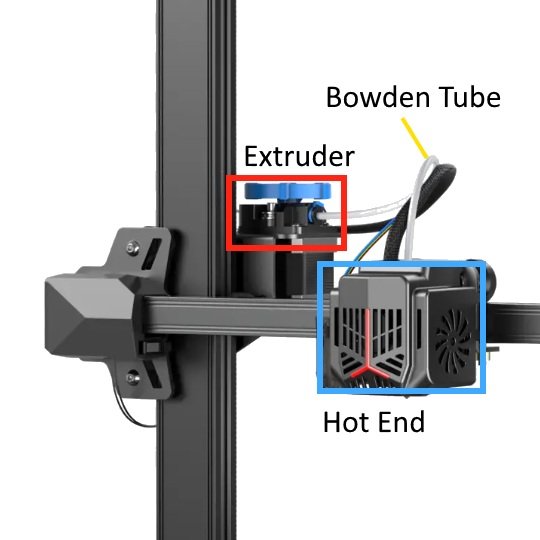
The Creality Ender 3 V2 Neo uses a Bowden extruder, mounted on the left side of the gantry.
Bowden extruders are mounted separately from the print head, typically on the side of the printer, and route filament to the hot end using PTFE tubing (otherwise known as the Bowden tube).
Benefits:
The separate extruder means that the print head is lighter, allowing for faster printing and less likelihood of artifacts like "salmon skin" from inertia of the added weight.
Easier to upgrade and maintain, since the hot end and extruder can be modified independently and use simpler designs.
The simpler design means they are typically less expensive and result in a lower total printer cost.
Typical retraction distance: 7.5 mm
Driect Drive
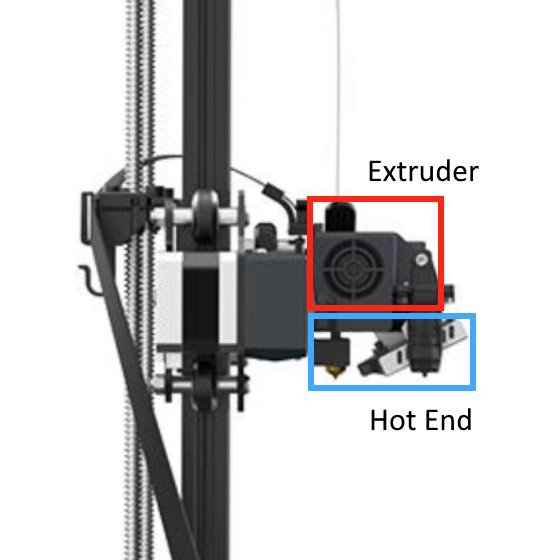
The Creality Ender 3 S1 uses a direct drive extruder. You can see that the filament is loaded directly into the print head.
Direct drive extruders are mounted right above the hot end, and push the filament directly into it. This requires that the extruder moves along with the print head.
Benefits:
The close proximity of the extruder and hot end means that retraction distances can be much less, allowing for easier management of stringing and other print artifacts that result from retraction.
Less prone to jamming, since the shorter retraction distance does not bring hot filament as far back into the cool zone of the hot end.
Easier to load and unload filament.
Much easier to print flexible filaments like TPU.
Typical retraction distance: 0.8 mm
Extruder Gearing
Another variable in extruder construction is the gearing between the extruder motor and the extruder gear that contacts the filament. Typically, Bowden extruders mount the extruder gear directly to the motor, while direct drive extruders use additional gearing in order to fit in the more restrictive space above the hot end. Although additional gearing adds complexity, it does have benefits. It increases the torque provided by the extruder motor and allows more fine control over the filament movement.
That said, we have had success with both styles of extruder, so we haven’t seen a huge difference between geared versus ungeared extruders. It is important to understand the difference when changing extruders, since you will need to adjust your printer’s E-steps setting, which determines how much to turn the extruder when pushing filament a certain distance.
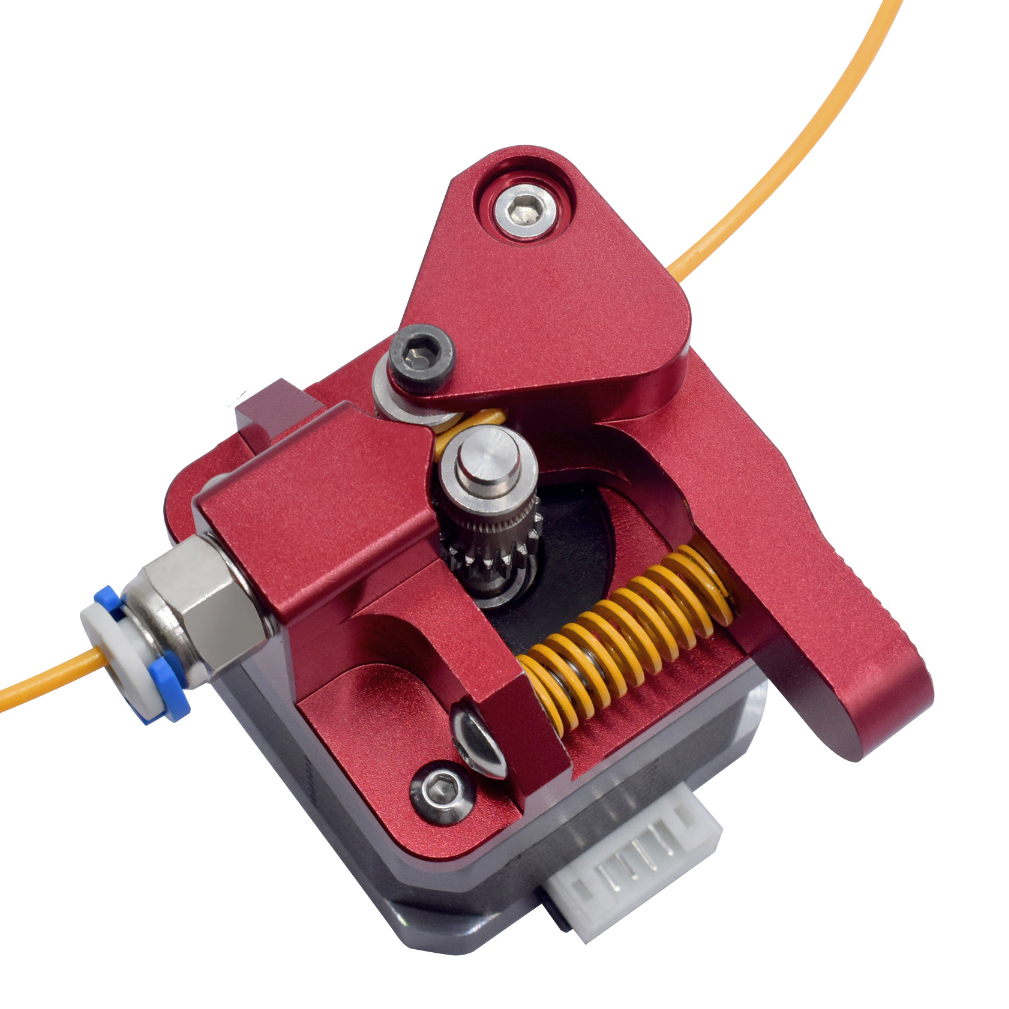
On this Bowden extruder, the extruder gear is mounted directly to the motor, making the design very simple.

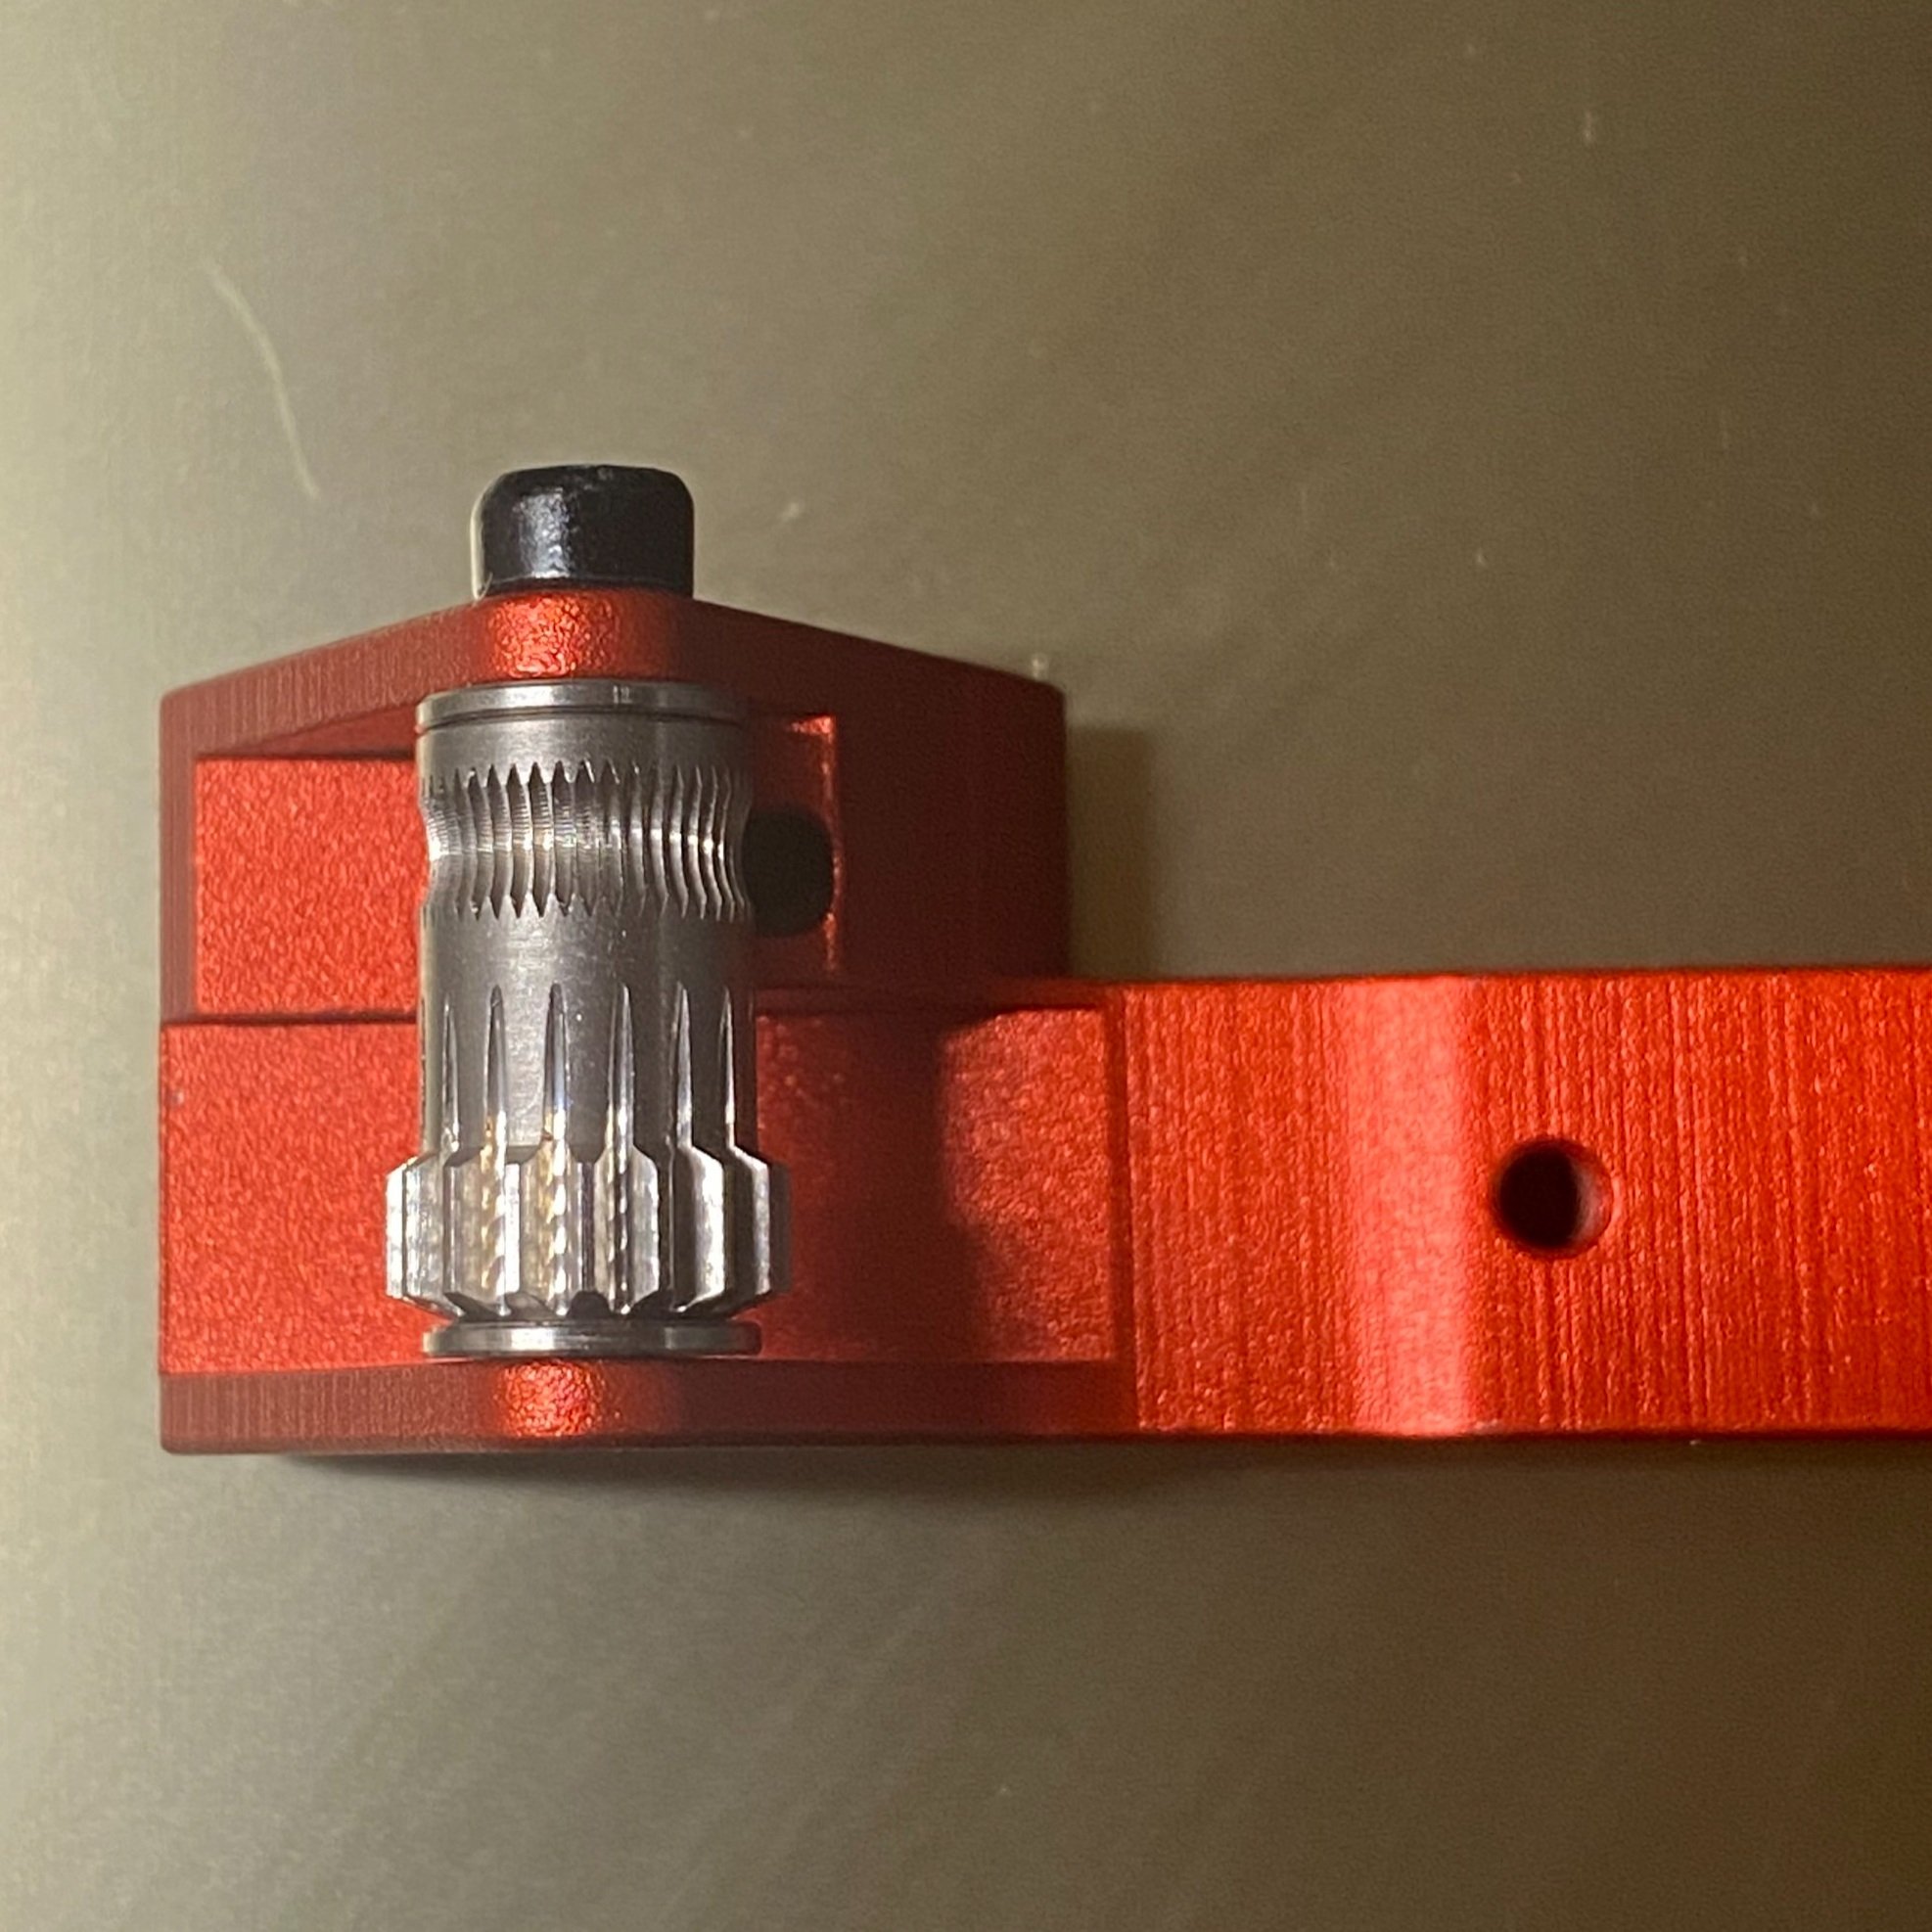
The Ender 3 S1 extruder motor is mounted to the small central gear (under the spring), which drives an offset extrusion shaft. This configuration is borne out of space constraints, but also improves torque.
Bowden Extruders on Creality 3D Printers
This section provides an overview of the different Bowden extruder designs that Creality produces and ships on its 3D printers. We also provide our upgrade recommendations for each extruder.
Plastic Single Gear

This extruder design is what shipped on the first Creality 3D printers, starting with the CR-10, and it can still be found on some of the newer budget 3D printers like the Ender 3 and Ender 2 Pro. The single-gear design is a fairly simple mechanism, using a single toothed gear attached directly to the extruder motor to drive the filament, with a free turning idler pulley on the other side of the filament.
This design is generally effective, however there are a number of issues you can encounter after prolonged use:
The plastic housing is susceptible to cracking over time, since the parts are under constant tension from the springs. It is important to make sure the spring is providing sufficient tension for the single gear to grip the filament well.
The brass gear that ships with these extruders is susceptible to wear over time, and we recommend upgrading to a steel toothed gear which wears much more slowly and likely will never need to be replaced. In a pinch, you can rectify a worn extruder gear by moving it slightly up or down the shaft so the worn-down section is no longer contacting the filament.
There are a few less common issues that you may never encounter, but it is good to be familiar with in case they do happen:
The toothed gear is held in place by two small grub screws, which can become loose over time, leading to the gear falling to the bottom of the shaft and losing grip on the filament.
The idler pulley on the other side of the filament path can seize, causing under-extrusion due to the increased resistance. This is not common, but is hard to track down when it does happen.

The plastic extruder arm is a common failure point for the plastic extruders. We have also seen similar cracks on the housing itself.

A worn brass extruder gear will cause under extrusion and eventually a total failure to extrude.
If your printer has this extruder, we highly recommend upgrading to one of these superior extruders:
Metal single-gear extruder, which is a drop in replacement with no firmware updates needed (upgrade instructions here)
Metal dual-gear extruder, which provides better filament grip but will require calibrating the E-steps of the printer.
Metal Single Gear Extruder

This extruder uses the same design as the plastic single gear extruder, but uses a metal housing and arm which will never break under tension. The rigid metal also ensures that all of the tension from the spring is transferred to the filament gear, improving its grip on the filament. These extruders still do have some of the issues of the plastic version, since they use the same brass toothed gear and pulley, so we still suggest upgrading the gear to a steel version.

The results of an extruder coupler failing. We have never experienced this issue with the integrated coupler on newer models.
The metal single-gear extruder is the workhorse extruder for Creality, and is now becoming more standard across their lineup. The Ender 3 Neo series, released in 2022 as a revamp of past Ender 3 models, all include this extruder. We have these on many of our own 3D printers (with the steel gear upgrade) and are happy with their performance. Newer 3D printers use an integrated Bowden coupler instead of a separate screw-in piece, which we have found to be more reliable and less susceptible to failure.

Newer extruders use an integrated coupler design (left) which we have found to be much more reliable. If you are purchasing an upgrade kit, be sure to choose one with the integrated coupler design.
Aside from the steel tooth gear, we don’t think an upgrade should be high on your list if you have a single gear metal extruder, although there are marginal benefits to a dual-drive extruder such as increased filament grip. Keep in mind that upgrading to a dual-drive extruder will require you to calibrate E steps—more on this in the next section.
Metal Dual-Drive Extruder

The dual drive extruder replaces the toothed gear and idler of the single gear design with two hobbed gears, which each have a concave toothed section for gripping the filament and are connected with gear teeth on the bottom so they simultaneously apply pressure to the filament from both sides. One gear is mounted directly to the motor shaft, and the other uses an internal bearing to rotate freely. Both gears are made of steel and are unlikely to experience wear issues. This extruder is seen on Creality’s premium 3D printers, including the CR-10S Pro, Ender 6, and CR-X Pro.
The new design works very well, and provides superior grip on the filament. Unfortunately, there are a few design flaws of this extruder which will cause it to wear over time:
There is no washer under the free turning gear, so it will eventually wear down the aluminum arm that holds it, and sit lower and lower until it eventually does not contact the filament at all
The shaft of the free gear is just an M3 screw instead of a smooth shaft, which can cause the bearings to wear and fail prematurely

A lightly used extruder shows little wear…

But after a lot of use, the free gear will wear down the base of the extruder arm and eventually lose contact with the filament.
Fortunately, there is an updated version of this extruder on Amazon which addresses both of these issues. We recommend buying the updated version if you already have this extruder style or are upgrading to it. If you are replacing an existing dual-drive extruder, you can simply replace the arm/gear assembly, which comes preassembled in the upgrade kit.
Note: If you are upgrading to a dual-drive extruder from a single extruder variant, you will need to update the E-steps on your printer from 100 to 139 (since the dual drive gear has a smaller radius, more rotation is needed to move the filament the same distance). This setting can be found in Control >> Motion >> steps/mm >> Esteps/mm on the Ender 3 and similar UIs. Be sure to store the configuration (Control >> Store Settings) after updating it or it will revert to the default after powering off the printer.
The upgrade kit includes washers above and below the free gear to prevent the wear issue.

The shaft for the gear is also not threaded, which is another welcome improvement in the kit.
So far, we have not seen this updated version on any of the 3D printers Creality ships, but hope that they will update the design of the stock extruder in the future.
Aside from updating to the version with these fixes, this is a great extruder and we do not recommend upgrading it, unless you want to switch to a direct-drive model.
Enclosed Single Gear

Some of Creality’s newer printers, including the CR-6 SE and CR-10 Smart, use an enclosed single-gear extruder design, which features a lockable lever arm that makes filament loading and unloading easier since it doesn’t require pushing on the lever continuously through the process. However, the housing of the extruder is plastic, likely due to the complex geometry of the parts making it more difficult to manufacture as a metal part.

An inside view of the enclosed single gear extruder.

The design has a lot of small parts and seems needlessly complex.

A cracked housing causes reduction of filament grip, since the idler is held in place by the housing. This is a common issue we have seen reported for this extruder design.
While we have not tested this extruder ourselves, many users have reported cracking in the extruder housing, which causes the idler shaft to be free to move away from the filament. Based on this and the feedback we have seen, we see this as a step back from the metal designs, and recommend replacing it with one of the metal extruders discussed previously.
Direct Drive Extruders on Creality 3D Printers
Sprite Extruder
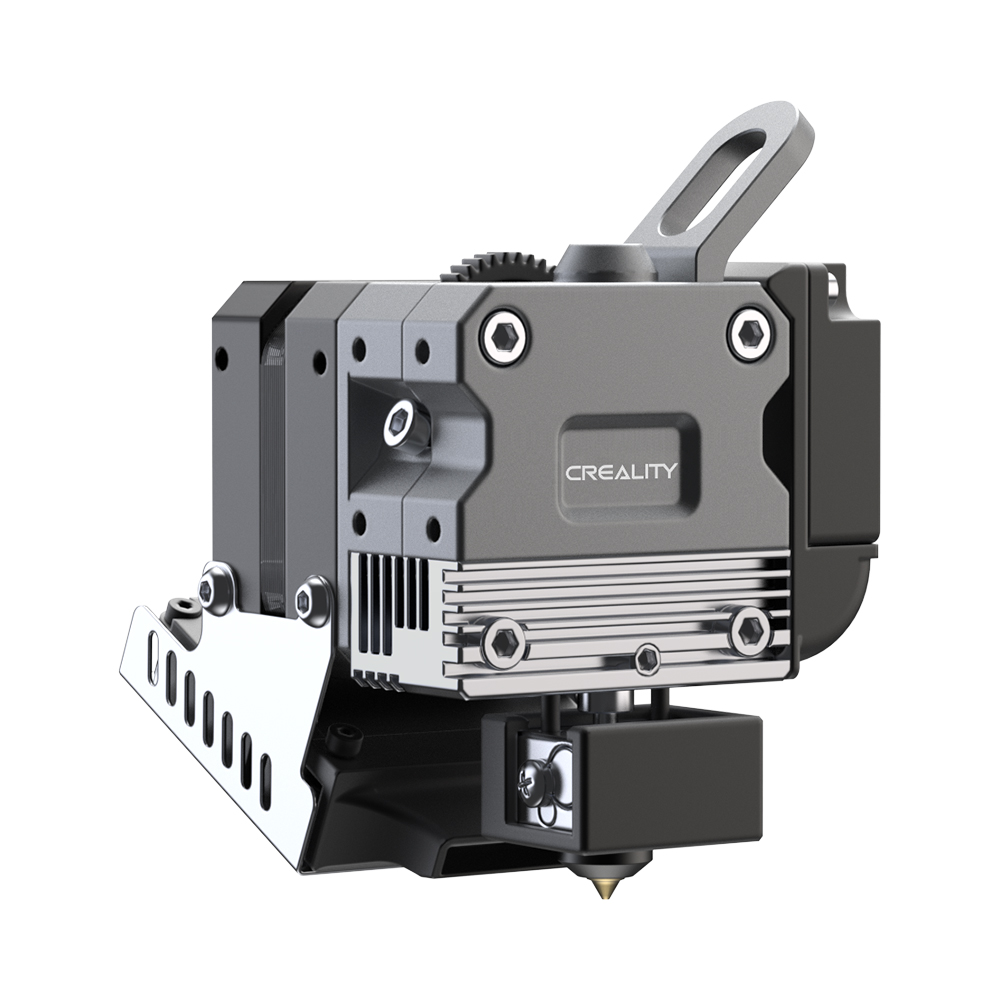

The Sprite extruder uses a dual drive system for improved grip on the filament.
The Sprite extruder is Creality’s first direct drive extruder design, and has been featured on a number of printers starting in 2021, including the CR-10 Smart Pro and the Ender 3 S1 series. The Sprite extruder is compact and small, with a 25mm motor to reduce the total weight of the print head. It is a bit heavier than a Bowden extruder, and most of Creality’s printers with the Sprite extruder include a second Z lead screw to ensure the increased weight is well-supported.
The Sprite design uses a dual-drive system, which uses two powered toothed gears to drive the filament for improved grip. We have extensively tested this extruder with our Ender 3 S1, and have been very happy with the consistent results we’re getting.
Direct drive extruders offer improved performance on retraction, and are significantly more capable of printing with flexible filament such as TPU. They’re also less likely to jam than Bowden extruders, making them more reliable in long-term use.
Note that the Sprite is an integrated unit that includes both the extruder and hot end. In the original version of the Sprite, the hot end uses a short PTFE tube section and is able to print at up to 260° C. There is also a Pro version with an all-metal hot end, described in the next section. The hot end uses the standard nozzles found on many of Creality’s Bowden hot ends—a definite plus over some other designs that use non-standard nozzle threading.
Our only durability concern with the design of the Sprite is that the lever arm is thinner than the arm on some other extruder designs, and we worry it is a potential failure point since the arm is under constant tension. However, we have not had this happen on our Sprite-equipped printers or heard any reports of it as of this writing.
Sprite Pro Extruder
The Sprite Pro is a Sprite extruder with an integrated all-metal hot end. This allows the Sprite Pro to heat up to 300° C, which enables it to print high-temperature materials such as nylon. In all other respects, the Sprite Pro is the same as the Sprite—there are no changes to the extruder itself.
The Sprite Pro is found on Creality’s direct drive-equipped machines with “Pro” in the name, such as the Ender 3 S1 Pro and CR-10 Smart Pro. It’s also available as an upgrade kit (Amazon link) for other Creality 3D printers, and we have an installation guide for that upgrade.
Sprite Extruder-Only Upgrade

The Sprite extruder is also available in a special kit that includes only the extruder itself and is designed to work with the existing hot end on many Creality printers. This version of the Sprite allows users to upgrade a Bowden extruder printer to direct drive without replacing the wiring harness for the hot end, and is also available at a much lower price than the full Sprite extruder and hot end upgrade. It’s compatible with many of Creality’s Bowden-equipped printers, including the CR-10, Ender 3, Ender 3 V2, and Ender 5.
This drop-in Sprite upgrade offers most of the advantages of a direct drive extruder, but due to its design, it does result in a slightly longer filament path from the extruder to the hot end compared to the fully integrated version of the Sprite. This means its retraction performance isn’t quite on par with the full Sprite upgrade, although it’s much better than a Bowden extruder. Additionally, its ability to print high-temperature materials is dependent on the hot end in use, so you will need an all-metal hot end to print high temperature materials. The Sprite Pro upgrade, on the other hand, includes an integrated all-metal hot end.
This extruder is a great option for users who want to add direct drive to an existing Creality 3D printer but don’t want to open the printer casing or change wiring. It’s important to note that there are two versions of the upgrade, intended for different printer models—see our direct drive extruder buying guide to make sure you find the right kit for your printer. Additionally, we have an installation guide for this upgrade.
E3D Titan Extruder


The internals of the E3D Titan, showing the gearing system used to drive the extruder gear.
Creality’s first entry into direct drive extruders was the use of an E3D Titan extruder on the CR-10 V3. This extruder uses a fairly large motor (the same 40mm motor used on the previous Bowden extruders), and is therefore heavier than newer extruder models like the Sprite, which we’ll cover next. The printers that use this extruder all have dual Z axis motors, which does help mitigate the extra weight.
Inside the Titan extruder, the extruder gear is connected to the separate motor shaft through a gear system with a gear ratio of 3:1. Like the single-gear Bowden designs, the filament is driven on one side, while the other side is held by a freely rotating idler pulley. Below the gear, the filament path is fully enclosed, which is important to prevent jamming when printing with flexible filaments like TPU.
We haven’t tested this extruder, but we have not heard of any common issues with it. E3D is a reputable brand, so we trust that this extruder works well and do not see a reason to upgrade it if you own one.
Upgrading the Extruder on Creality 3D Printers
Upgrading the extruder is a fairly straightforward upgrade that you can complete with the tools that are included with your 3D printer. If you are moving from Bowden to direct drive, the upgrade can be a bit more involved. Before getting into the details, here’s a recap of our upgrade recommendations:
Which extruders should you upgrade?
An upgrade is highly recommended
Plastic Single Gear Extruder
Enclosed Single Gear Extruder
An upgrade is worth considering
Single Gear Metal Extruder
An upgrade is not recommended
Dual Gear Metal Extruder**
E3D Titan Extruder
Sprite Direct Drive Extruder
Upgrade to (Amazon links):
Upgrade to (Amazon link):
*The metal dual-gear upgrade requires setting the E-steps due to the smaller radius of the toothed gear.
**if you have the dual-gear metal extruder, we do recommend replacing the arm with the updated version to avoid wear issues, but do not feel that changing to a different extruder type is worthwhile.
We currently have an upgrade guide for the single gear extruder, and will add more to this page as we develop them. If there are guides you’d like to see, please contact us to let us know!
Switching from Bowden to Direct Drive
In most cases, we don’t think that moving from a Bowden extruder to a direct drive extruder is worth the added effort of the upgrade, but if you are looking to print flexible filaments, it is worth considering. If you have issues with frequent jamming, a direct drive extruder may also be worth considering since it will reduce the chances of jamming due to heat creep. This is mainly due to the much smaller retraction distances, since the large retraction movements required with Bowden extruders bring more heated filament into the cold side of the hot end.
The sprite extruder kit is almost fully assembled, and is fairly easy to install
If you do want to make the switch, the easiest direct drive upgrade is the Creality Sprite extruder due to its lighter weight and straightforward installation process, since Creality sells it as a fully assembled kit. However, this kit is more expensive than other options. The upgrade also includes an all-metal hot end, which allows you to print at higher temperatures for more demanding materials like nylon and reduces wear. However, these hot ends can be a bit more susceptible to jamming than a standard hot end (although this is less of a concern with a direct drive extruder). The Sprite extruder kit is available on Amazon here:
Note: Creality also produces the E-Fit dual gear extruder kit which integrates with the existing hot end. We tried this kit and had some issues with the hot end being loose and found that the included solution for part cooling is not effective. Installation is also more involved, since it requires using the pans from the existing hot end. For these reasons, we think the sprite is a better option.
Updating E-steps
After upgrading to a dual-gear metal extruder or a direct drive extruder, you’ll need to set the E-steps on your printer to match the extruder. The new setting will depend on the specific extruder model you are updating to, and you should always start with the setting in the reference material that is included. Generally, the settings should be close to the below for each extruder type:
Single Gear Extruder (plastic, metal, and enclosed) - 100.0 steps/mm
Dual Gear Metal Bowden Extruder - 139.0 steps/mm
Titan Direct Drive- 415.0 steps/mm
Sprite Direct Drive - 424.9 steps/mm
The E-steps can be configured and saved through the printer’s UI, and does not require a firmware update.

Setting E-steps on an Ender 3 style LCD.

Setting E-steps on an Ender 3 V2 style LCD.
Updating E-steps on the Ender 3 Style LCD
Navigate to Control >> Motion >> steps/mm >> Esteps/mm.
Set the value to the new extruder setting (see above).
Store the configuration using Control >> Store Settings so it persists after power off.
Updating E-steps on the Ender 3 V2 Style LCD
Navigate to Control >> Motion >> Transmission Ratio >> Transmission Ratio E.
Set the value to the new extruder setting (see above).
Store the configuration using Control >> Storage Configuration so it persists after power off.
After calibrating the E-steps, we recommend fine tuning it by performing an E-steps calibration, where you compare the actual extrusion to the expected amount to adjust for any imperfections.