Creality Ender 3 V2 Neo Review
The Creality Ender 3 V2 Neo is the 2022 iteration of Creality’s popular Ender 3 series of 3D printers. Building upon the success of the Ender 3 V2, the V2 Neo ships with a number of improvements and upgrades at nearly the same price, aiming to compete with other new entries in the budget 3D printer space such as the Anycubic Kobra. But does this new Ender 3 model stack up against the growing competition, and is it worth the price premium over other Ender 3 models?
In this review, we’ll take a look at how to assemble the Ender 3 V2 Neo, whether the Ender 3 V2 Neo is easy to use, and the overall print quality you can expect. We’ll then discuss our recommendations to help you decide whether the Ender 3 V2 Neo is a good fit for you, whether this is your first 3D printer or your tenth.
Note: Creality Experts receives a commission for items you purchase from this page, at no additional cost to you. For more information, please see our affiliate link policy.
Packaging and Unboxing
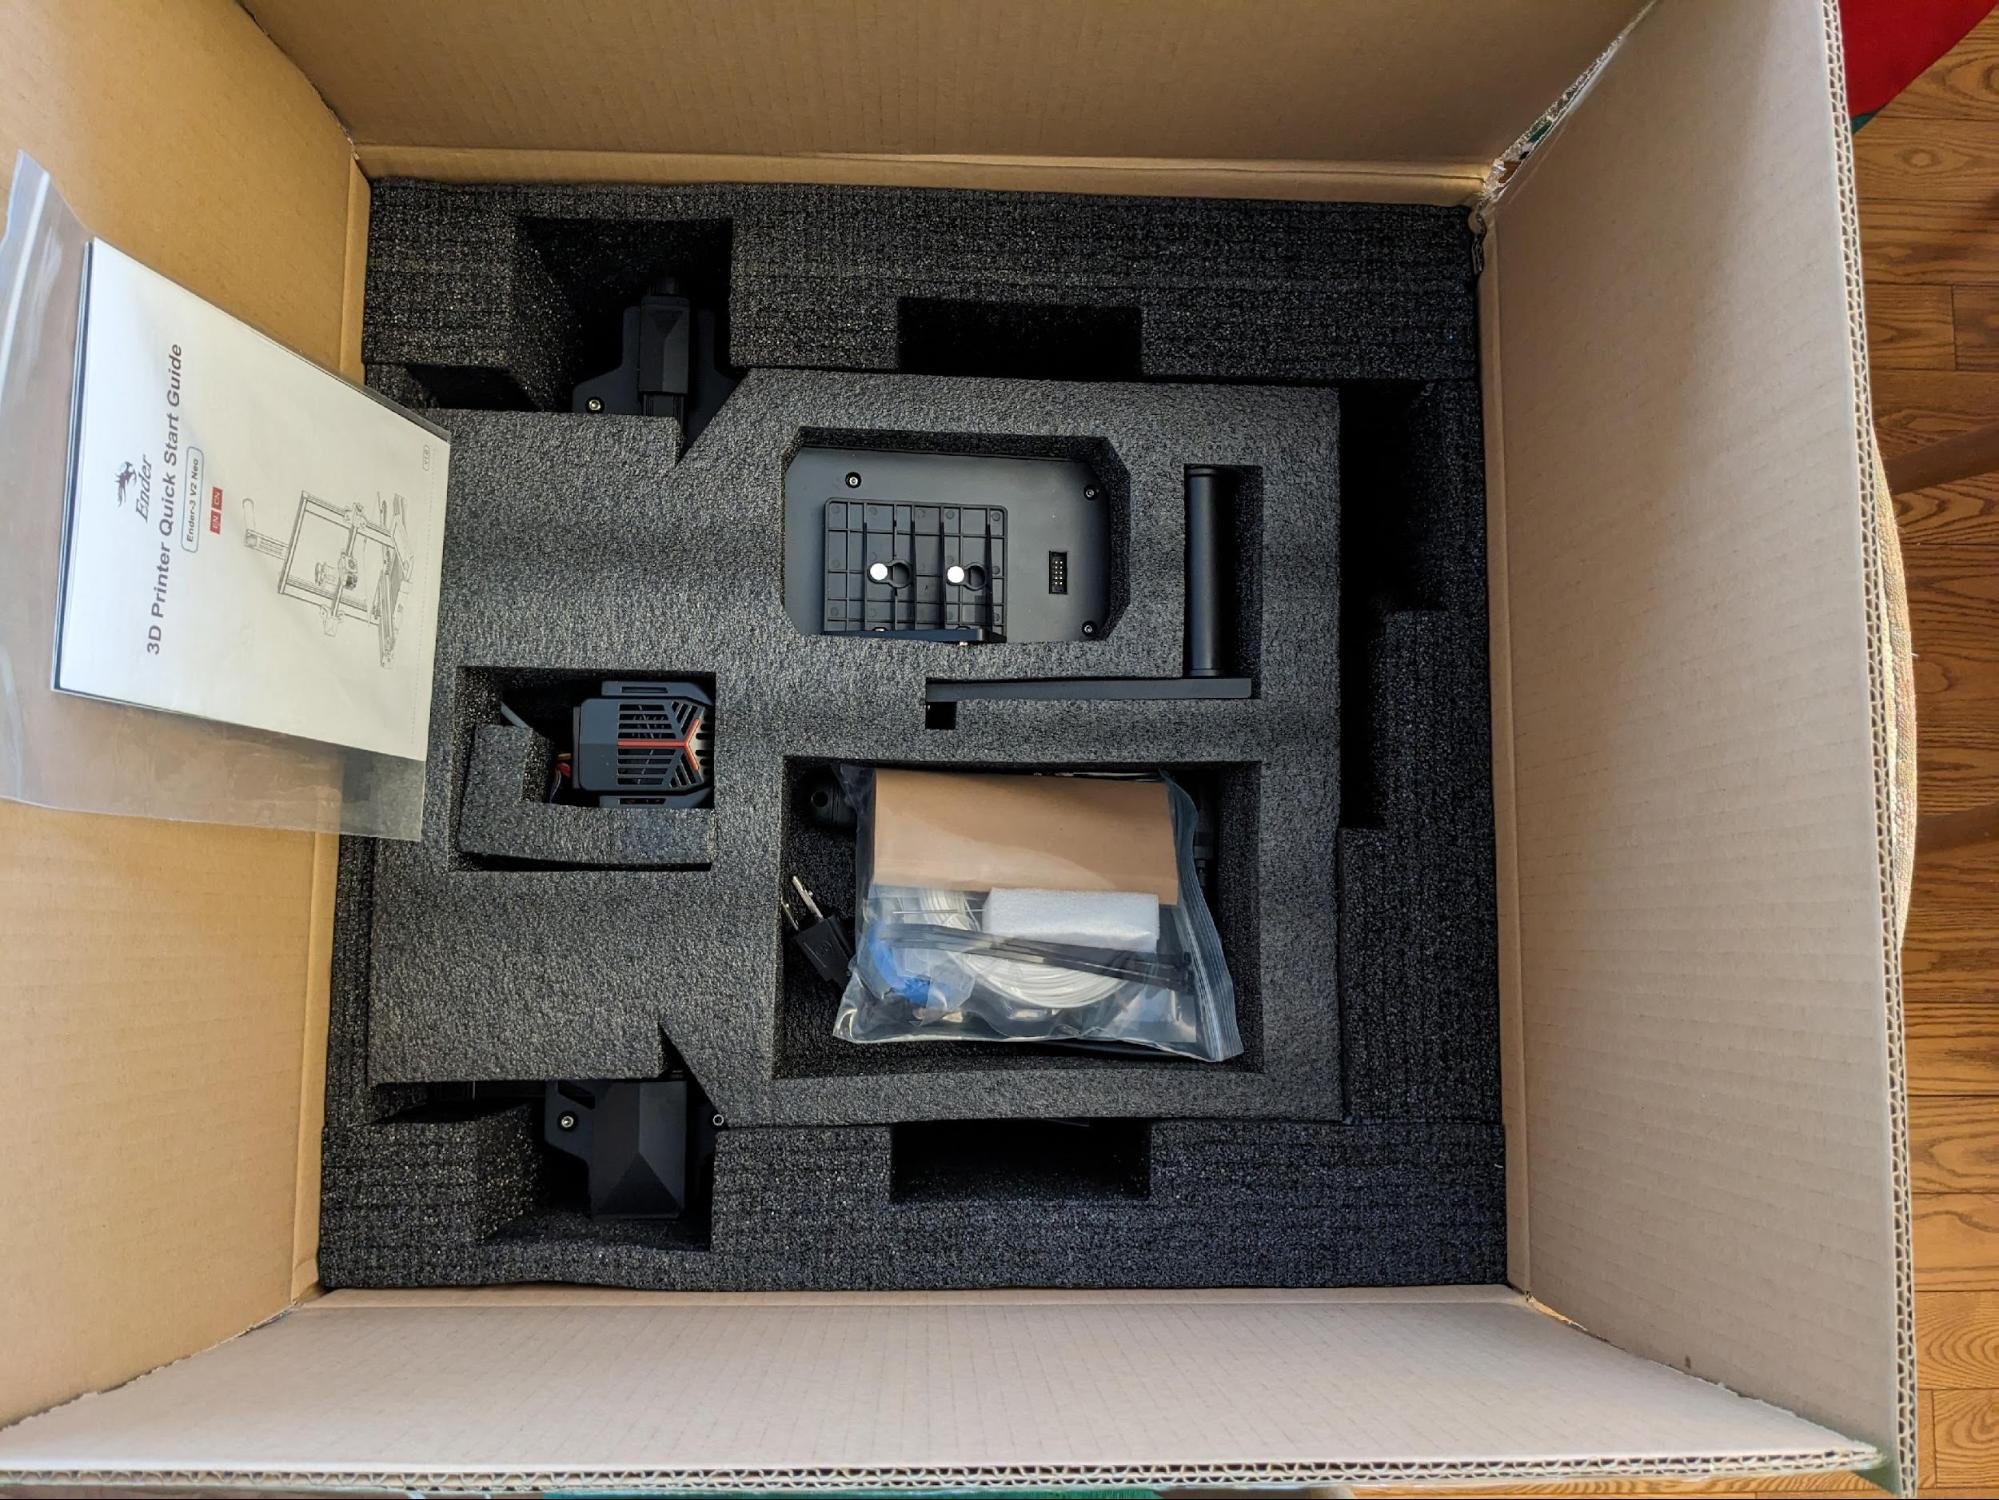
The Ender 3 V2 Neo comes in a fairly large box that is larger than previous versions of the Ender 3 due to the fact that it arrives partially assembled. However, to save some space, the gantry is not attached to the base. Everything is well-retained in thick foam with cutouts. The parts sit on top in cutouts in the foam, underneath is the gantry, and the base sits at the bottom of the box. The parts are very well protected and separated from each other to protect from shipping damage, similar to what we have seen with other Creality printers.
The printer includes a typical set of accessories, including a number of spare parts, the tools you’ll need for assembly, and flush cutting nippers (very useful for cleaning prints!)

Included Accessories - a nozzle cleaner, micro SD card in a USB adapter, tools, sample filament, and flush cutting nippers.
Assembling the Ender 3 V2 Neo
General Overview of Assembly
We were pleased to see that the connectors are all labeled and keyed to only insert one way, making the assembly process very beginner friendly. The instructions indicate which connectors are 6-pin or 2-pin and how many wires are in each connector, making it easy to identify the right connector.
While the text and illustrations of the provided paper guide are very small, there’s a full manual on the included micro SD card which is much more complete with text and illustrations that are far easier to read—it’s worth looking at this on a computer or phone to aid in assembly. Note that this manual is not available on the Creality website as far as we see, so make sure to back up the files from the SD card. The connectors all branch off of a single cable bundle running out of the mainboard housing in the base. This cable bundle is nicely sleeved coming out of the base to the hot end. It splits out to a ribbon cable and further separates out to a series of connectors near the extruder. The only exception is the Z axis stepper motor connector, which is attached to the base. The gantry is oriented so that the nozzle assembly faces forward with the display on the right and the Z axis stepper motor and lead screw on the left. Be aware of this orientation during assembly – if the Z axis connector doesn’t reach, the gantry is facing backwards.
Only the video on the included micro SD card shows where Creality recommends you install the cable ties – two of these secure the print head cable to the extruder and one secures the ribbon cable further up the sleeved cable.
Assembly Process
Assembling the Ender 3 V2 Neo took about 15-20 minutes, rather than the hour or more that the previous Ender 3 models could take, and is definitely more beginner friendly. While we recommend you use Creality’s instructions for the assembly, we’ll walk through the assembly process to give you an idea of what it entails.
1. Position the gantry and secure it with bolts. This is tricky as the entire printer with the unattached gantry must be pushed over the edge of the work area to insert and tighten the bolts from underneath. Once one bolt is tightened and the gantry is firmly attached, the rest of the bolts are much easier to install.
2. Install the display, filament reel holder, and filament advance indicator knob. The display attaches to a bracket and the bracket attaches to the rail with 3 screws. With the display attached to the bracket, it’s impossible to access the upper screw, so it’s best to attach the bracket without the display, then slot the display back onto the bracket.
3. Connect the LCD display to the nearby multicolored ribbon cable.
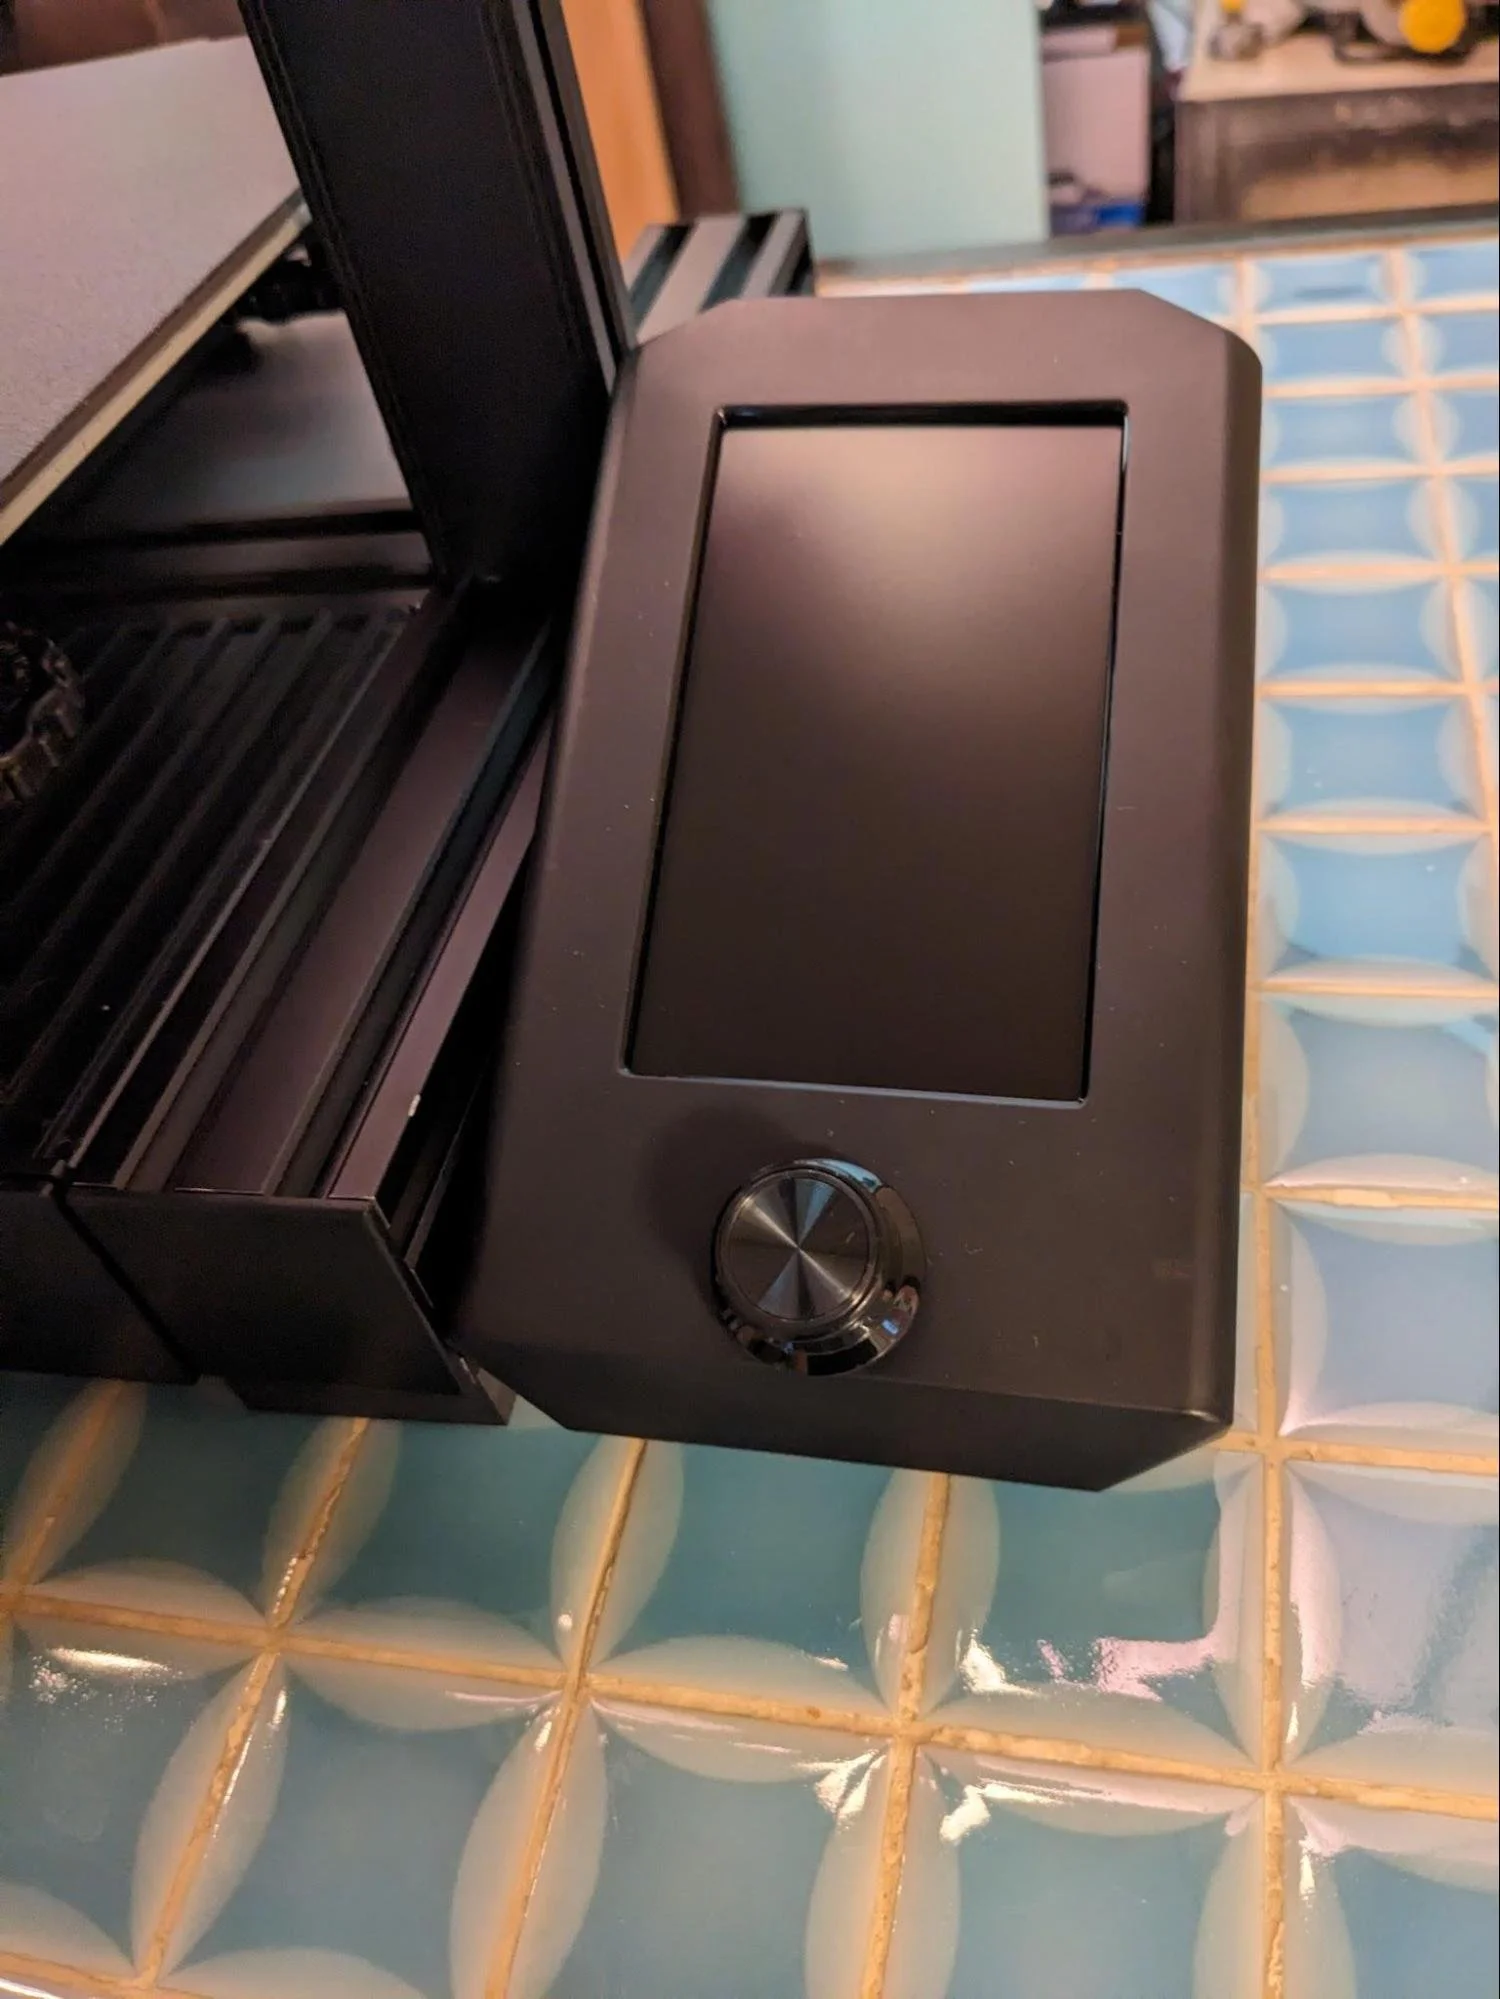
The display is attached to the rail by 3 screws on a bracket underneath (not visible).
4. Connect the X axis stepper motor, extruder motor, and X-axis limit switch.
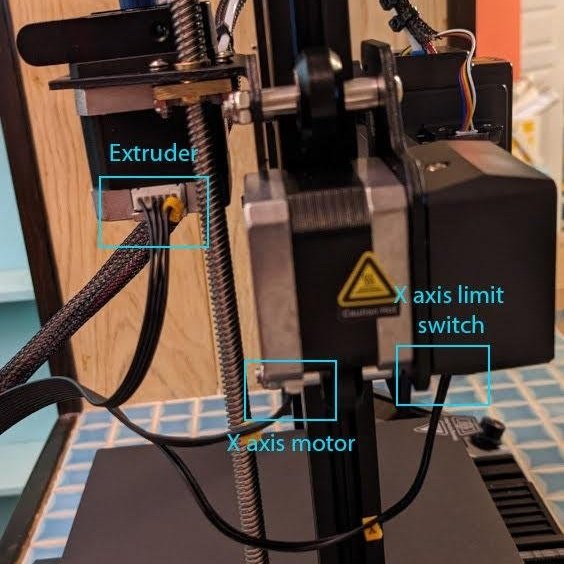
Cable connections for the electronics on the gantry.
5. Connect the Z axis stepper motor cable.
6. Finishing touches: Attach the blue extruder advance indicator knob, Z axis stepper motor connection, and cable ties on extruder and sleeved cable.
7. Before turning the printer on, verify the voltage is set correctly on the power supply. Like most 3D printers, the Ender 3 V2 Neo is equipped with a power supply that does not automatically adjust to incoming voltage. This may be a surprise to those new to 3D printing and used to computer power supplies. The selection switch is set from the factory to 230V, requiring you to change the setting if you are in an area with 120V power, such as the US. This is indicated in the quick start and complete manuals and there’s a prominent yellow warning sticker showing this, which is good because the switch is relatively far inside the housing and is a little hard to see based on lighting conditions.

Extruder advance indicator knob, Z axis stepper motor connection and cable ties on extruder and sleeved cable.

Make sure you set the input voltage properly, or the printer will not turn on.
Ender 3 V2 Neo New Features
The Ender 3 V2 Neo includes a few new features we were particularly excited to check out.
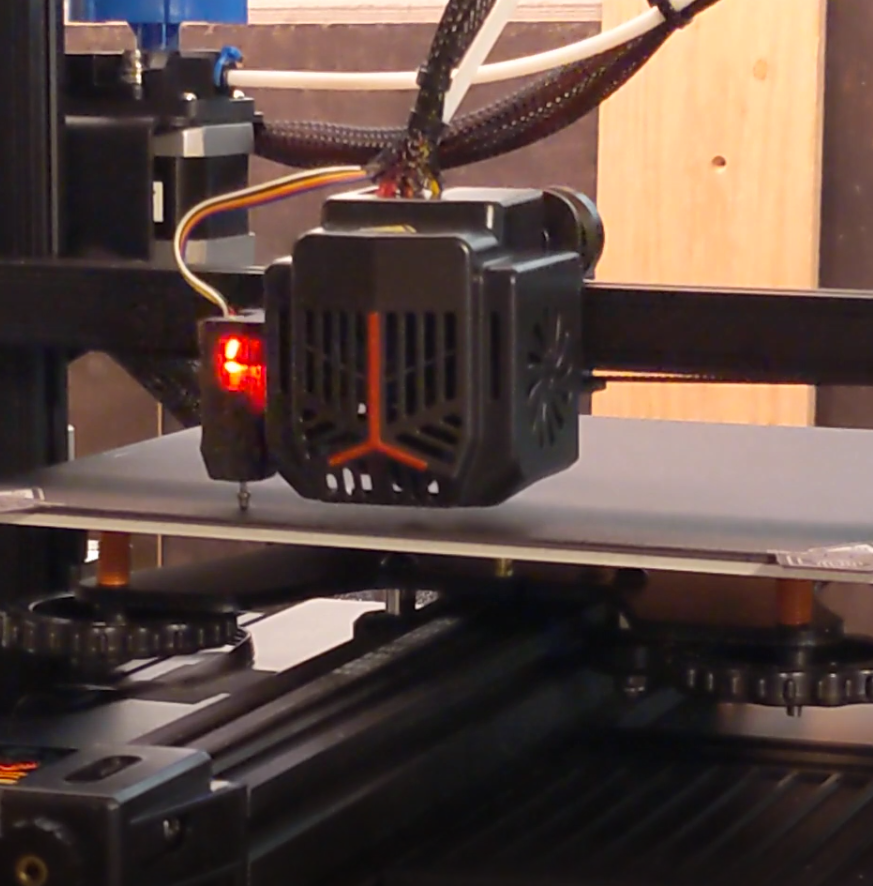
The CR-touch sensor probing the bed as part of the mesh leveling procedure.
Using the CR-touch Auto Bed Leveling
Although the Ender 3 V2 Neo is equipped with CR Touch automatic bed leveling, it’s still a good idea to roughly level the bed manually, especially before your first print. Auto leveling works best on a bed that’s already close to level.
To level the bed, refer to this article on our site. This is also covered in the helpful video included on the micro SD card, which has steps more specific to the Ender 3 V2 Neo. When you level the bed, move the nozzle to each corner carefully, moving the paper around as you do so to make sure the paper is still free. Stop if the nozzle suddenly snags the paper and adjust the bed leveling knob closest to the nozzle to lower the bed until the nozzle is free again.
Once you’ve roughly leveled the bed, the video then instructs you to trigger the CR Touch auto leveling, which is like magic if you’ve never seen it before! The CR Touch module turns its indicator LED from purple to blue and extends its metal probe. The nozzle starts in the center and moves around to 16 spots spread over the bed. It lowers slowly until the CR Touch probe touches the bed and depresses, changing the probe light from blue to red. This creates a 3D mesh profile of the bed, mapping its slight height variances. On every print, the printer reads this mesh profile and adjusts for the mapped bed height throughout the bed area. This results in prints with a consistent first layer, which is critical for successful and high-quality 3D prints.
Some procedures advise you to perform bed leveling with both the nozzle and the bed heated so that expansion due to heat is taken into account. With regards to this, we found something unusual: if bed leveling is triggered from the display, the nozzle and bed heaters will turn off. Due to this odd behavior, the nozzle will be rapidly cooling and the bed will be slowly cooling while the auto bed leveling is taking place. But there’s a workaround if you want to do the leveling with a heated bed and nozzle. If bed leveling is triggered by adding the “G29” command after the heating commands into your custom start G-code in your slicer software, it works as expected.
Updated Hot End
Creality introduced a new hot end for the Neo series, with a couple of notable updates over the previous design. The new enclosure is easy to see in images of the printer, but a less obvious feature is that the heat sink has been redesigned to help prevent filament jams. Jams are typically caused if filament gets hot too soon and melts within the heatsink section before it reaches the nozzle, so improved cooling of the portion before the heated nozzle is an important new feature that should improve reliability.
We were also pleased to see a more robust connector for the PTFE tubing at the top of the hot end - we have seen these fail on some printers and need to be replaced, but the new one appears to be fully metal and less prone to failure. Previous designs used small metal teeth to hold the tube in place, which would break and fail over time.
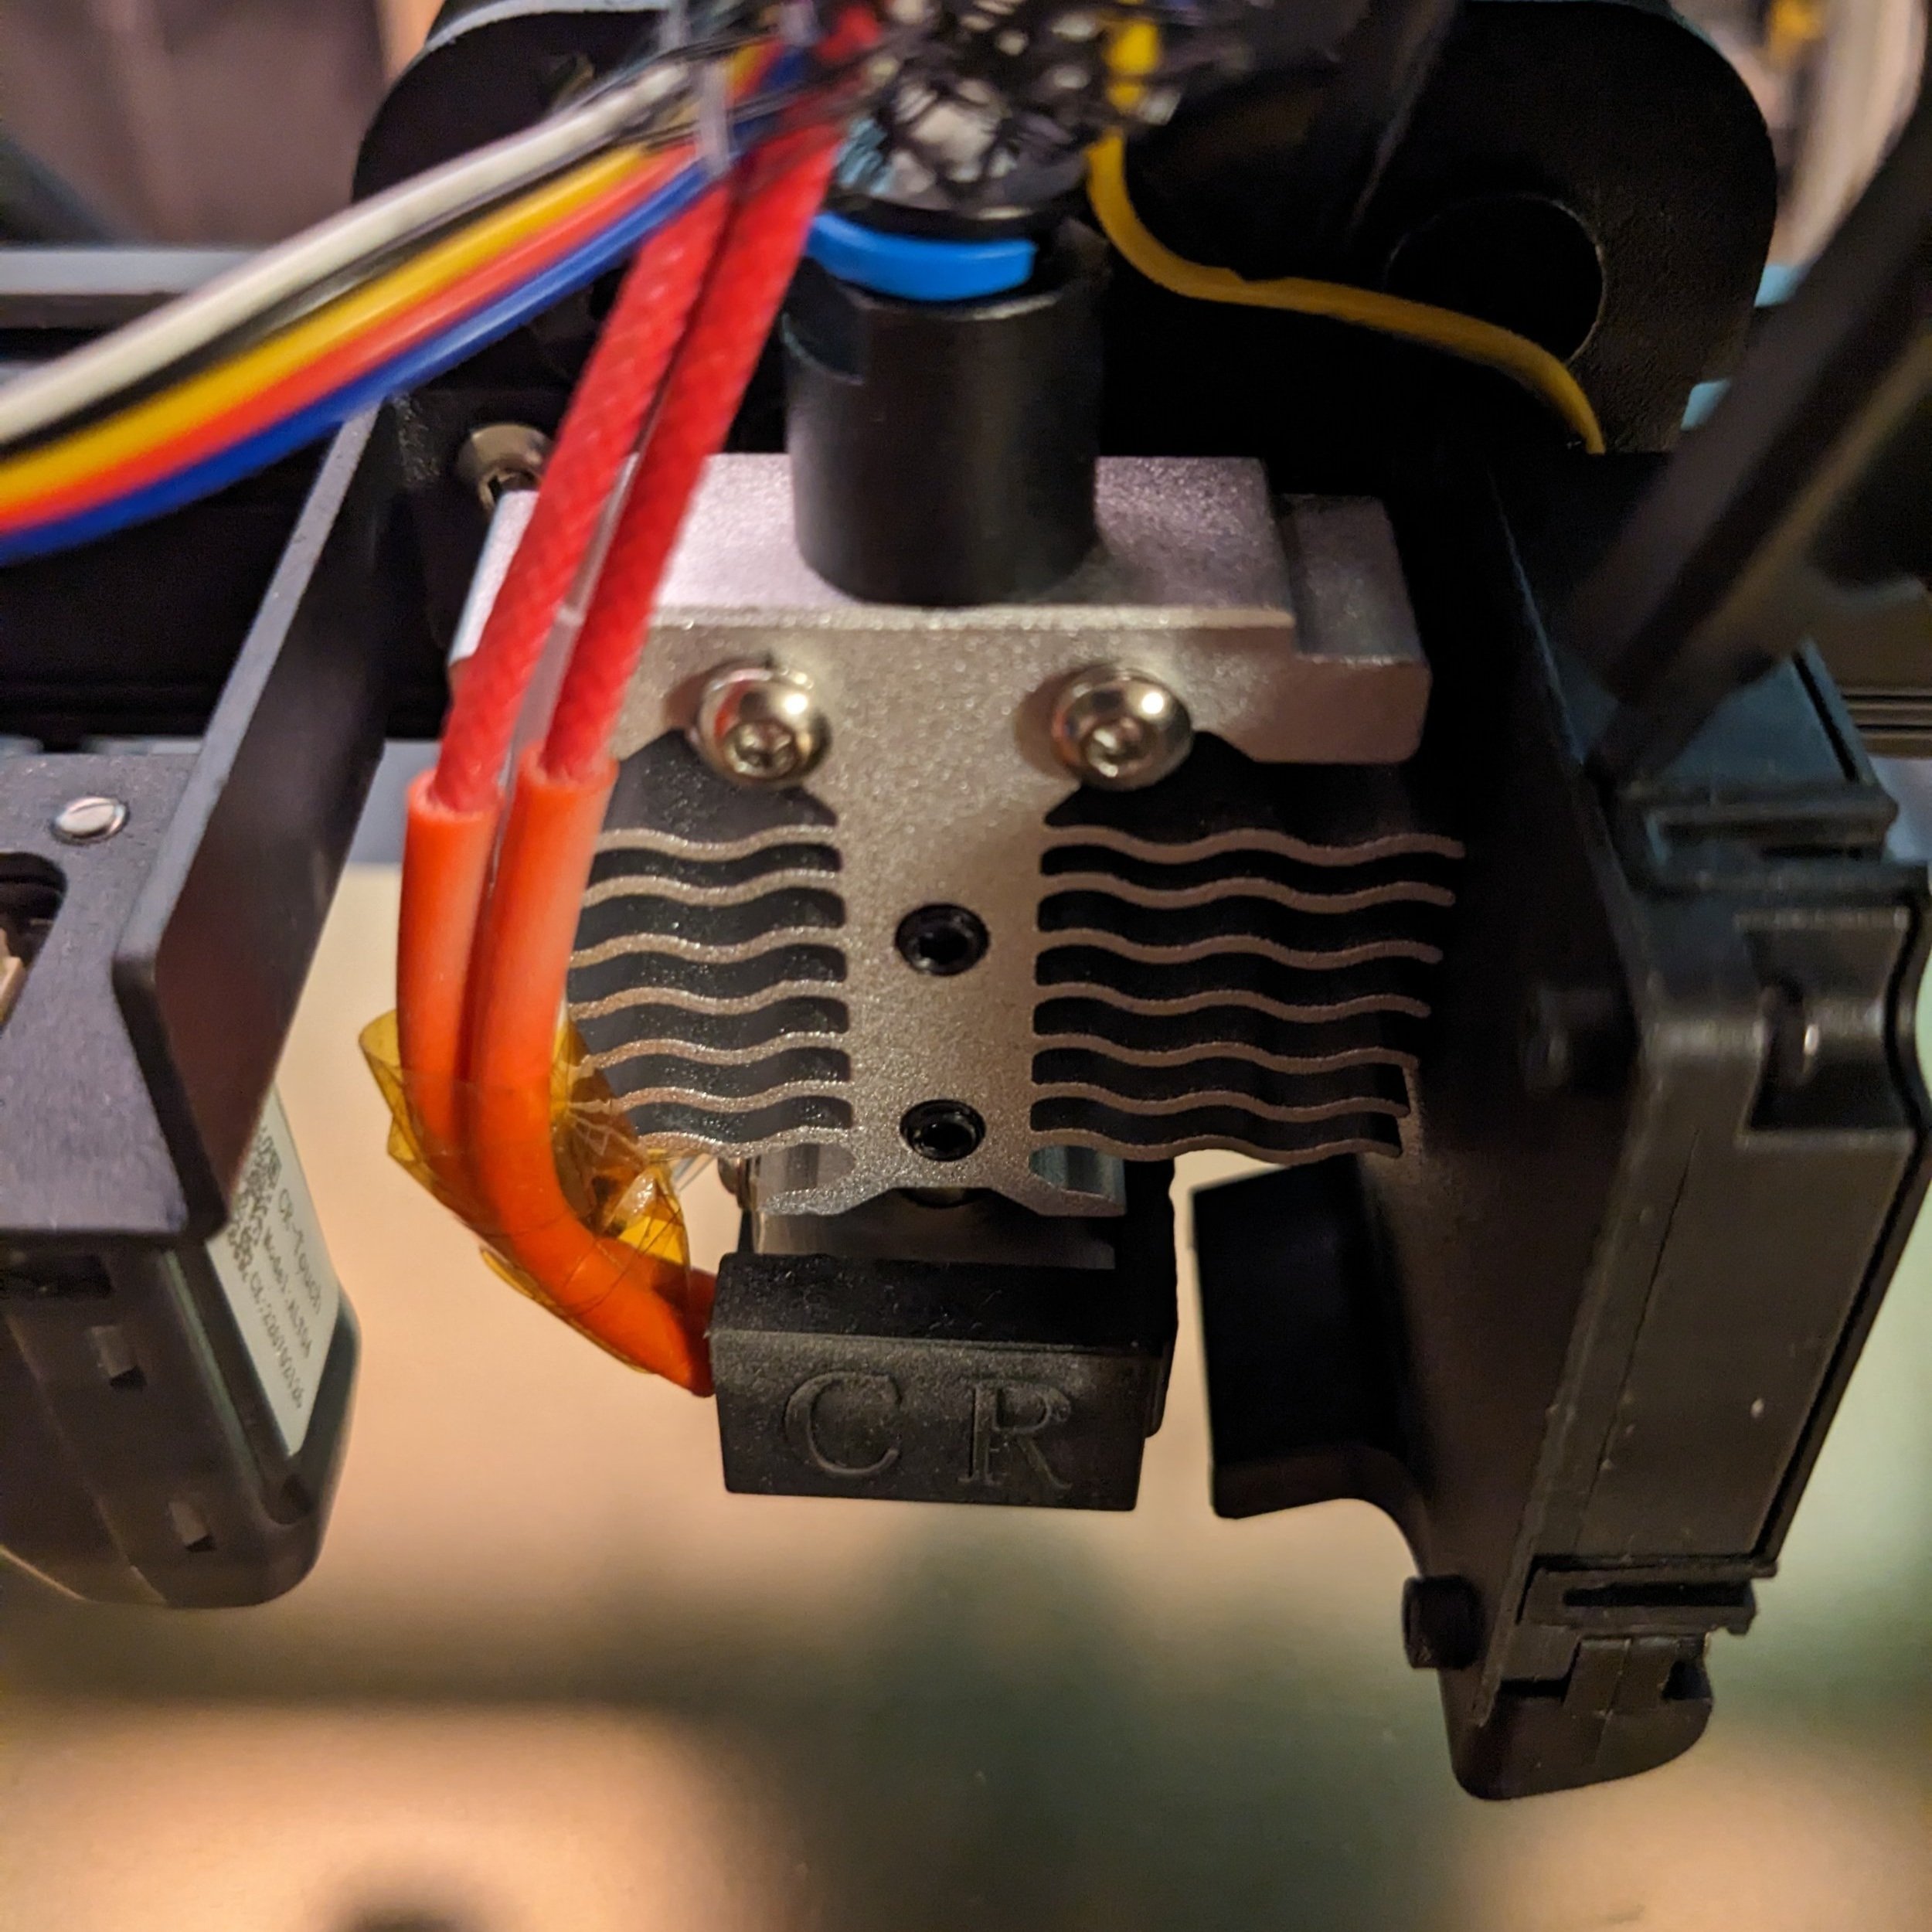
The redesigned heat sink and new metal PTFE tube coupling are key improvements to the Ender 3 V2 Neo’s hot end.
Preparing to Print with the Ender 3 V2 Neo
The menu has a helpful “Preheat PLA” setting, which heats the bed and nozzle to the correct temperature for PLA. If you need to load or switch filament, this is a quick and easy way to heat up the hot end so you can fully insert the filament.
At first, loading the filament was harder than the video showed. The filament jammed before it even got past the extruder. The sample PLA was sharply curled which prevented the filament end from lining up with the extruder exit hole. The solution was to manually bend the last few centimeters of the filament end straight. If the filament is sharply curved or has a melted end that won’t fit into the extruder, you can also break off the last few inches to leave you with a straight piece for inserting into the printer.
The bed and nozzle heat up quite quickly and the filament extrudes through the nozzle easily once it is pushed fully into position. You can use the menus to move the extruder forward, which will cause it to feed filament through the printer and out the nozzle. When we first set up a new printer, we like to extrude 30-50mm of plastic to make sure everything is working properly.
The new model preview feature on the Ender 3 V2 Neo works well for selecting a model from the micro SD card. Unlike previous models where you had to guess based on the file name, this feature shows you an image of what the model looks like—a lifesaver if you don’t name your files descriptively. For getting started, the micro SD card includes two pre-sliced models—a “Boat” (the typical Benchy test print, which we chose to start with) and a rabbit.
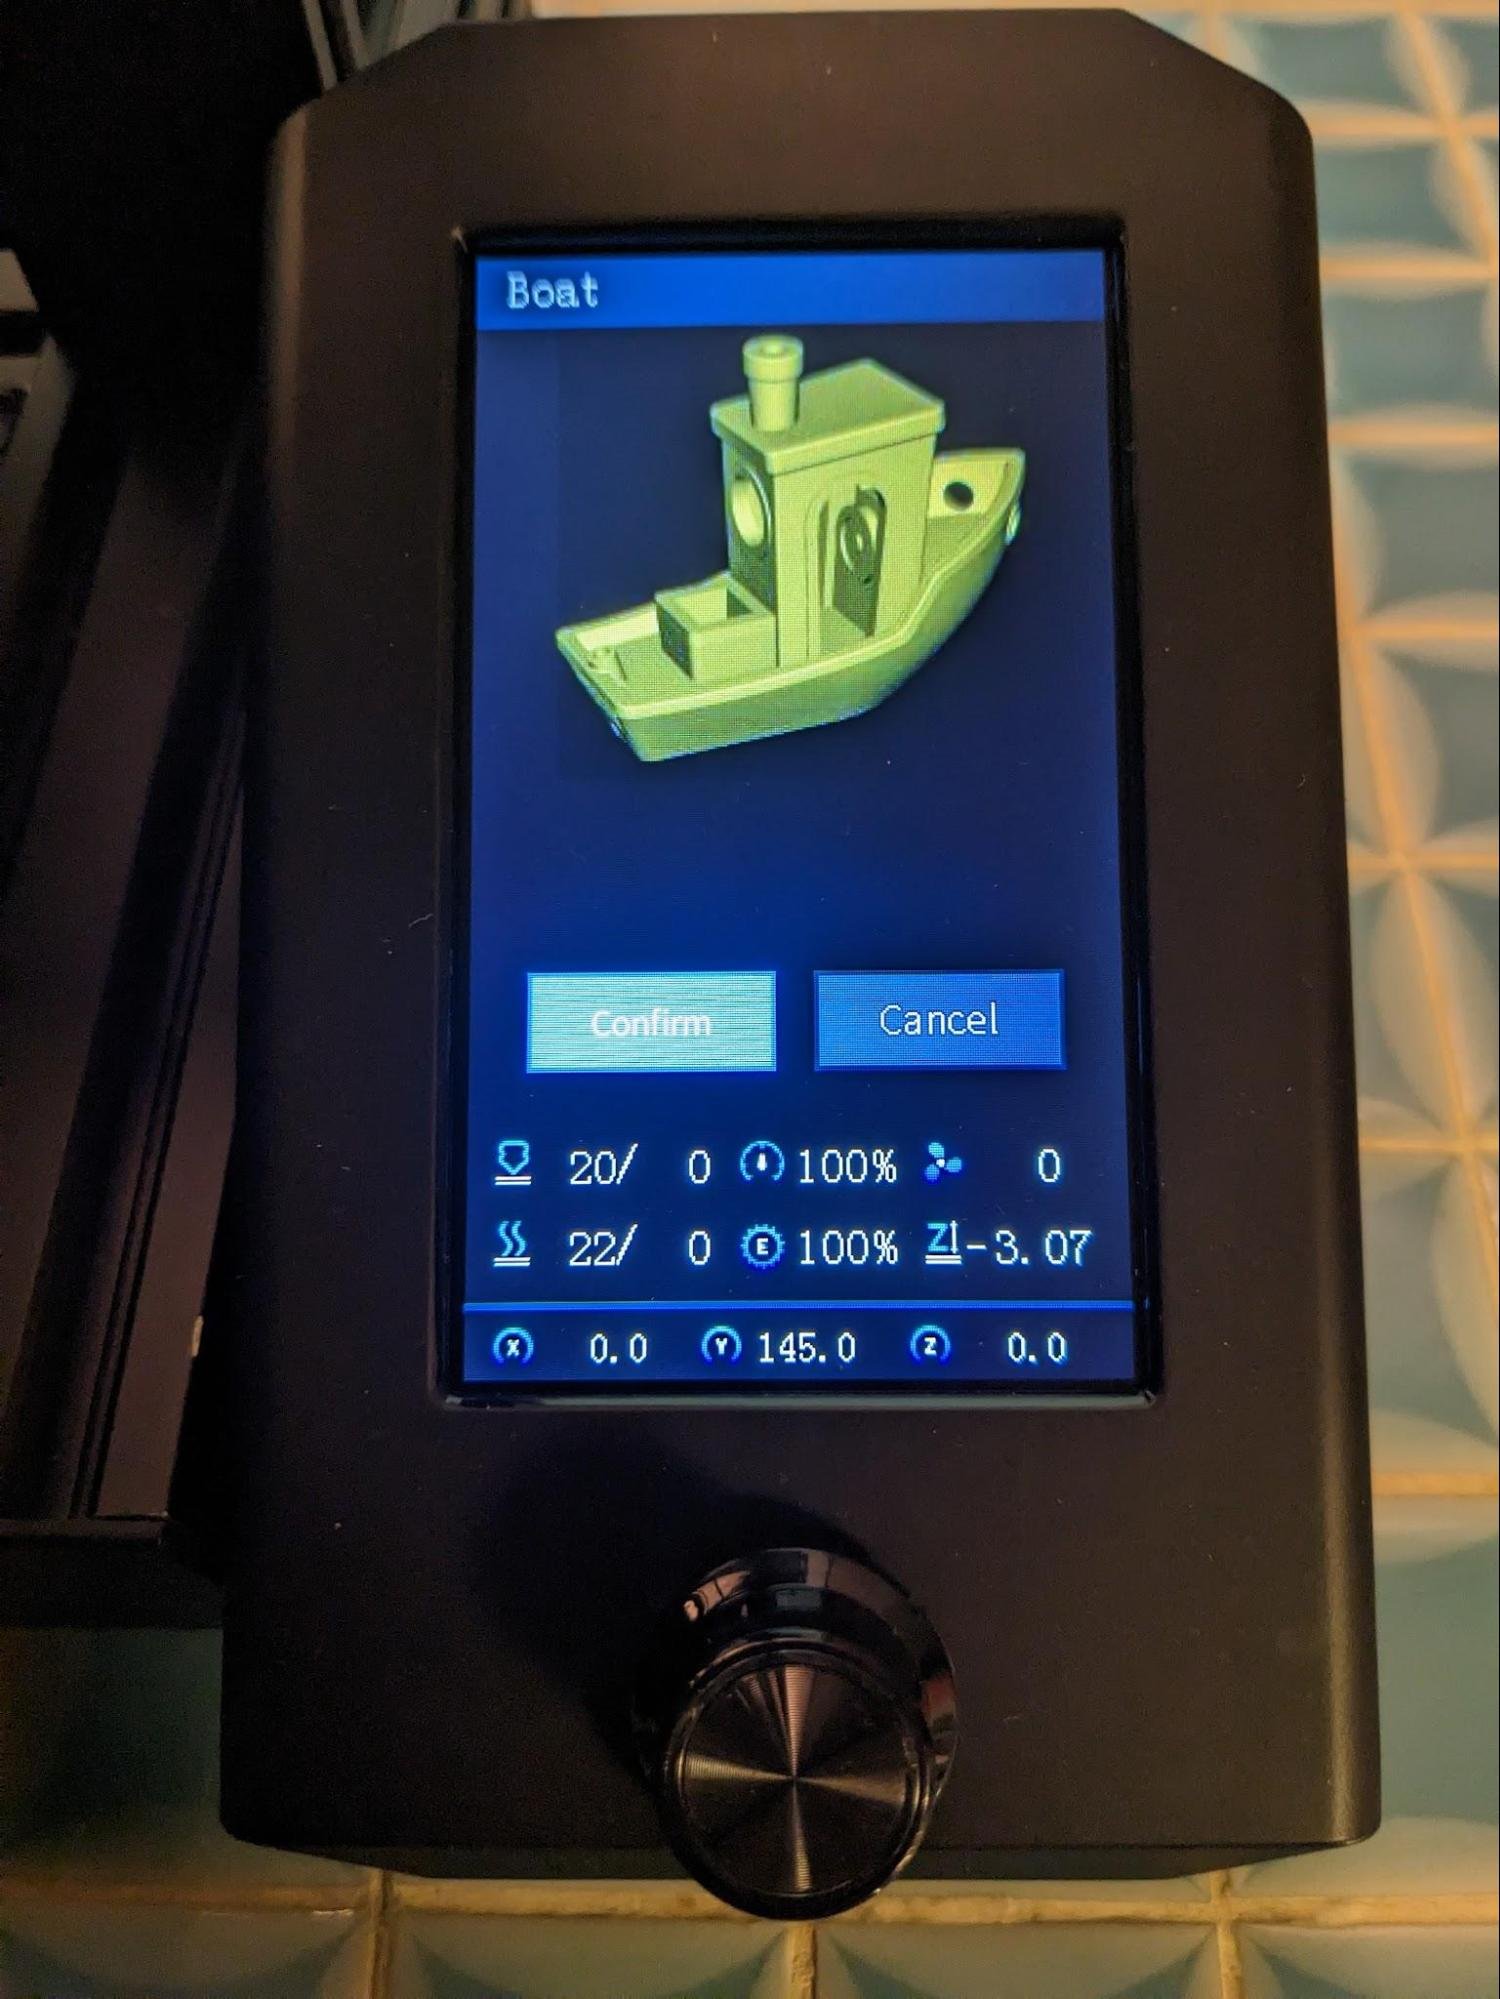
The model preview feature is new to the Ender 3 V2 Neo.
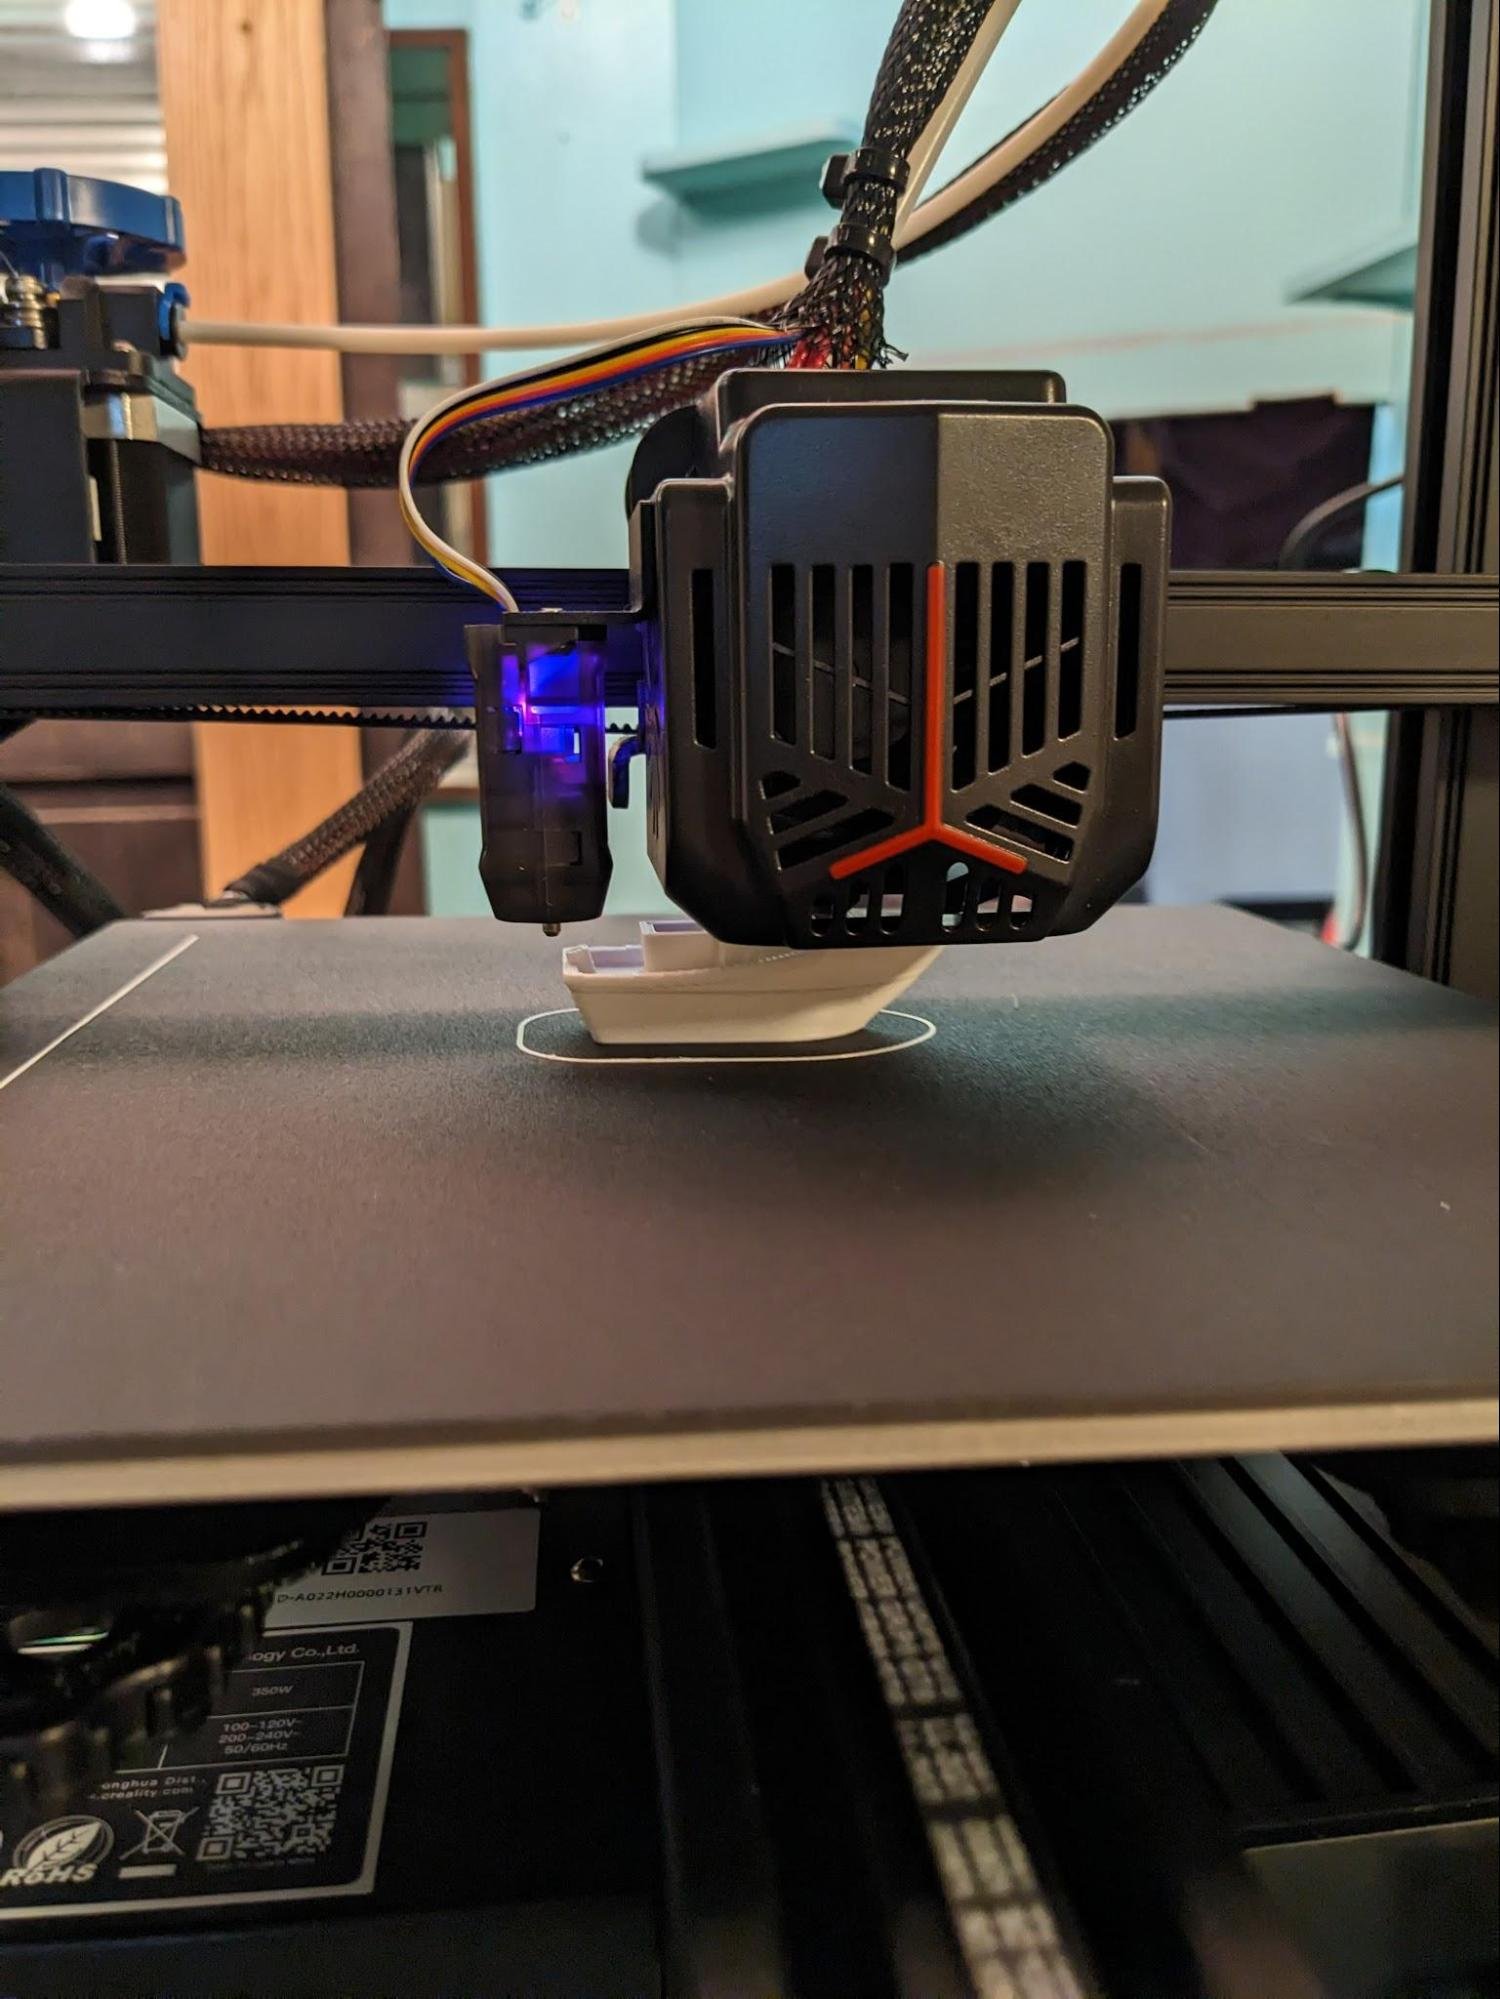
Benchy at 56% complete.
Preparing Your Own 3D Models To Print
When slicing using other 3D models, it would seem natural to use Creality Print slicing software. After all, it’s made for the printer, right? Actually, we found it’s just a stripped-down version of the most popular slicing software, Ultimaker Cura. It didn’t take long to realize that Cura was just as easy as Creality Print, but far more configurable. And Creality Print does not yet have an Ender 3 V2 Neo profile, while Cura allows complete modification of its Ender 3 V2 profile to suit the needs of the V2 Neo. Our recommendation is to use Cura to slice your own models.
Note: If you use Cura, you will need to install a custom Cura plug-in if you want the model preview feature to work, which involves adding a new file to the scripts folder, and enabling it in Cura. You can find detailed instructions on the process here.
Starting the Print
The printer takes approximately ten seconds to react after selecting the model and activating the “Confirm” on-screen button. Before starting the print, the machine prints a priming line on the left and a skirt line before starting on the model itself.
We did notice that the stepper motors are silent or nearly so as claimed, but the fans are definitely not - you can hear the fans at 40-45 dB. This may be bothersome in a quiet environment and a shock to someone used to quiet computer fans, but it is a constant sound that is easier to get used to than the stepper sounds of older printers.
While printing, the display shows progress as a percentage with a progress bar and number, printing time, and time remaining. Like earlier Ender 3 models, it has Tune, Pause, and Stop buttons, as well as nozzle temperature, speed multiplier, and cooling fan speed (255 is 100%). Underneath this is bed temperature, extrusion multiplier, and the Z offset.
We noticed that the printing time and remaining time oddly sometimes do not show all digits so the numbers can be hard to decipher at a glance.
Printing Results
When our test print finished, we noticed a little stringing and a few minor defects, but overall the printer produced a high quality print—especially considering this was using out of the box print configuration and the printer settings have not been tuned.
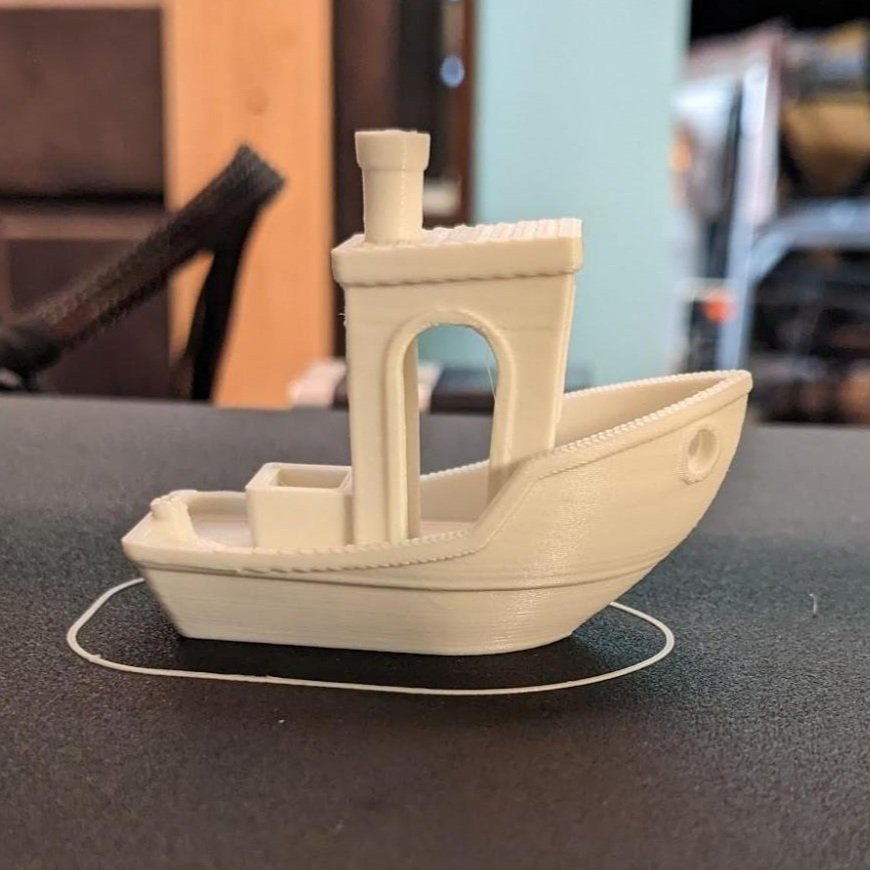
A completed Benchy test print from the included SD card.
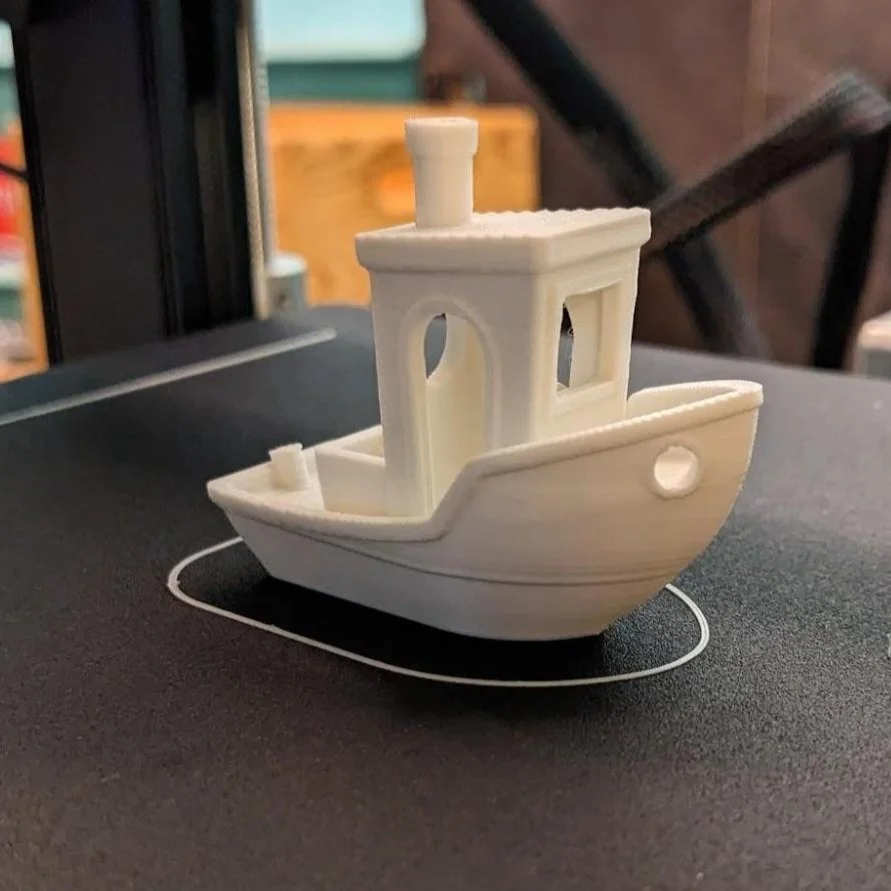
A little stringing and some distortions here and there, but not too bad.
Next we printed some upgrade parts for the printer (this bed leveling lock/discretizer). We used the Cura slicer for these with the highest quality settings to show what the printer can do - super quality 0.12mm layers and 50% gyroid infill. We started with the built-in Ender 3 V2 profile, since the V2 Neo has the exact same dimensions and overall configuration. If you want auto bed leveling triggered at the start of every print, add “G29” to the custom start code.
This printed fantastically with just a little stringing - the Benchy model that Creality pre-sliced and included on the micro SD card does not really show the true quality the printer can achieve if you slice your own models.
We were happy with the initial adhesion of the prints, but had some difficulty with removing completed parts. The bed material is PC (polycarbonate coated) magnetic spring steel and Creality claims prints should just pop off by taking the bed cover off and flexing it. We found that the Benchy print required quite a bit of flexing from all 4 sides and needed to be pulled off with a fair amount of force. The priming line peeled off easily but the skirt line needed to be pried off with the scraper. No amount of flexing would separate it from the bed.
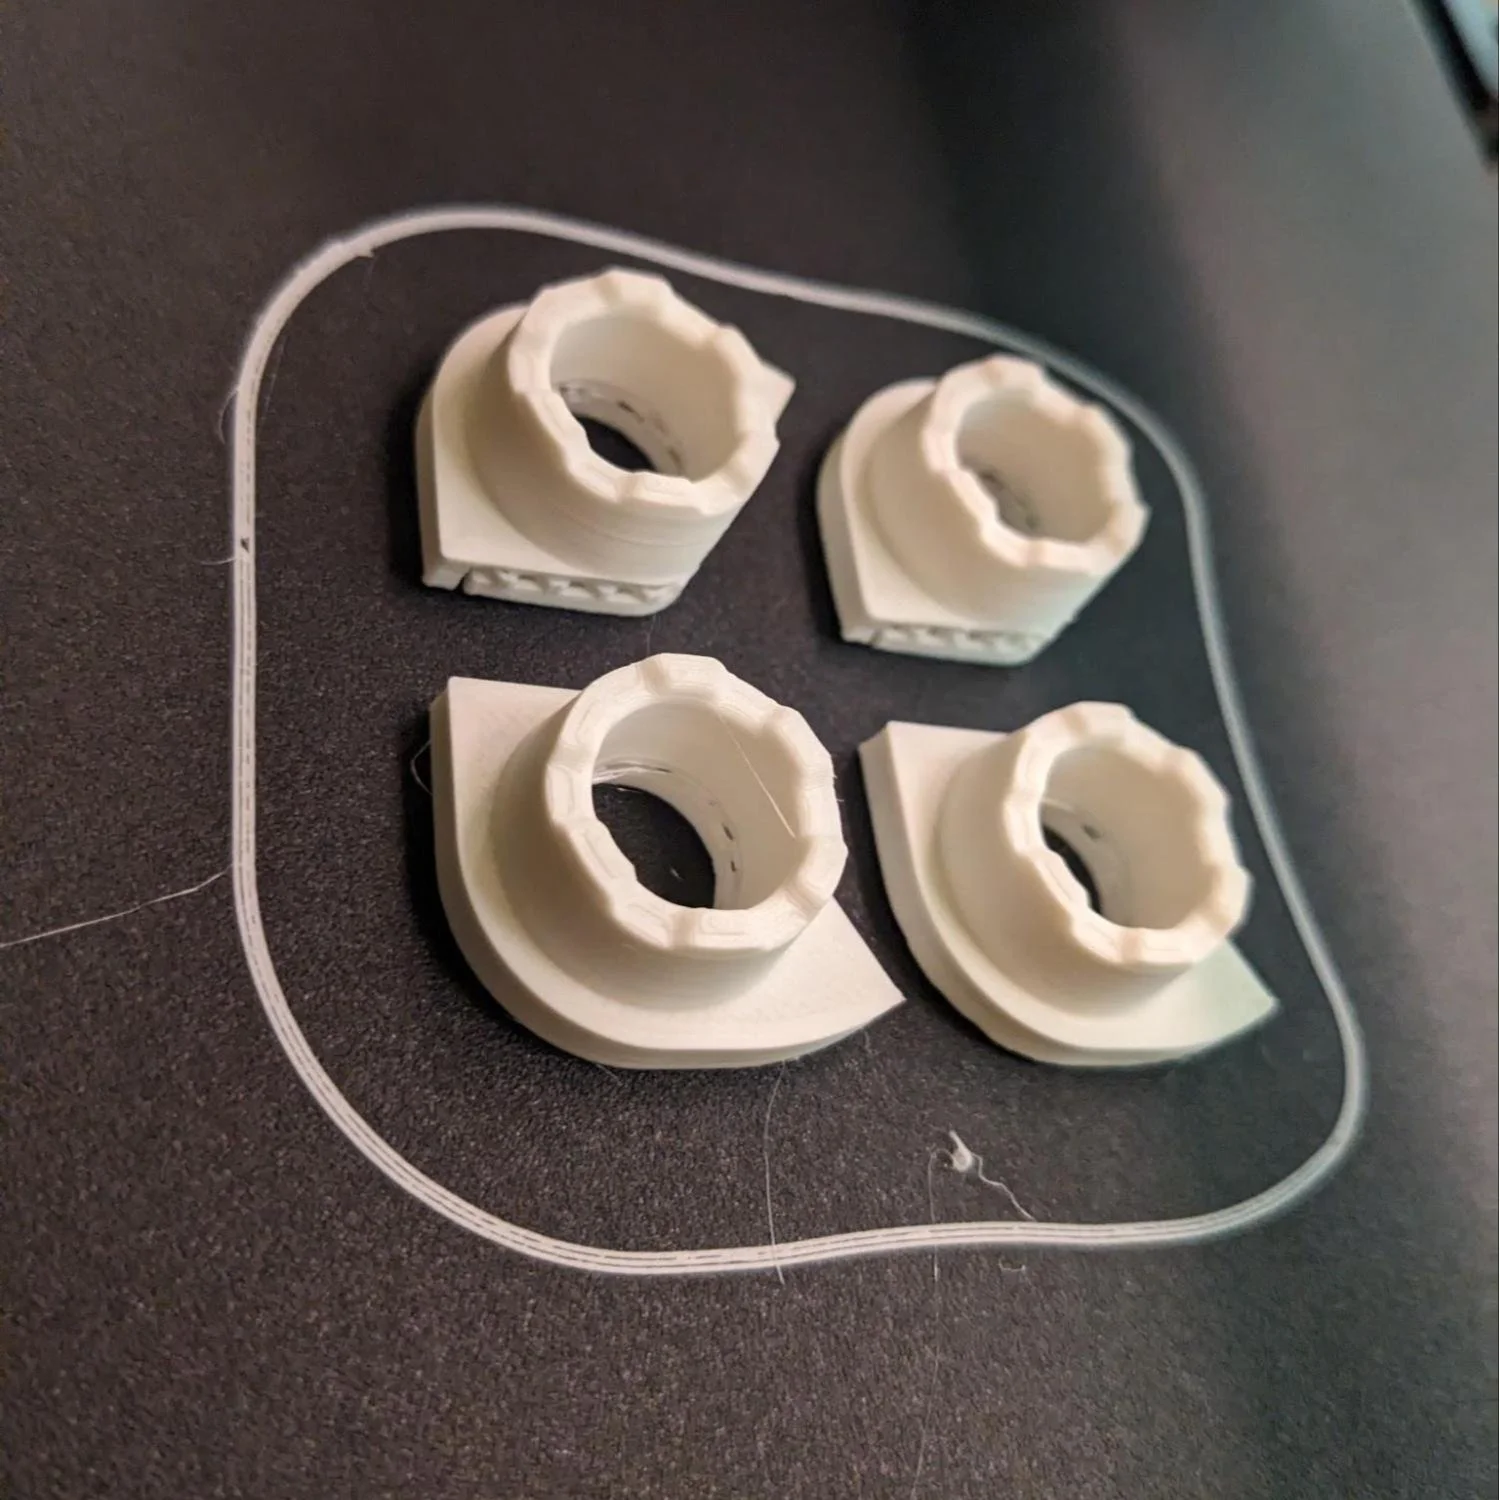
The parts printed flawlessly and look very smooth—much better than the Benchy (note that some support material is under the part).

Another test print with less bed contact surface area printed quite well, thanks to the high adhesion of the bed.
Upgrades to Consider
The Creality Ender 3 V2 Neo can be considered an Ender 3 with most upgrades preinstalled. It’s not necessary to upgrade the mainboard or extruder. The display is not a touchscreen, but it’s a dramatic improvement over the original Ender 3 display. The confirmation beeper is quiet enough to not need a cover. Belt tensioning knobs are installed and the bed leveling springs are flat formed steel. Automatic bed leveling with the CR Touch sensor comes standard.
The one upgrade we would recommend is changing to a PEI bed. While the part adhesion is really good with the default bed, it’s difficult to remove parts, and it can cause you to damage the bed while trying to pry larger parts off with tools or sharp edges. We recommend a PEI bed upgrade, since it is also magnetic and can be easily swapped in. The PEI-coated steel is a good compromise between adhesion and easy removal. The smooth side is ideal for PLA, and the textured side provides PETG with more “teeth” for adhesion. Don’t discard the stock PC bed though - the improved adhesion is great for parts with a small bed footprint, and you can swap the beds out easily depending on the job. Because of the automatic bed leveling, you shouldn’t even need to re-level the bed after swapping it.
How Does The Ender 3 V2 Neo Compare To Other 3D Printers?
We’ve written several articles comparing the Ender 3 V2 Neo to other 3D printers from Creality and other brands. You can find them here:
The Verdict
Overall, we found the various upgrades the Creality Ender 3 V2 Neo offers over the Ender 3 V2 to be quite worthwhile. The price of the Neo model is actually less than what you’d pay if you purchased an Ender 3 V2 and upgraded the parts separately, making this printer an excellent deal. In particular, the CR Touch automatic bed leveling really helps to get a good print, especially for newer users.
Creality addressed many of the shortcomings with the Ender 3 series with the release of the Ender 3 V2, and further addressed the few remaining issues with the release of the Ender 3 V2 Neo. This is the most upgraded and the most advanced Ender 3 3D printer you can buy. This printer is very newbie-friendly and does not require much work or knowledge to get good prints right out of the box.
For these reasons, we definitely recommend the Creality Ender 3 V2 Neo, especially for beginners to 3D printing or those looking for modern features on a budget. The price is reasonable for what you get—it assembles very quickly, and prints accurately with little effort. No upgrades or modifications need to be installed first, it’s all been done for you.
If ease of use and reliability are more important to you and you are willing to pay a higher premium, we suggest looking at the Creality Ender 3 S1 (see on Amazon), which uses a direct-drive extruder that we have found to be extremely reliable, and still includes some of the key convenience features found on this printer, such as the CR-touch automatic bed leveling. Take a look at our Ender 3 V2 Neo vs Ender 3 S1 comparison article for more information.